56 minutes
Web Application and Dashboard Overview – Owners
This video is divided into chapters, to skip directly to the Dashboard section, please click here
Hubstaff’s web dashboard provides a central location to access and modify data and settings about your teams’ tracking and performance. This article is an overview of all web app and dashboard features.
Dashboard
This page can be accessed by clicking the Dashboard menu on the sidebar.
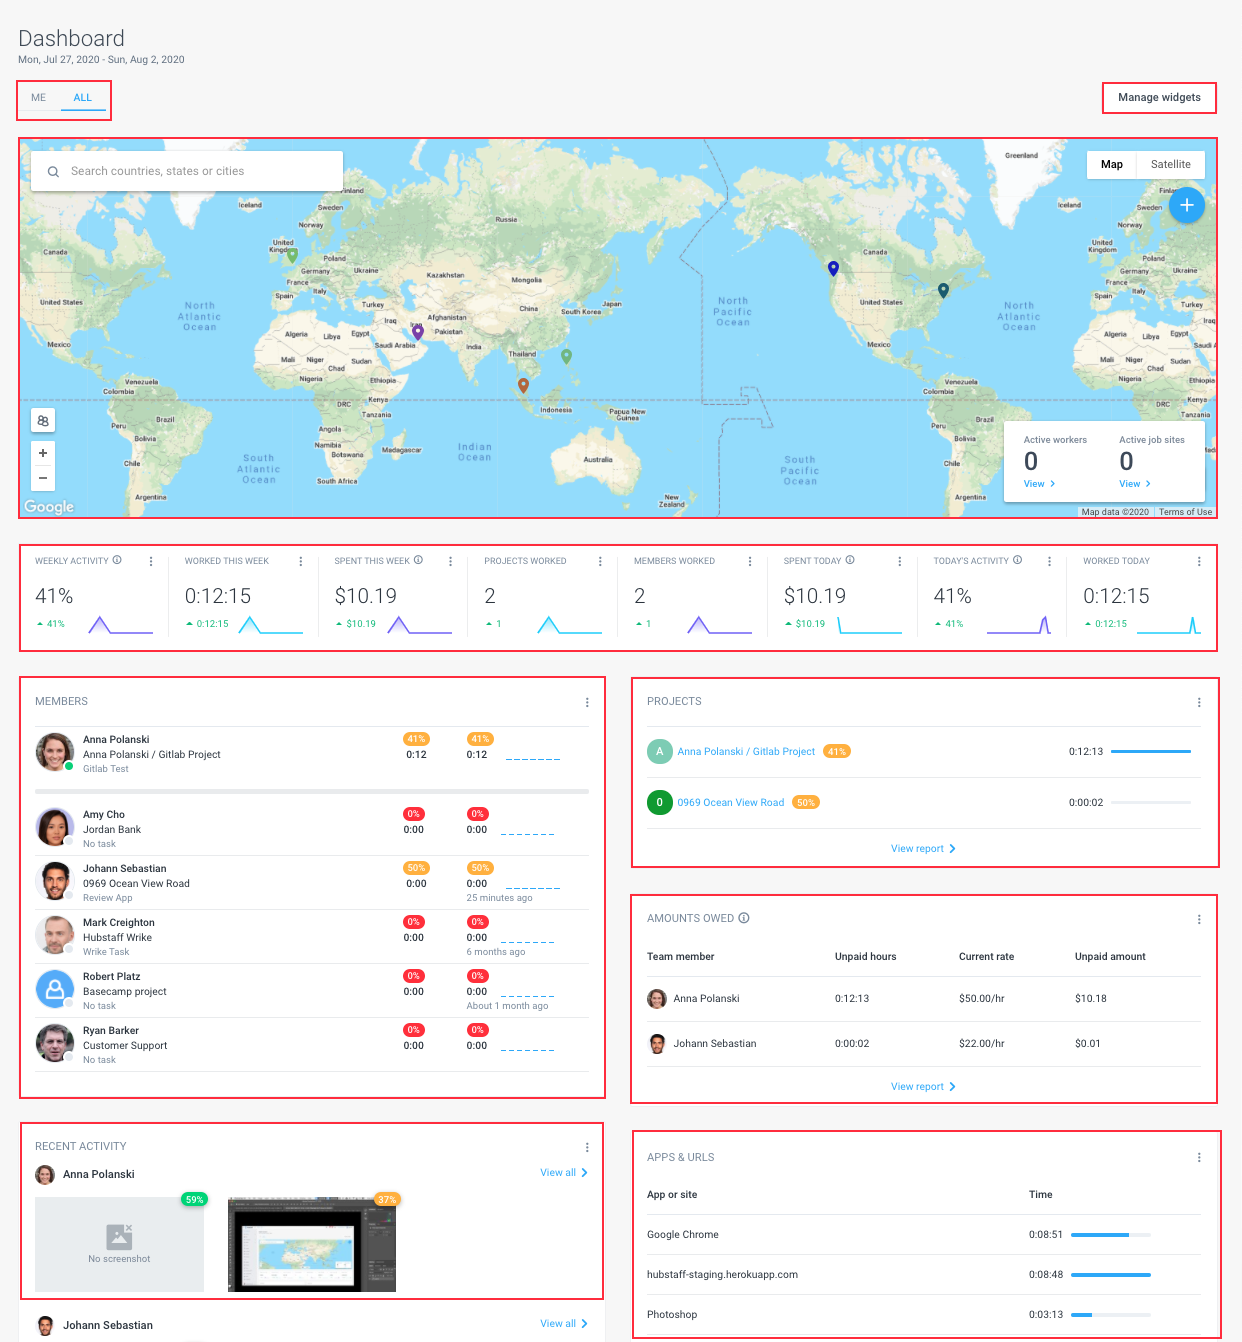
The Dashboard is your Hubstaff web application’s homepage. It provides an overview of your team’s activity along with other statistics across your organization; such as the total hours tracked and the total amount spent.
You can also add and customize widgets to show which users are currently online, how much time was spent on each project, and more. To learn more about the dashboard and what widgets you can add, click here.
Timesheets
Under the Timesheets section, you’ll find the time tracked by your users in a daily, weekly, or calendar format. Timesheet approvals can be managed from this screen as well.
View and edit
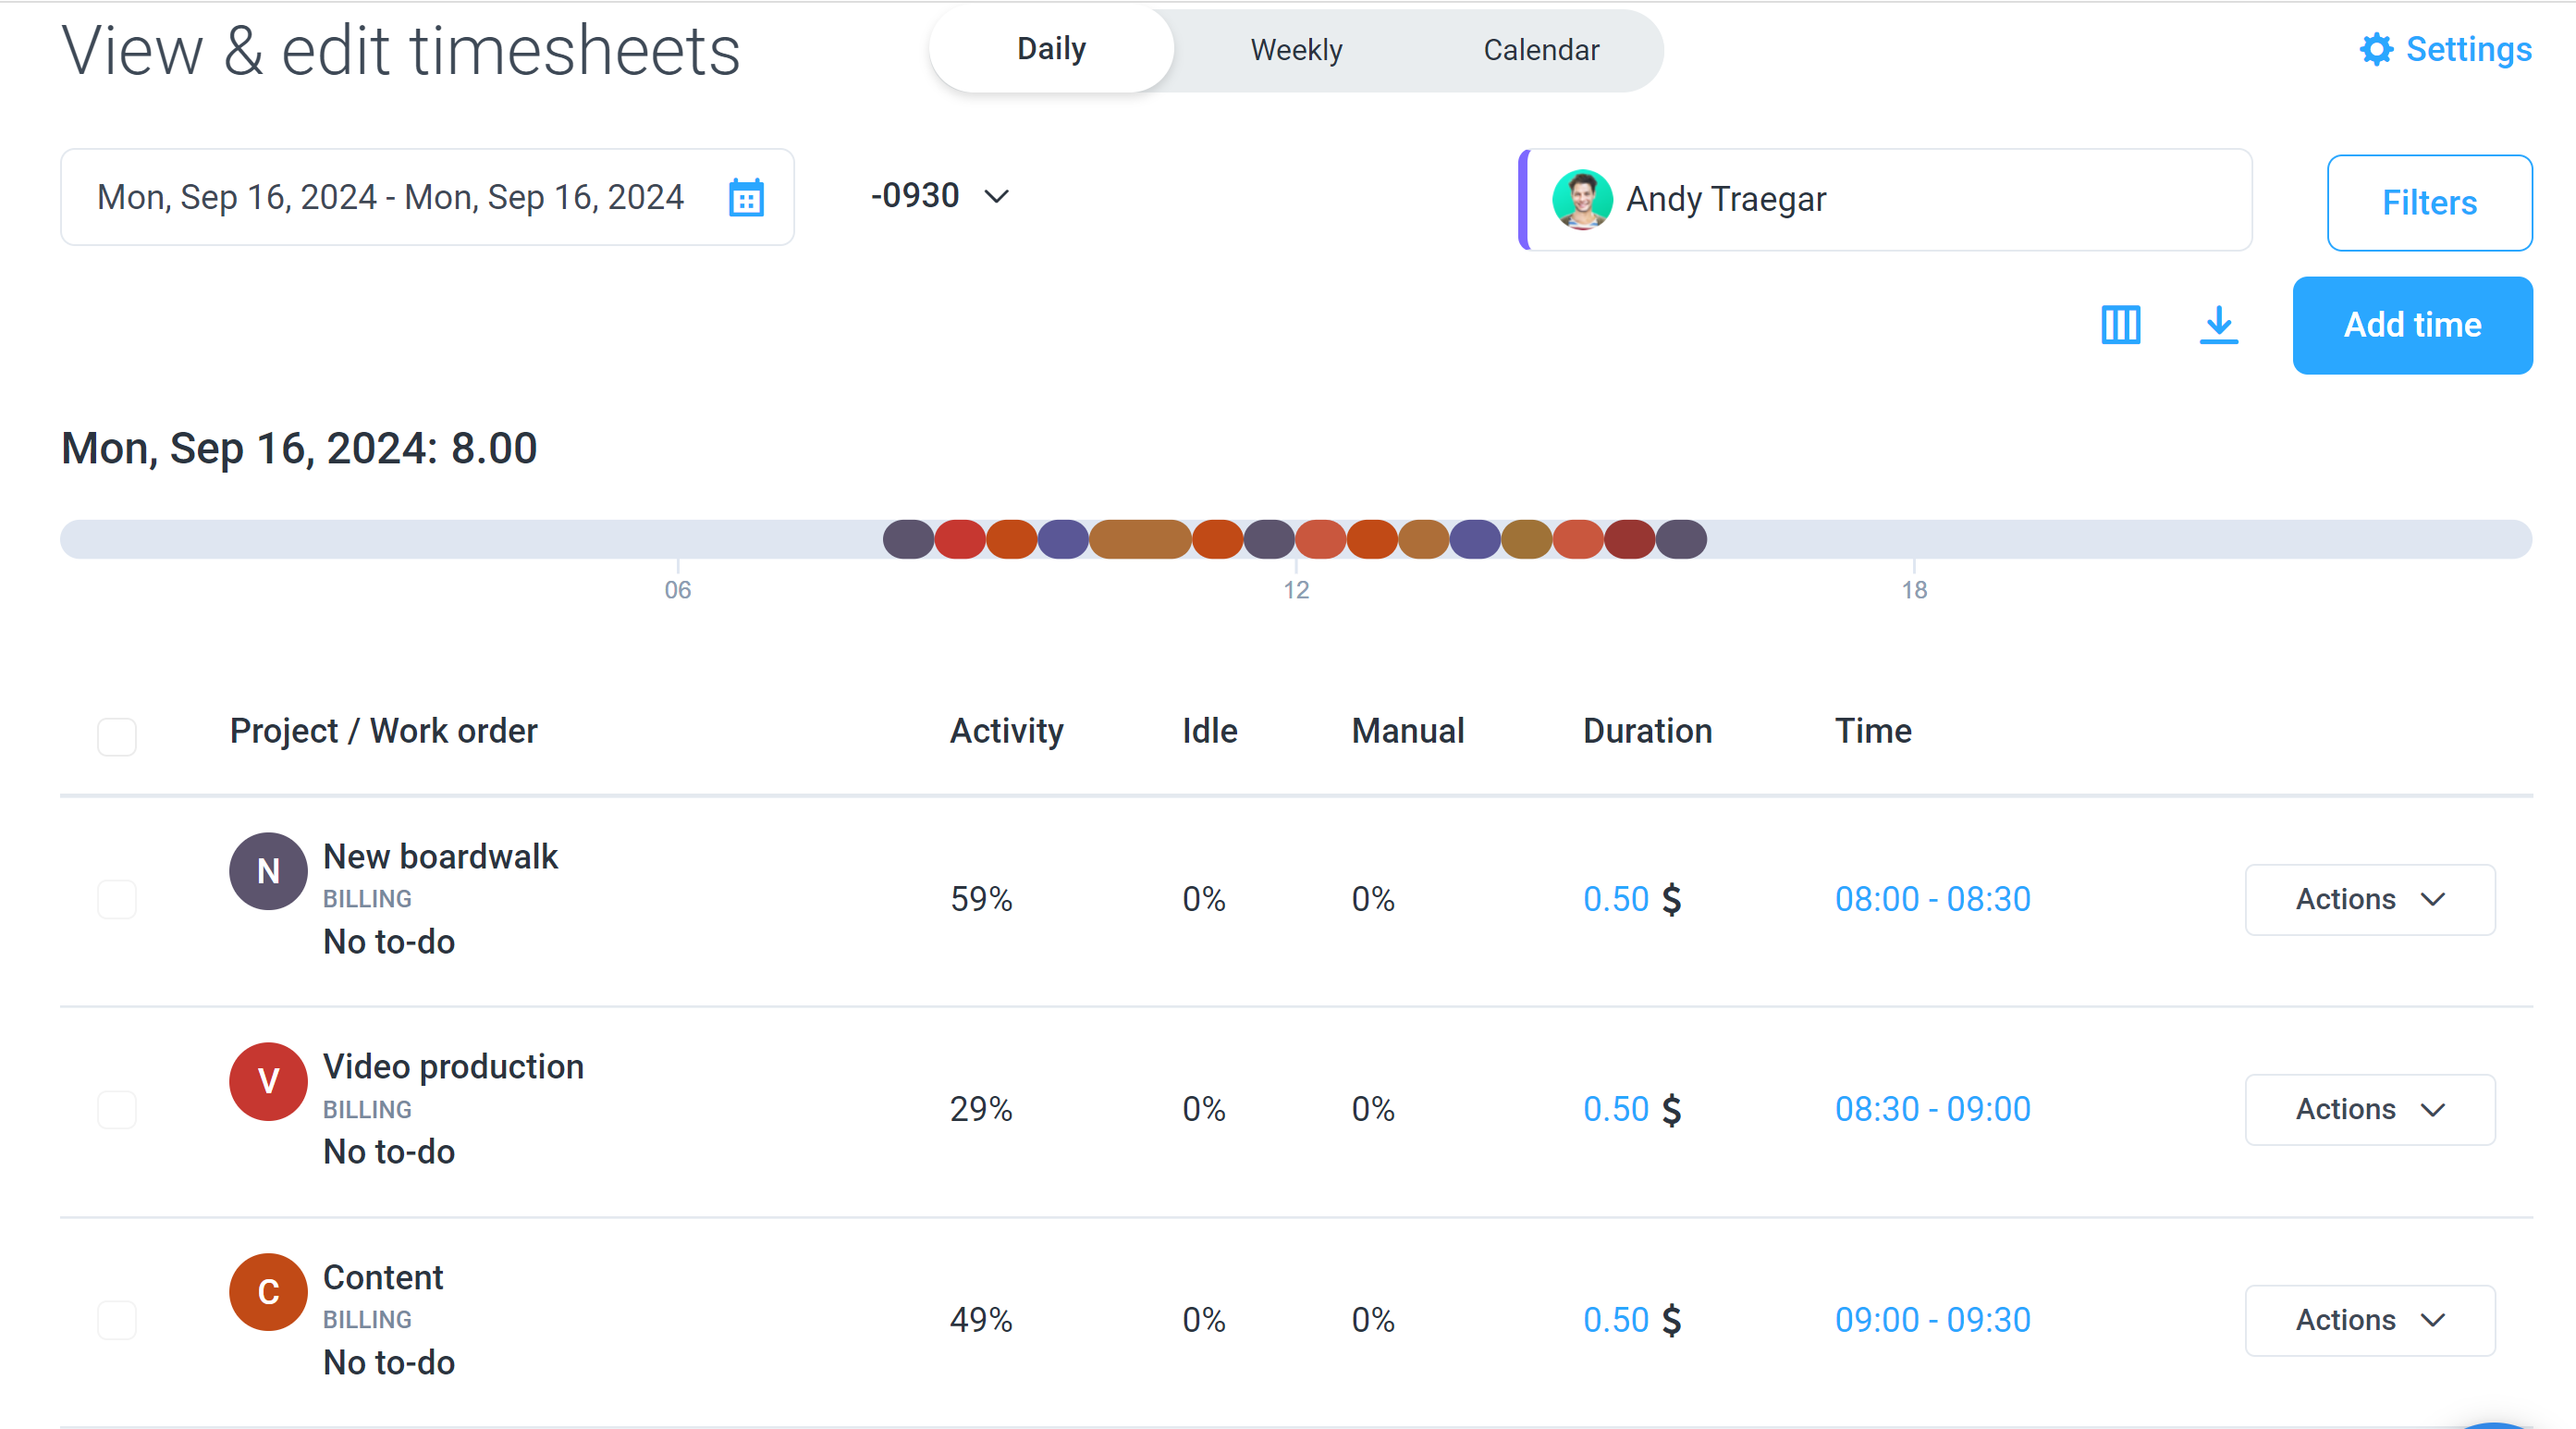
The Timesheets > View & edit page provides the daily time tracked by your users. It displays the exact time your users started and stopped their timer, the daily total number of hours tracked, which projects they were tracking time against, and how much idle and manual time was added (if any).
From this screen, you can manually add/edit the time in your users’ timesheets. For more information about manually editing timesheets please see our detailed guide here.
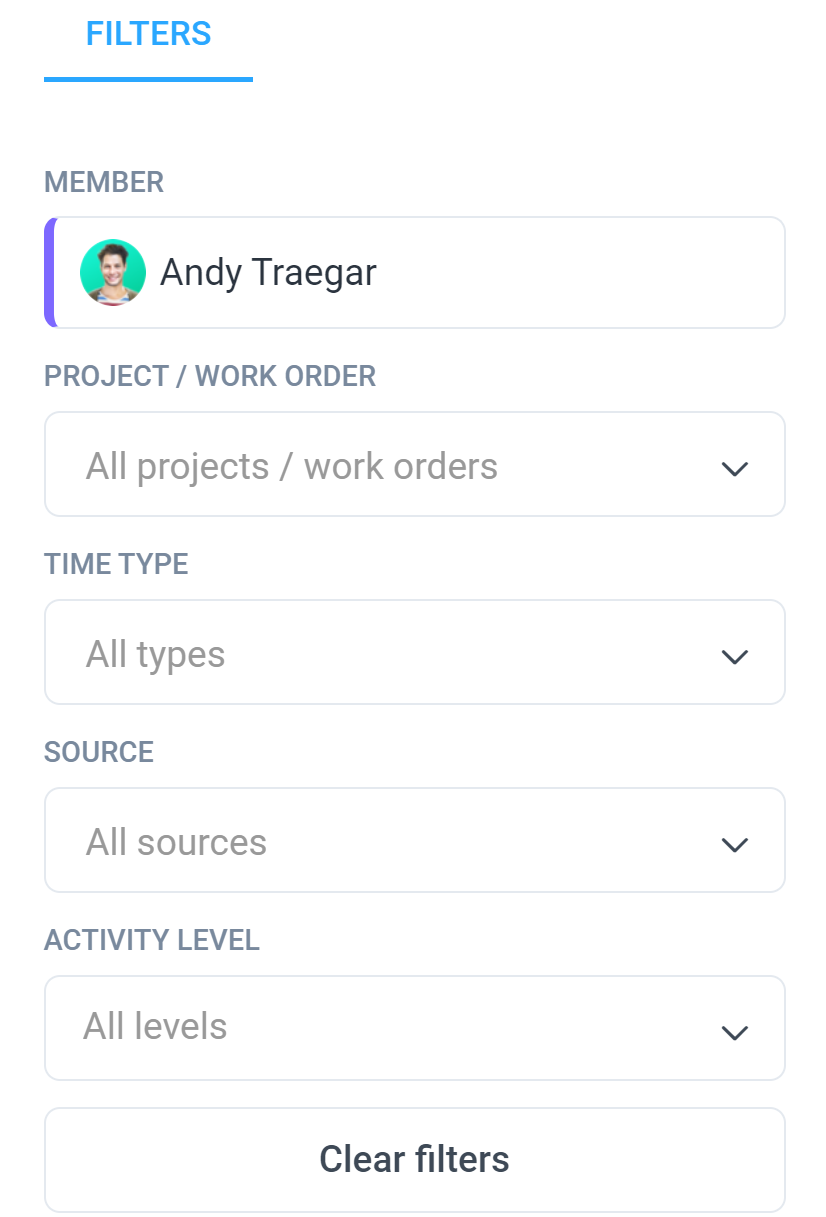
It is possible to filter the data by user, source (what app was used to track time), timezone, and date, by clicking the relevant menu at the top of the screen.
Weekly
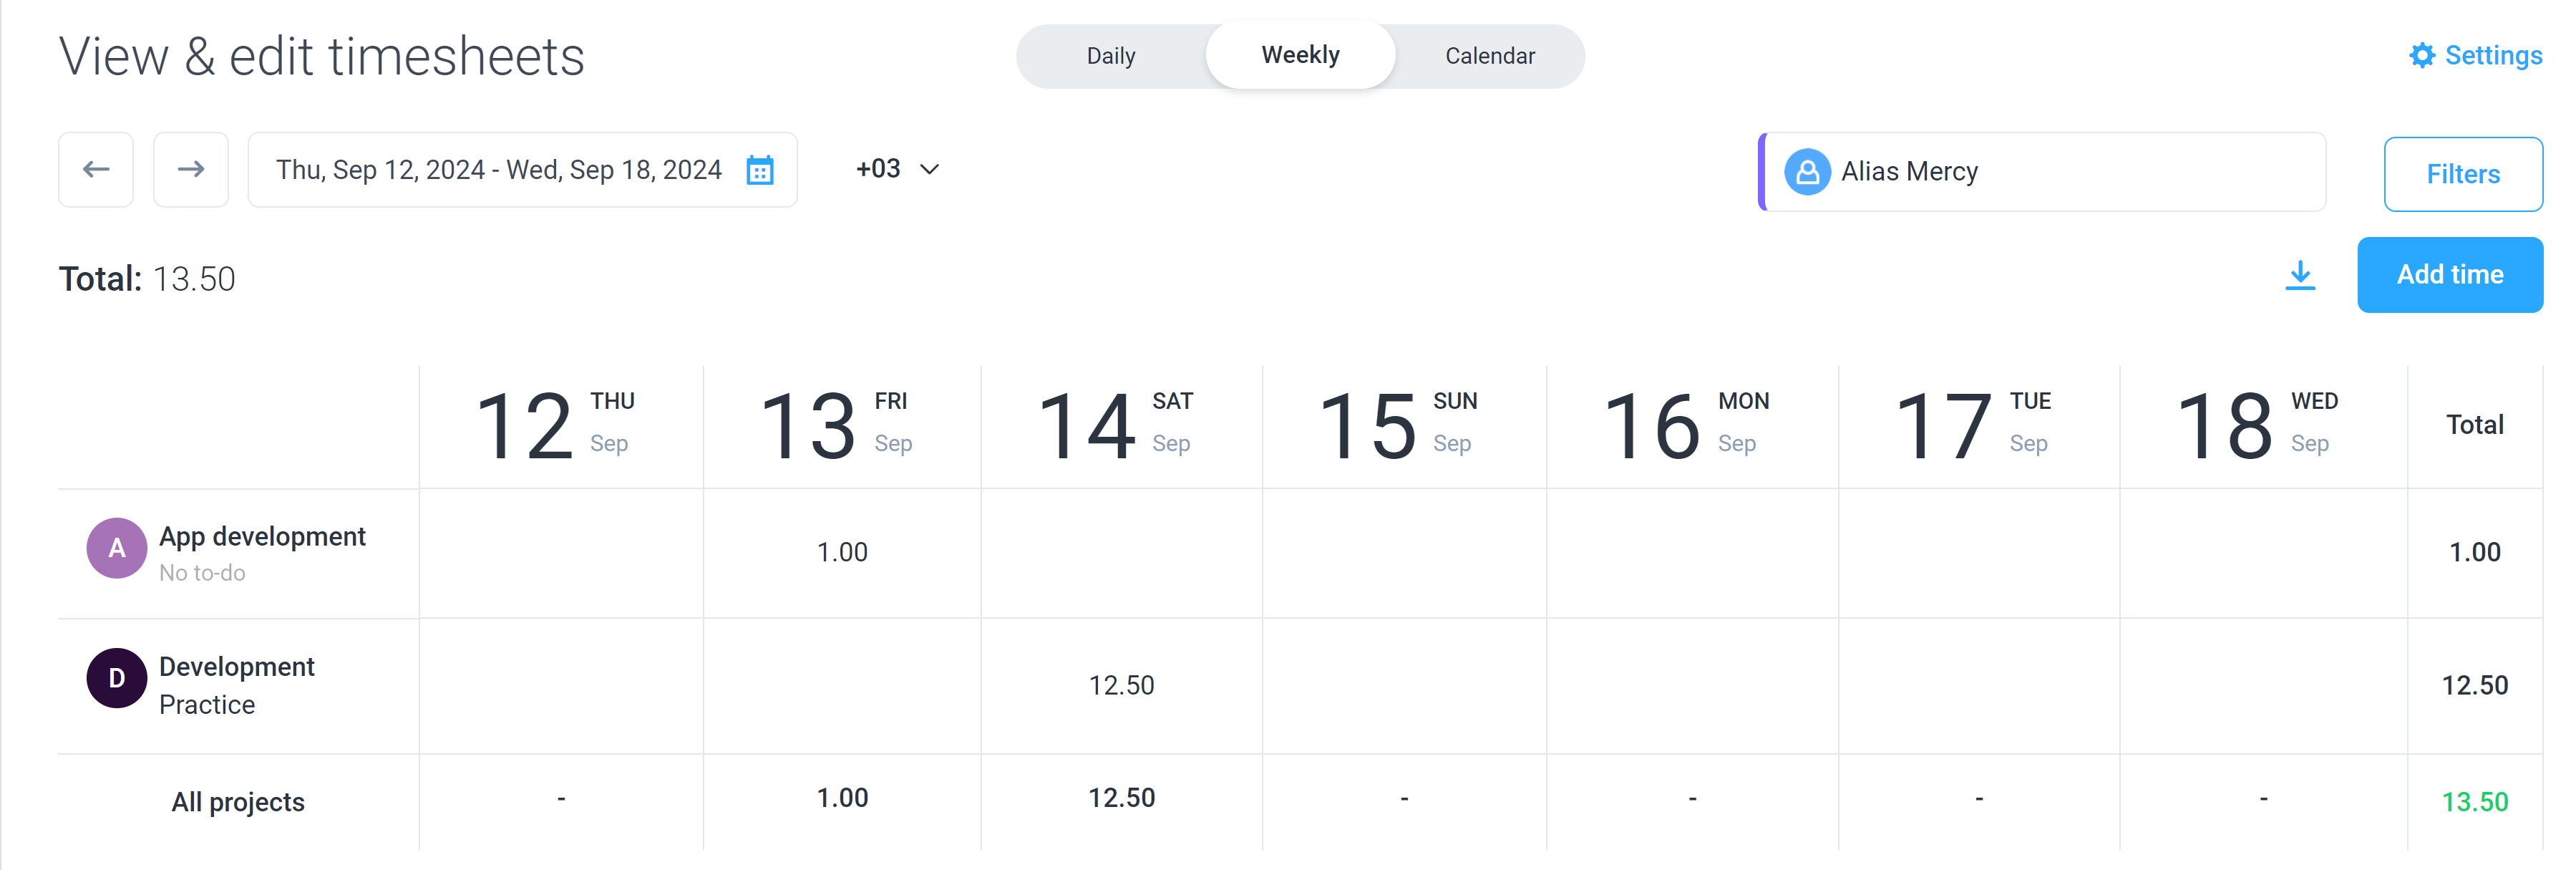
The Weekly Timesheet section provides the weekly time tracked by your team members. It displays the total number of hours tracked per day, as well as per weekly time span. It also shows a breakdown of how much time was spent per project and the total number of weekly hours worked.
From this screen, you can manually add/edit the time in your users’ timesheets. For more information about manually editing timesheets please see our detailed guide here.
It is possible to filter the data by user, source (how time was tracked), timezone, and date by clicking the relevant menu at the top of the screen.
Calendar
The Calendar section displays your individual user’s timesheets in a calendar view.
Please note this is separate from the Schedules section which is used to create shifts for your users.
When a time entry is clicked upon, a pop-up box will appear, enabling you to edit or remove their time. For more information about manually editing timesheets please see our detailed guide here.
It is possible to filter the data by user, source (how time was tracked), timezone, and date by clicking the relevant menu at the top of the screen.
Timesheet approvals
The Approvals section is designed to work in conjunction with our automatic payroll feature. When a pay period is configured and the timesheets approvals feature is enabled, timesheets need to be manually reviewed and approved by the organization owner/manager before payments can be processed.
The time span in which timesheets are generated for your staff is defined when you create pay periods for them. You can select weekly, bi-weekly, twice per month, and monthly. Below are the payment schedules for each pay period type:
- Weekly: Every Monday
- Bi-Weekly: Every other Monday (For Bi-weekly payments you will have the option to choose from 2 pay periods)
- Twice per month: 16th and 31st of the month
- Monthly: 31st of the month
The Approvals section shows a user’s name (1), their pay period (2), regular and overtime hours worked along with the total hours (3), their average activity level (4), and the timesheet status (5) for that pay period. Additionally, the submission date and the number of screenshots taken during the period are displayed on this page.
Timesheet statuses can be categorized in the following ways:
- Open timesheets are timesheets that are yet to be submitted by your users, generally because the pay period has not yet concluded.
- Submitted timesheets are timesheets that have been submitted and are pending. approval/denial
- Approved timesheets are timesheets that are approved and set to run to payroll.
- Denied timesheets are timesheets that were rejected and will not run to payroll.
Click the Actions button at the end of a row to either <strong>View </strong>a timesheet in more detail or to <strong>Approve/Deny </strong> it.
Activity
The Activity section displays the screenshot, application, and website data tracked by your users, broken down into a detailed daily format.
Screenshots
Navigate to the Activity > Screenshots section of the sidebar menu to see your team’s screenshot data.
Screenshots can be taken up to 3x per 10-minute interval depending on your organization’s settings. Moreover, using the More Screenshots Add-on, Hubstaff can capture up to 10x screenshots every 10 minutes. The images are uploaded from the app installed on the user’s machine to the screenshots section.
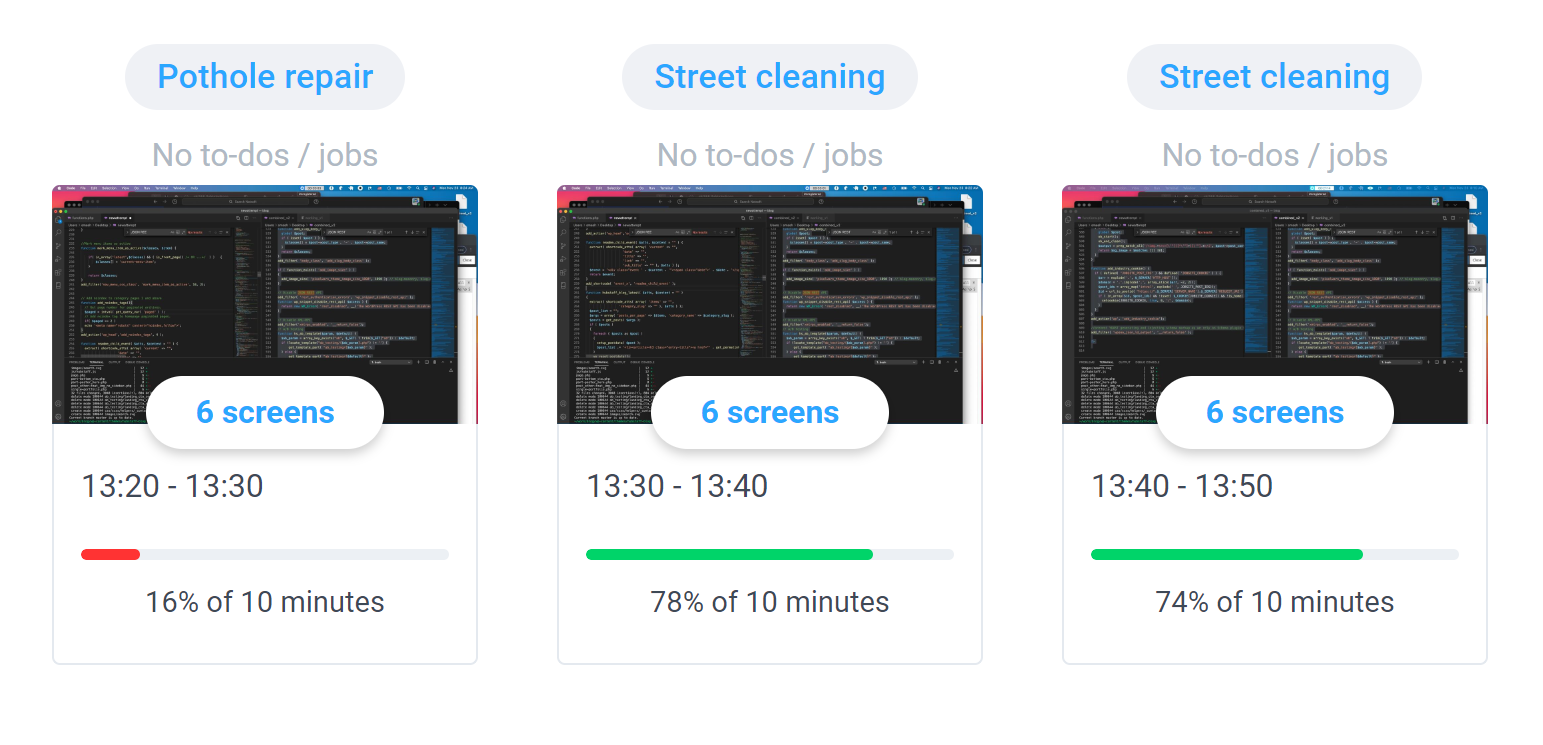
Each row represents one hour of time tracked by a user broken down into 10-minute intervals. Six thumbnails representing each 10-minute interval within the hour are displayed within each hourly row. The project the user was tracking against, at the time the screenshot was taken, is displayed directly above every image.
Directly under each image, you will find the timestamp of when each screenshot was taken as well as the activity level your user achieved. To learn more about how to interpret activity levels please see our detailed guide here.
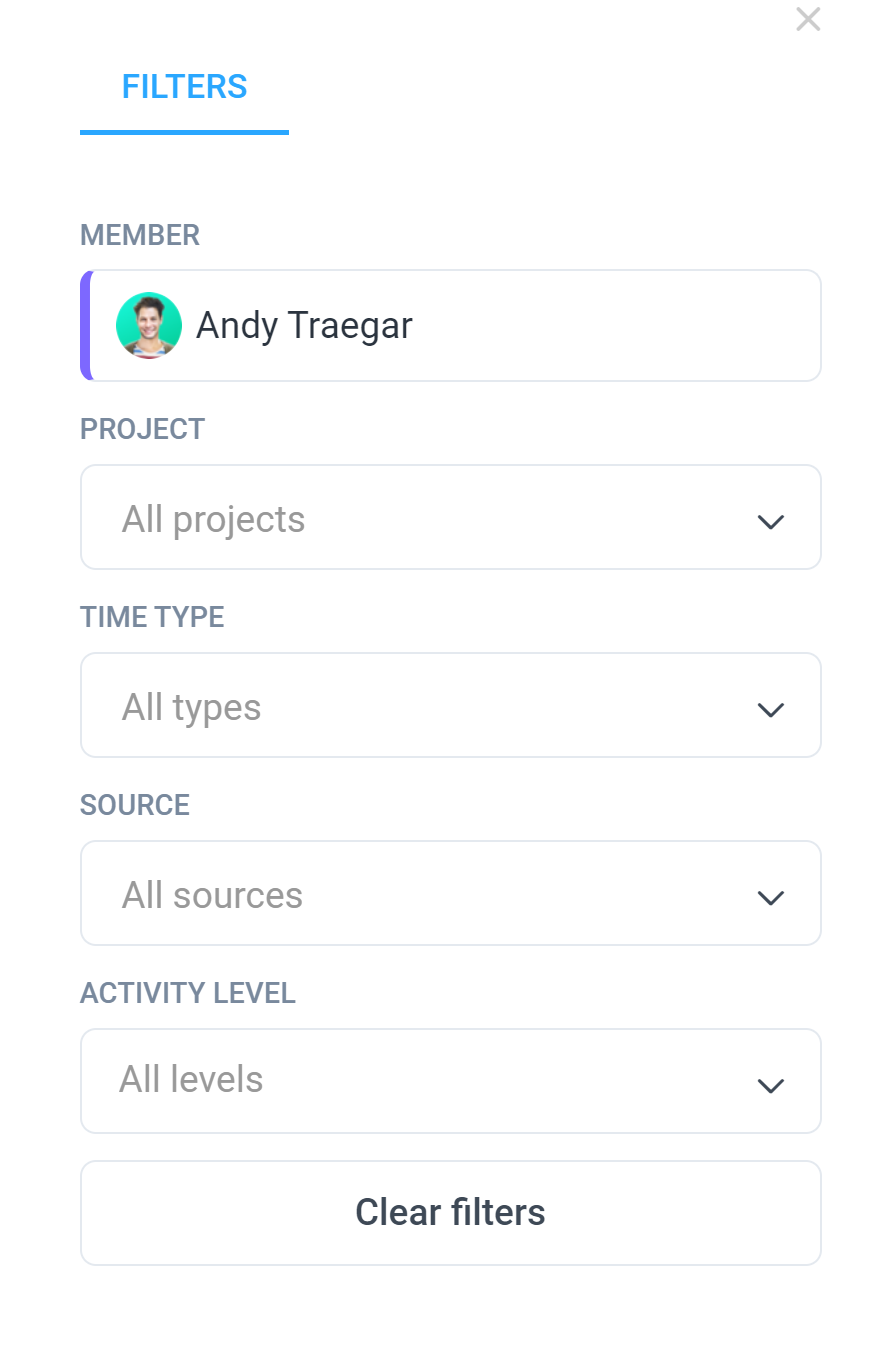
It is possible to filter screenshot data by Member, Project/Work Order, Time Type, Source, and Activity Level by clicking on Filters.
To learn more about the screenshots page, click here.
Apps
App and URL activity can only be captured when your team is using our desktop app to track their time. For more information about ensuring your staff are always tracking from our desktop apps, please see the allowed app settings guide here.
This section lets you monitor what applications are being used by your team during their shift.
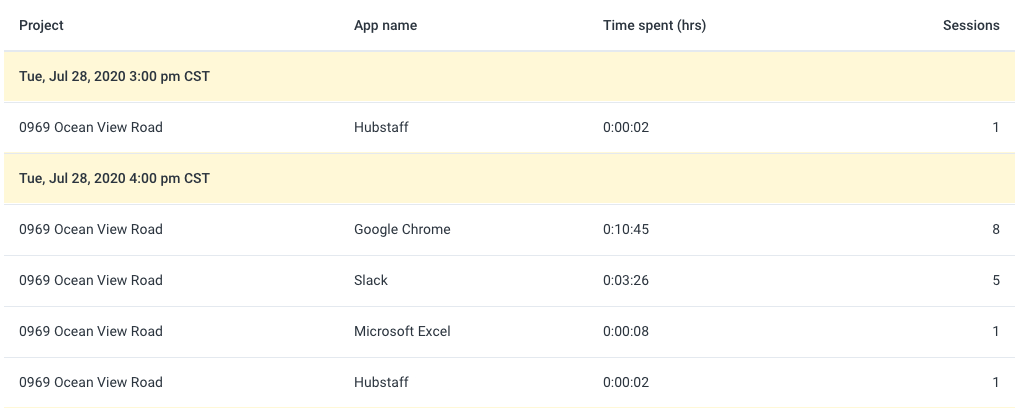
The Apps section will list down the app name, what date it was accessed, how many times it was accessed (sessions), how long it was accessed for (time spent), and the name of the project the user was tracking time against when the application entry was recorded. The report is broken down into hourly intervals and arranged with the app with the most time spent in descending order.
It is possible to filter this data by user, project/work order, time type, activity level, timezone, and date by clicking on the relevant menu at the top of the screen.
URLs
App and URL activity can only be captured when your team is using our desktop app to track their time. For more information about ensuring your staff are always tracking from our desktop apps, please see the allowed app settings guide here.
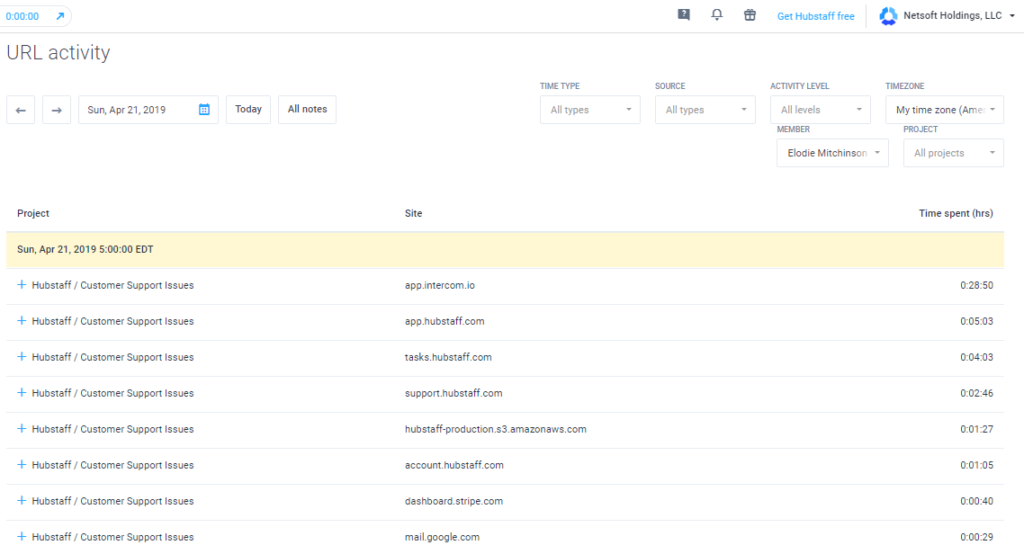
Your team’s URL browsing history can be monitored with Hubstaff. When a user accesses a website during their shift, it is captured and then presented under this section.
As per the image below, you will find activity data regarding which URLs (websites) were accessed, which date it was viewed, how long the user browsed the website for, and under which project the user was tracking their time to.
It is possible to filter this data by user, project/work order, time type, activity level, timezone, and date by clicking on the relevant menu at the top of the screen.
Location
Map
Locations can only be recorded when tracking time from a mobile device.
The Map enables you to monitor which geographical locations are being visited by workers during their shifts.
To learn more about how your team can track locations, click here.
Locations are displayed on a map with blue markers that represent each recorded GPS point. From this screen, you can zoom in and out to increase or decrease the size of the map and filter between map or satellite views.
Job Sites
The Job Sites section allows you to designate specific Geofenced areas where your team is allowed to track time. The app can automatically start recording time when a user enters the job site or stop the timer when they leave the job site.
Whenever a user is tracking time within a job site, the system provides a report of when and for how much time the user spent at that job site, which you can generate and review with our Reports feature. To learn more about setting up job sites, click here.
Project management
Projects
In order to track time in Hubstaff, a user will need to be assigned to a project. The Projects section provides a central location to create and manage all projects within your organization.
Each row outlines the name of the project, which teams and members are assigned to it, tasks in it, the project’s budget (when applicable) as well as member limits.
To add a new project you can press the Add project button.
Active projects will be displayed by default, but if you wish to view archived projects you can do so by selecting the option at the top left-hand side of the screen.
You can edit, manage, archive, or transfer a project by clicking on the Actions drop-down menu at the right-hand side of the project’s row.
Search for individual projects from the Search projects menu.
To-dos
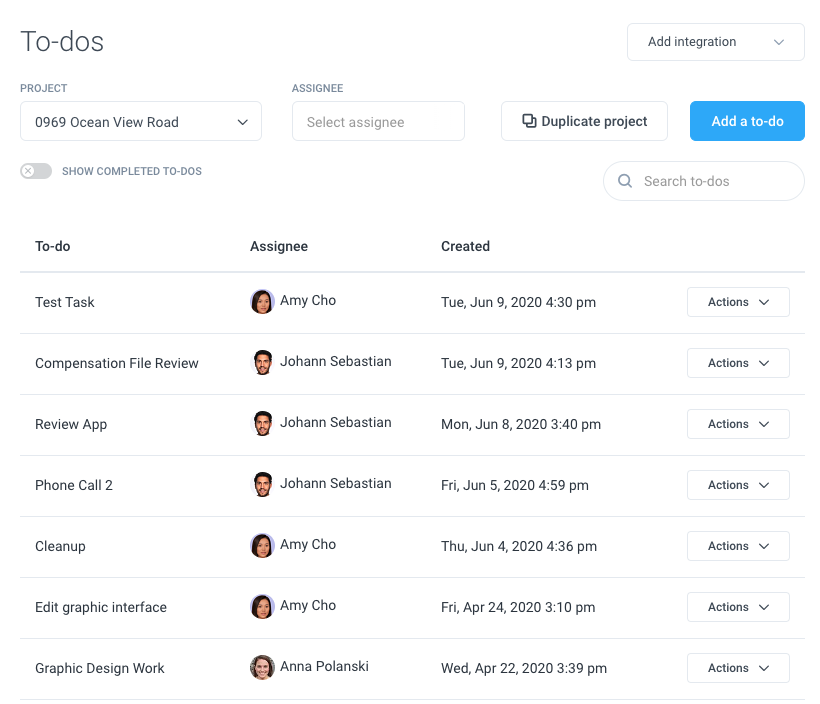
Hubstaff offers simple built-in tasks feature available straight from our web app. Navigate to the Project management > To-dos menu on the sidebar to add tasks.
Our To-dos feature allows you to create, edit, or delete a task directly from within the web app, without needing to integrate with one of our third-party project management tools.
From this section, all the To-dos within your organization will be displayed as a single list. You can identify whom the task is assigned to and when it was created.
To add a new To-do simply click on the Add a to-do button.
Additional filters are available at the top of the screen. You can choose to only display tasks associated with a certain project via the project drop-down menu. Also, it is possible to search for individual tasks via the “search to-dos” field, or by whom they are assigned to, via the “select assignee” field. Include completed tasks or not, by toggling the “show completed to-dos” filter.
For more information about using our To-dos feature please see our detailed guide here.
Clients
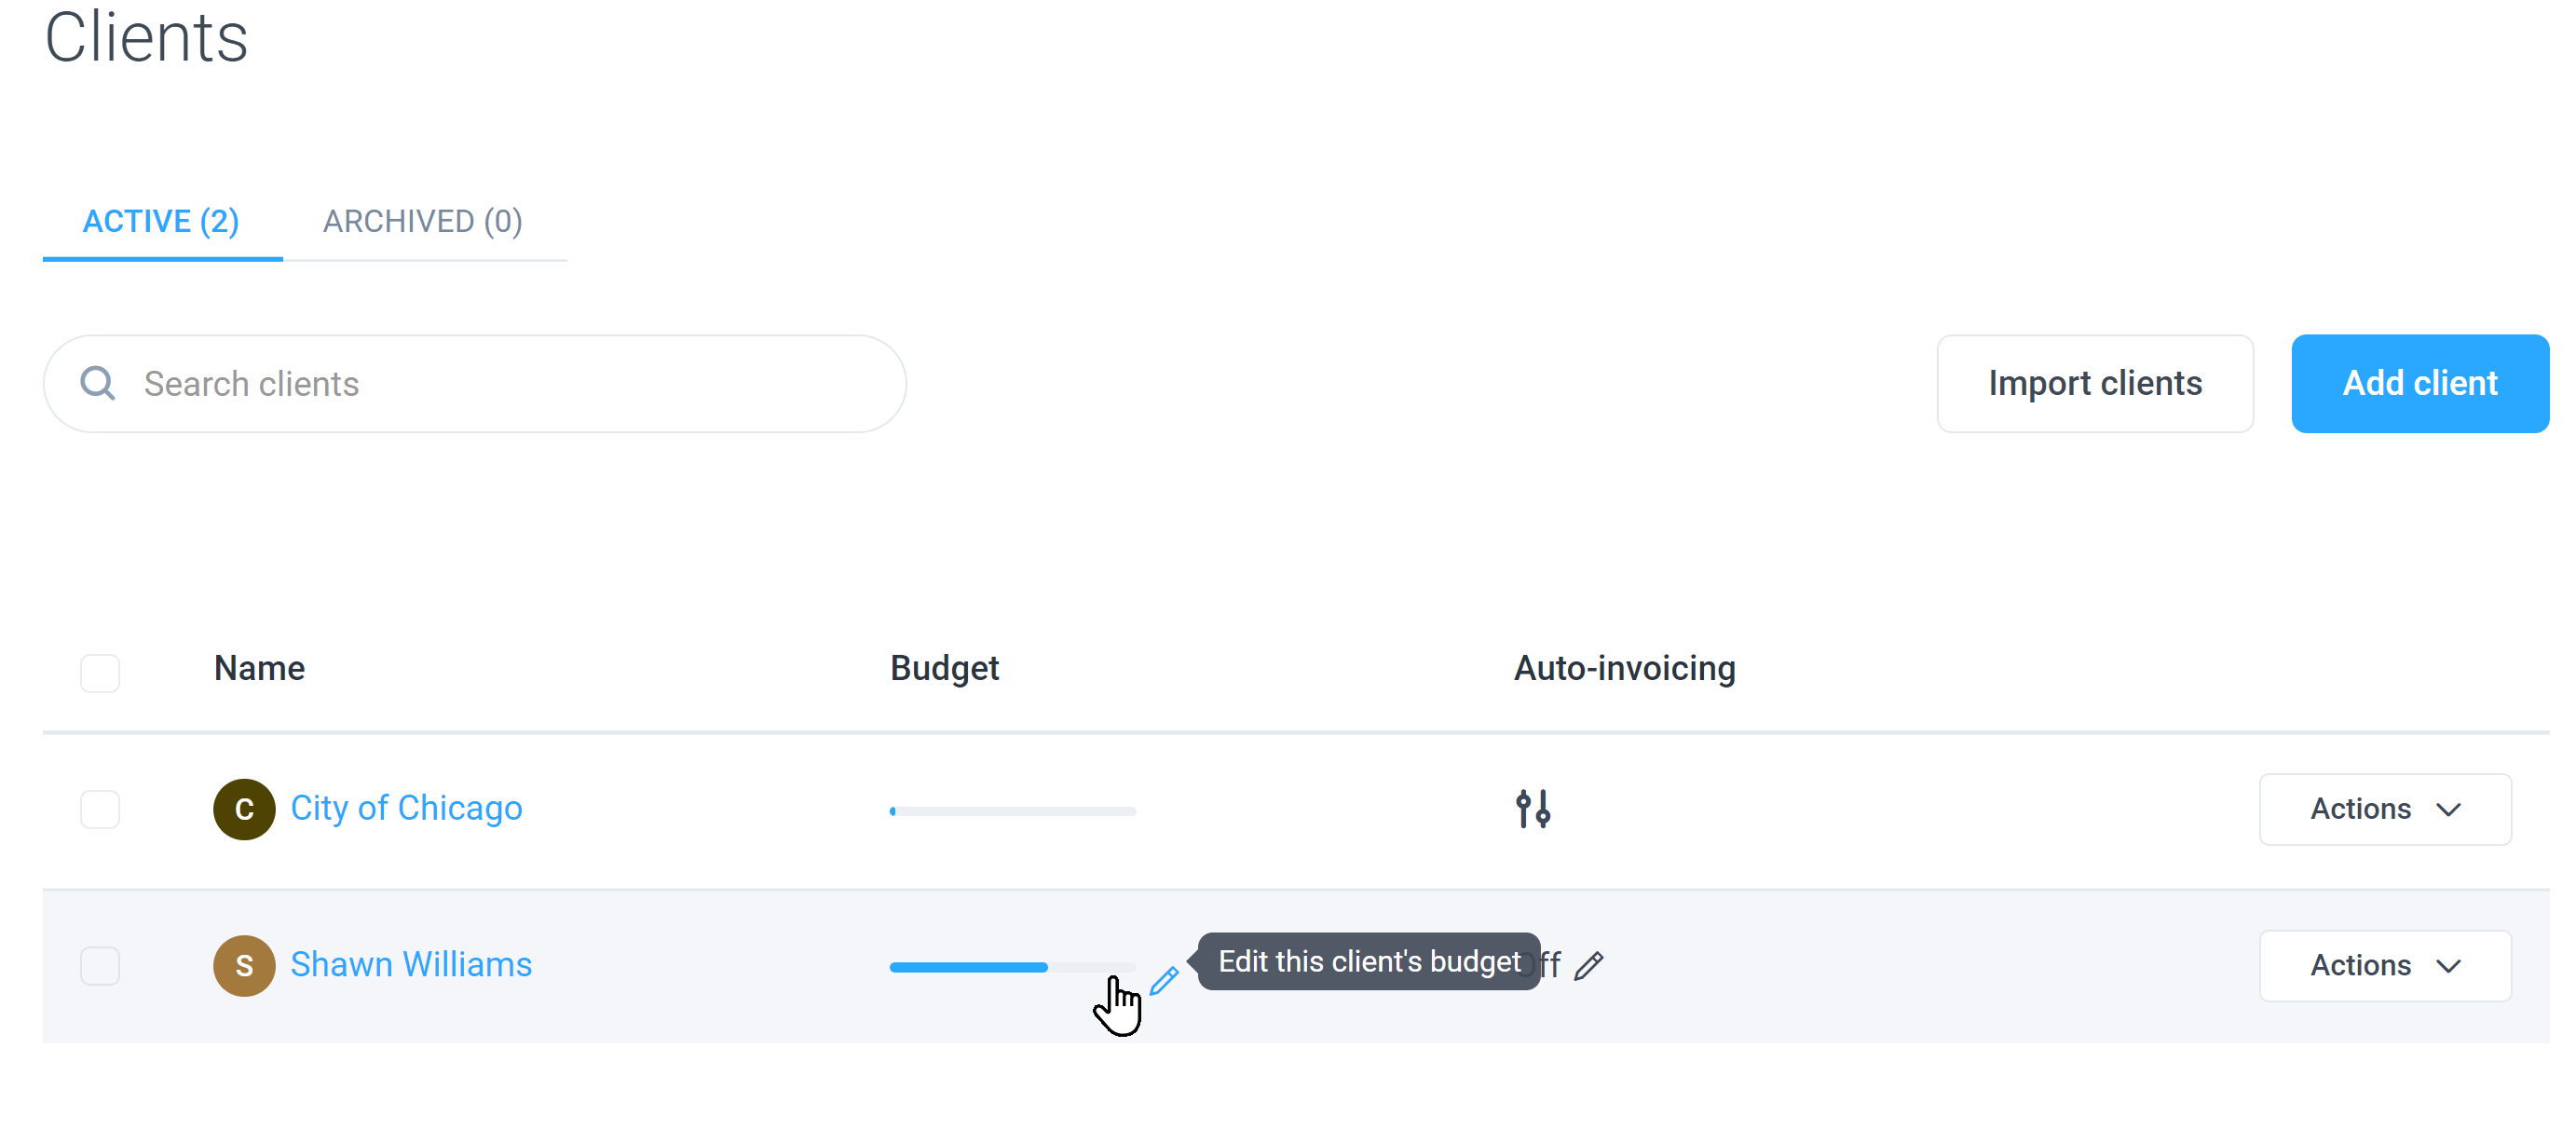
Clients can be assigned to projects for organizational purposes and can also be used in conjunction with our invoicing feature.
In the Clients section, a list of your clients will be displayed, as well as their budget details; including total cost/total hours, bill rate, pay rate, the budget amount, and the starting date of the budget.
To add a client simply press the Add client button.
By default, a list of all active clients will be displayed. However, if you wish to view archived clients you can click the archived tab at the top of the screen.
To configure budget settings for each client simply click the edit budget button to enter/define these variables.
To edit or archive a client you can select the option from the Actions drop-down menu at the end of each row.
Work orders
Work orders make it easier for organization owners and managers to assign specific jobs to their teams. Work orders allow you to define a specific scheduled time for the job, and/or a location as the worksite.
Step 1
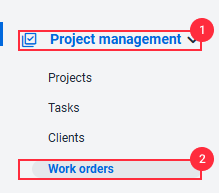
Navigate to Project management >Work orders on the sidebar.
Step 2
Click on Add a work order.
Step 3
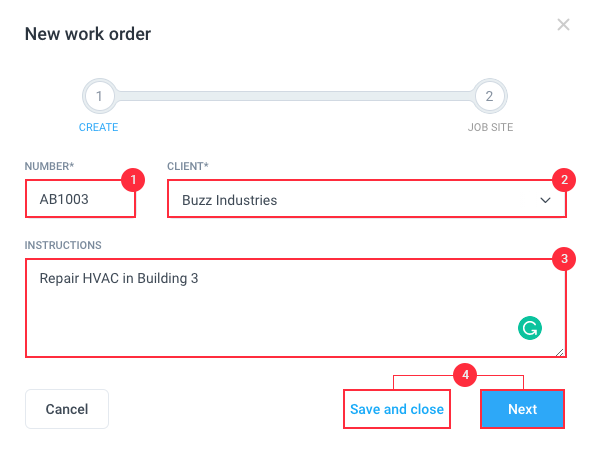
The New work order dialog will appear.
- Use the pre-generated work order number, or specify your own.
- Select a client
- Add the work order instructions (optional)
Click Next to continue or Save and Close to save the work order for now.
Schedules
Calendar
It is possible to create schedules for your team by using Hubstaff’s scheduling feature. By doing so you can automatically monitor the attendance of your team.
You can create one-time or recurring shifts for team members, send reminders to them if they are late, issue notices to owners for missed shifts, notify members and managers of late shifts, and/or shifts that have been abandoned.
Create a new schedule by pressing the Add Schedule button.
To navigate between dates click on the calendar icon at the top of the screen.
By default, you will see all user’s schedules listed together under the same calendar view. You can, however, choose to display an individual user, or an entire team’s schedule only by selecting their name from the Members drop-down menu.
For more information about how to create schedules for your staff please see our detailed guide here.
Time Off
Hubstaff’s Time Off feature allows you to set policies for your team regarding leave, time-off requests, and paid holidays.
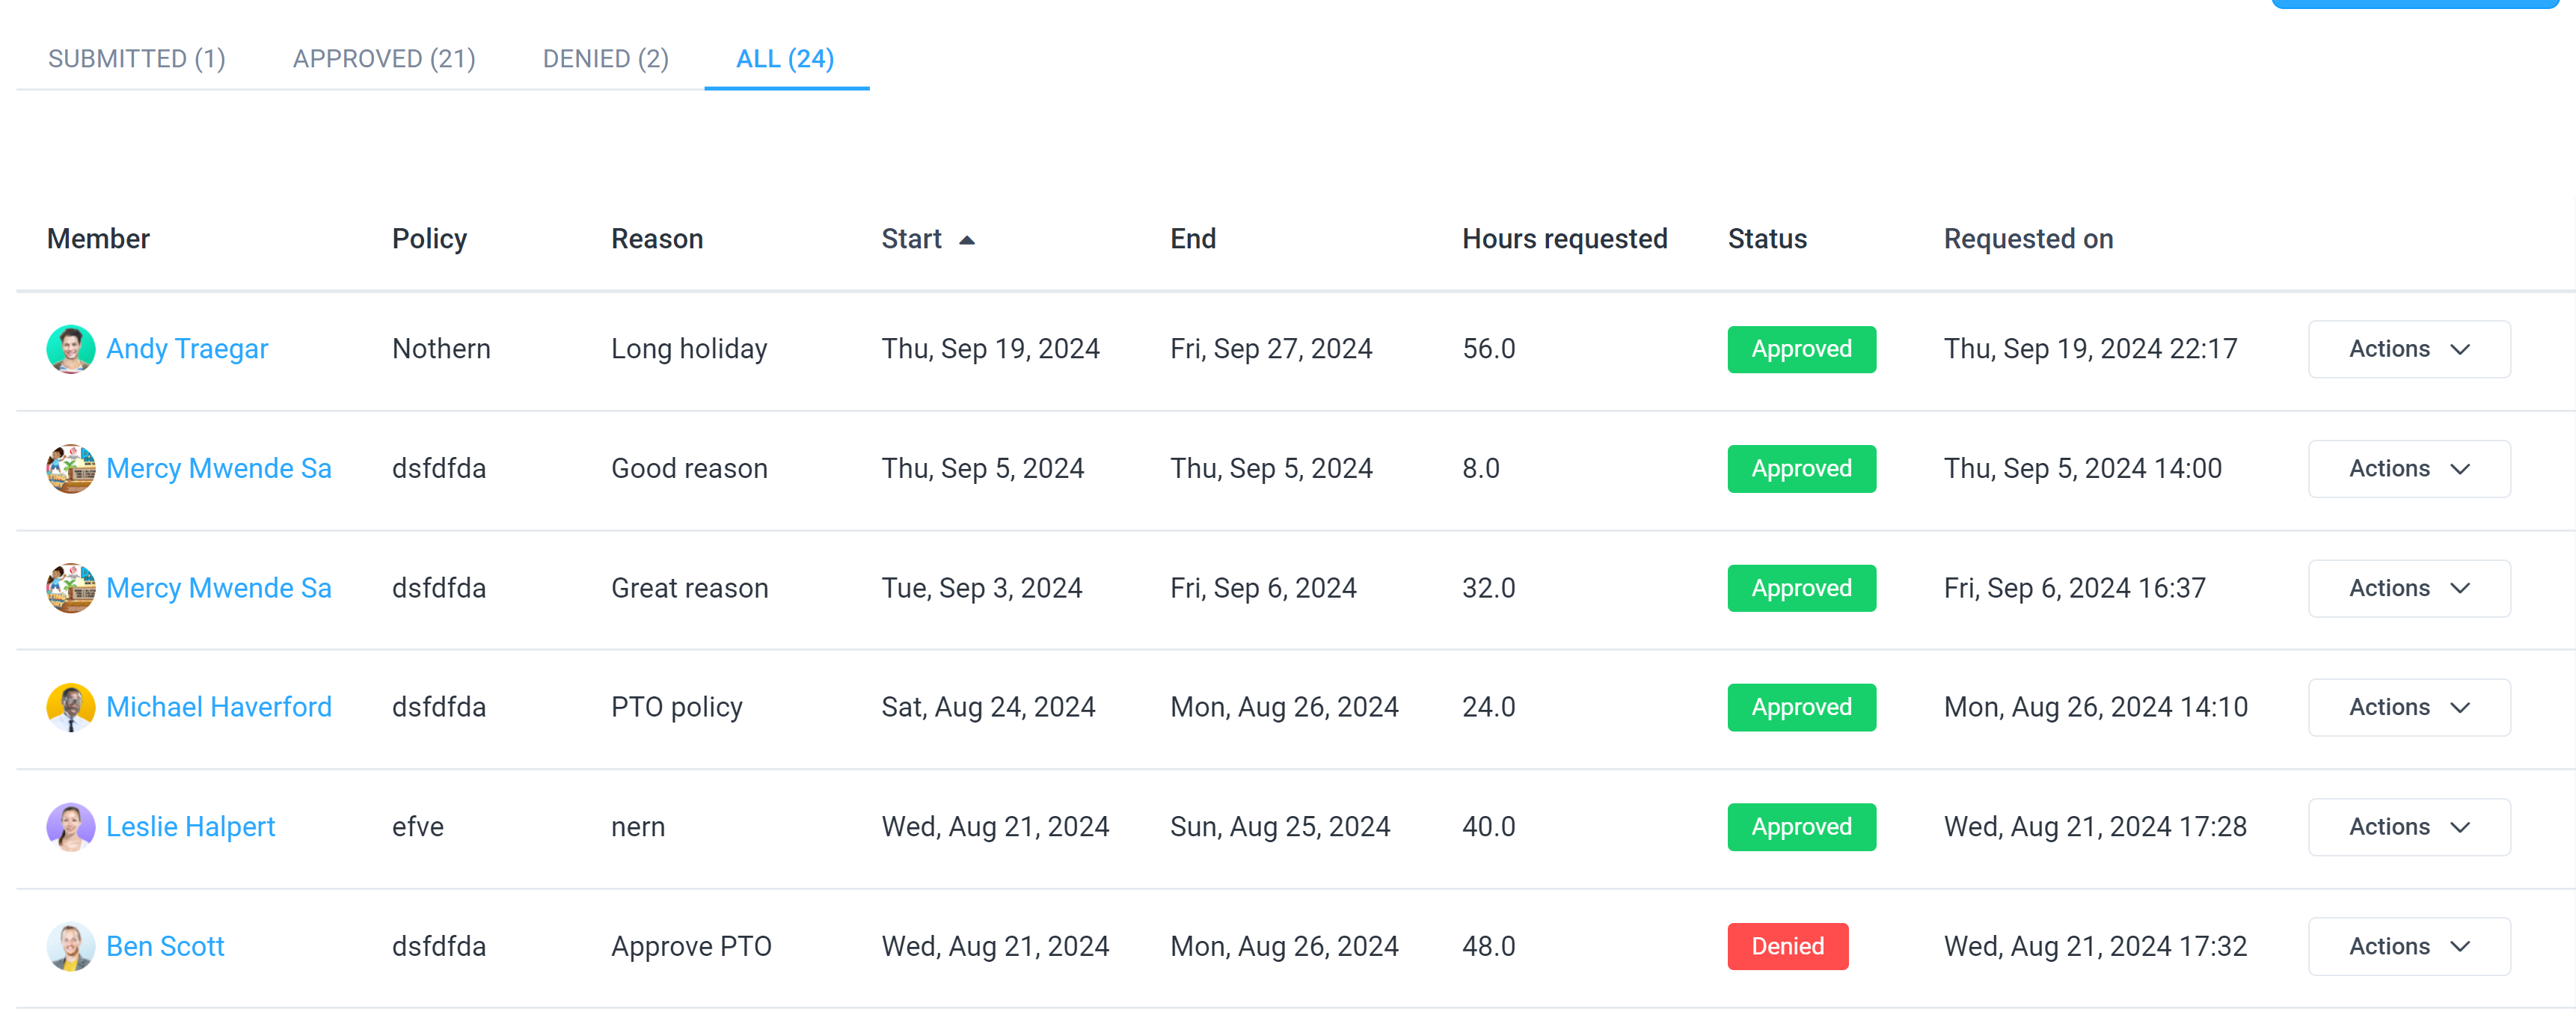
The Time off requests section displays an overview of members who have requested time off, what type of leave was requested, reason for the request, the time period of their leave, the specific hours requested off, when it was requested, and the current status of their leave request. The approved tab also shows who approved the time off request.
By accessing the Time Off settings, you can create time-off policies, which determine what kinds of leave requests your users can take.
For more information about creating Time Off policies and managing them for your team please see our detailed guide here.
Time off requests can be viewed, edited, deleted, or denied by clicking on the Actions drop-down menu on the right-hand side of the entry request.
Data can be filtered according to status. Time Off requests that are submitted, but not yet approved or denied, will appear under the Submitted header. Once a leave request is approved it moves to the Approved section, or if it is denied it is categorized under the Denied section. If you wish to view all types of leave requests please select the All column.
To view Time Off requests for certain members only, or specific policies simply choose their name from the Member filter, or Time off policy filter respectively at the top of the screen.
Reports
Hubstaff has an extensive reporting section in which detailed monitoring data can be reviewed regarding your team’s performance.
Please note, that unlike the Activity section, where it is possible to navigate between both the user and the organization’s timezone, reporting data is always reflected in the organization’s timezone.
View All Reports
The View All Reports section provides a directory of every report available to you within your Hubstaff organization. It includes a brief description of the contents of each report, below the title, with links to navigate to each one. Click here to view detailed guides for each type of report available.
People
Members
The Members section allows you to manage the members of your organization from one screen.
Before a user can begin tracking their time, first you will need to invite them into your organization as a member. To invite a user simply click the Invite member button towards the right-hand side of the screen.
To learn more about the process of inviting team members into your organization please see our detailed guide here.
By default, the Members tab will be selected, providing a list of all currently active members within your organization. However, to view users who were invited but have not yet accepted their invitation, select the Invites tab.
Under the Members section, you will be able to view each user’s name, their role within the organization, edit which projects they belong to, adjust their pay/bill rates, define their pay period and timesheet approval settings, set their weekly limit of trackable hours and determine if they are enabled for tracking or not.
You can enable or disable a user for tracking or remove them from your organization by selecting the option from the Actions drop-down menu. It is located towards the right hand of the screen at the end of each user’s row.
For comprehensive information about using the Members area, including an explanation of all features and settings available please see our guide here.
Teams
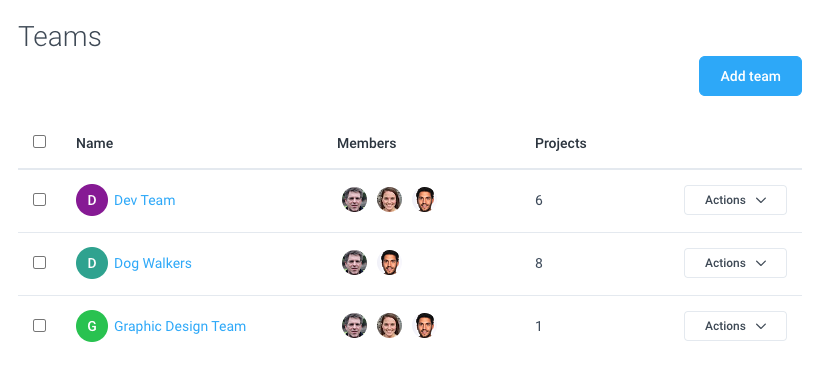
Hubstaff allows you to create Teams within your organization.
The Teams feature makes assigning multiple users to a project easier. It also allows you to assign a Team Lead so that you can delegate common day-to-day tasks like creating schedules, setting up user roles and projects, as well as approving timesheets and time offs.
To learn more about the Teams feature, click here.
Financials
Payroll
The payments section is used to manage your organization’s payments and payroll. We have three payroll methods available.
- Manual Payments – This involves exporting time worked in a file format of your choice, so you can easily pay your team outside of Hubstaff. This is available on both basic and premium plans. Click here to learn more.
- Automatic Payroll – allows you to set payment profiles for your team so they can be paid automatically through one of our payment gateways (Paypal, Bitwage, Payoneer, or Transferwise). They will be paid according to the time they have tracked through Hubstaff (weekly, twice a month, bi-weekly, or monthly). Click here to learn more.
- One-Time Payments – This allows you to send a single, one-time payment to one or multiple team members either manually (by exporting the payment) or via one of our payment gateways (Paypal, Bitwage, Payoneer, or Transferwise). This is a great option for fixed-rate, compensation, partial, or bonus payments. Click here to learn more.
To send payments using a payment gateway a Team or Enterprise plan is required
For more information about how to use our Payroll feature
Invoices
Hubstaff has a robust invoicing feature that allows you to create two types of invoices:
- Client Invoices – invoices you can send to an external client containing your team’s work hours.
- User Invoices – invoices sent to organization owners for their hours worked.
To display invoicing data for your client or team, simply click the Clients or Team filter, as shown below:
To create a new invoice, click on the New invoice button.
The Invoices section displays a list of all invoices created; including their invoice number (1), the name of the team member (2), the issue date (3), days since the invoice was created(4), the total amount invoiced (4), the total amount paid (5). There is also a status column that allows you to track if invoices have been paid (7).
For more information about how to use our invoicing feature please see our detailed guide here.
Expenses
Our expenses feature lets you keep track of all non-time related costs to your organization. Members can upload receipts, categorize expenses, then connect them to projects then add them to invoices.
To learn more about the expenses feature, click here.
Settings
The Settings screen lets you manage various settings for your organization.
To learn more about settings, please click here.
Integrations
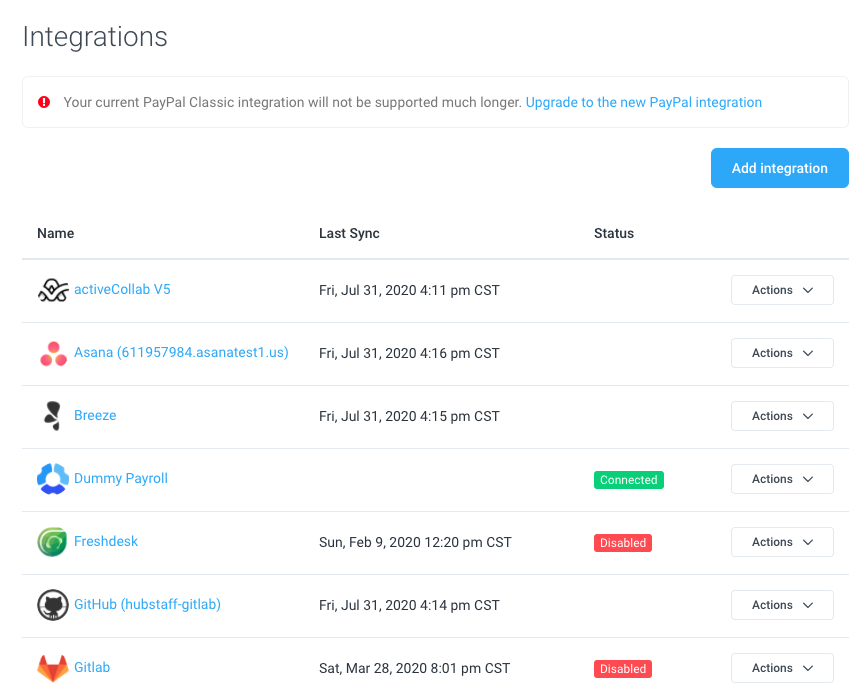
Hubstaff connects seamlessly with popular project management, CRM, accounting/invoicing, and help desk apps so your team can track time to integrated tasks using our timer.
For a full list of available integrations please see our Integrations page here. To learn more about what apps you can connect to Hubstaff and how to integrate them, click here.
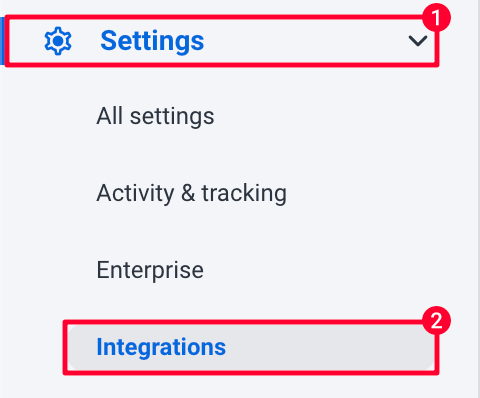
The Integrations section is used to both add new integrations and manage existing ones.
Organization menu
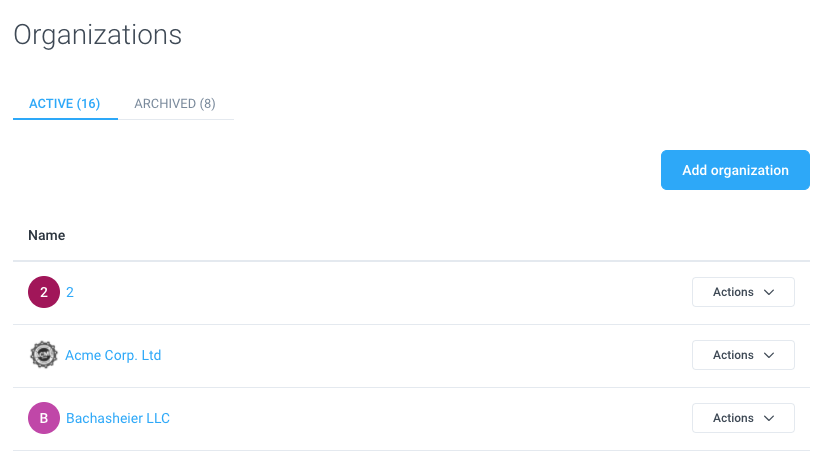
The Organizations screen provides an overview of the organization’s within your Hubstaff account. The setting can be located by clicking on the organization name on the top right corner of the page, then select the Organizations menu.
To add a new organization simply press the add organization button.
By default only active organizations will be displayed, however, you can view archived organizations by selecting the Archived tab towards the top of the page.
You can edit, manage billing, leave, or archive an organization by choosing the option from the Actions drop-down menu.

