21 minutes
Hubstaff Integrations Overview
Hubstaff has a number of third party integrations available to complement your time tracking tool. Whether you need to track time in one of the popular project management tools, add your customer relationship management solution, keep your accounting, pay your workforce, or bill your clients, we have got you covered with more than 30 integrations and counting.
Hubstaff supports Project management tools like Active Collab, Asana, Breeze, ClickUp, Github, Gitlab, Insightly, Jira, Monday, Podio, Redbooth, Redmine, Teamwork Projects, Trello, Unfuddle, Zoho Projects.
Hubstaff supports payments, accounting, and invoicing tools like Bitwage, Freshbooks, Payoneer, Paypal, Quickbooks, Wise, Gusto, and Deel.
Hubstaff supports helpdesk and CRM tools like Salesforce, Freshdesk, and Zendesk.
How can I use third-party Integrations with Hubstaff?
Hubstaff’s integrations are designed so that your projects, tasks and tracking data can be seen in one central location.
This means you can seamlessly use Hubstaff in conjunction with other time management and accounting systems, rather than switching back and forth between multiple services.
For example, say you have created projects and tasks in a project management system such as Asana or Trello. You can simply import them into Hubstaff using our Integrations feature so that your team can track time against them.
What is the process of connecting Hubstaff with an Integration?
Connecting an integration to Hubstaff is a three-step process:
- First, authenticate your Integration with Hubstaff.
- Second, connect your projects.
- Third, connect your Hubstaff users to their respective accounts in the integration.
Once these three steps are complete, your tasks from the third-party integration will populate into Hubstaff’s To-dos section.
What Integrations are available?
Below is a list of currently active integrations:
PROJECT MANAGEMENT INTEGRATIONS
ActiveCollab, Asana, Breeze, ClickUp, GitHub, GitLab, Insightly, Jira, Monday.com, Podio, Redbooth, Redmine, Teamwork Projects, Trello, Zoho Projects
PAYMENTS, ACCOUNTING, AND INVOICING INTEGRATIONS
Bitwage, FreshBooks, Payoneer, Quickbooks for Windows, Quickbooks Online, Wise, Gusto, Deel, Paypal
CRM INTEGRATIONS
Salesforce
HELP DESK INTEGRATIONS
Freshdesk, Zendesk
How do I set up an Integration?
Authenticating the Integration
Step 1
The first step in setting up integration is to give Hubstaff permission to share data. This process is called authenticating the integration.
You can find step by step guides on authenticating each Integration with Hubstaff below:
Project Management Integrations
- Hubstaff Tasks
- Active Collab
- Asana
- Breeze
- ClickUp
- Github
- Gitlab
- Insightly
- Jira
- Monday
- Podio
- Redbooth
- Redmine
- Teamwork Projects
- Trello
- Zoho Projects
CRM
Payroll Providers
Payment Processors
Accounting and Invoicing
Help Desk
Connecting your Projects
Step 1
Please note this is a basic summary of the setup process. For a more detailed guide on how to sync up your projects & users, please see our step by step instructions here.
When you go through your Integration’s Set Up Wizard, you will be asked to connect projects to Hubstaff as a part of that process.
However if you want to make any changes, remove or add new projects to your Integration you can do so from the Projects part of the Integration section.
Step 2
First, please select Settings from the main navigation menu. Then, click on the name of the integration whose projects you wish to edit.

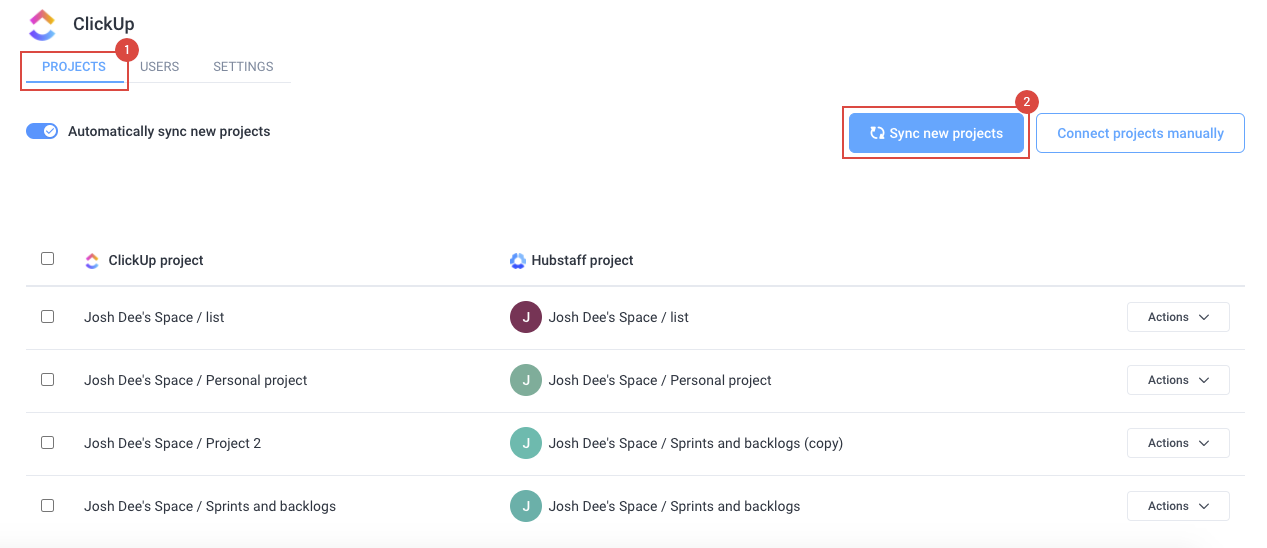
Step 3
Make sure the PROJECTS tab is selected. The quickest way to ensure the new projects from your Integration are in sync with Hubstaff is to select the Sync new projects button.
Step 4
A pop-up dialogue will appear. Click Confirm to begin the syncing process.

Step 5
To help you better manage the projects within your integration, we have some other features available.
Automatically sync new projects: If you do not wish to manually click the Sync new projects button whenever you create or edit projects within your integration, you can select the Automatically sync new projects toggle. When it is enabled Hubstaff will automatically scan your integration and link up any new projects as they are added.
Connect projects manually: If you wish to pick and choose which projects are added to Hubstaff you can use this option. For a complete guide on how to use this feature, please see here.
You can also manually sync projects in case they do not appear. To learn more, click here.

Connecting your Users
Step 1
When you go through your Integration’s Set Up Wizard, you will be asked to connect your team as a part of that process.
However, if you wish to make any changes, disconnect or add new members to your Integration you can do so from the Users part of the Integration section.
Please note: Your team member must first be invited into your Hubstaff organization before they can be connected to your Integration. For more information about how to invite a team member into your organization please see our helpful guide here.
Step 2
First, please select Integrations from the main navigation menu. Then, click on the name of the integration whose team members you wish to edit.
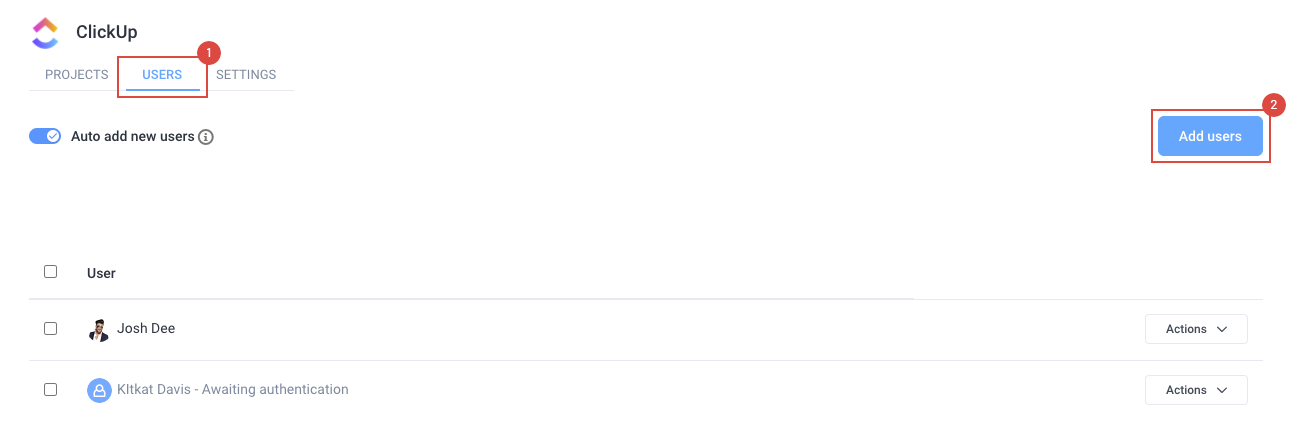
Step 3
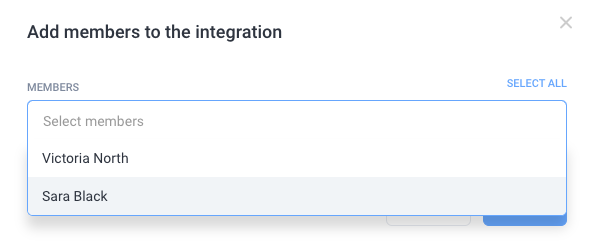
Make sure the USERS tab is selected. To add a new member to the Integration please click the Add users button.
Step 4
A pop-up window will appear. Select the Users you wish to connect from the drop-down menu.
Select the Save button. An email with a confirmation link will be sent to all users who were selected. The email will request that they connect their account to configure the integration.
Step 5
There are other options available to manage the users connected to your integration.
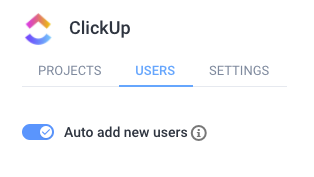
If you do not want to add users automatically to your Integration. Disable Automatically add new users toggle (gray).

If you do want to Automatically scan your integrations and link up any new users as they are added. Enable Automatically add new users toggle (blue).
Disconnecting users: If you do not wish for a user to be connected with your Hubstaff integration, please click on the Actions menu besides their name. Select Disconnect from the drop-down menu to disconnect them from the Integration.

What do the settings on the Integrations page do?
Time Logging
Once your third-party Integration is connected with Hubstaff, you can choose how often you wish for the data to be exported back to the Integration.
Hubstaff currently has two modes of how we synchronize time back to integrations. Either we synchronize the time daily (Daily, Hourly or Delayed) or we synchronize time when the task is completed in Hubstaff (Completed).
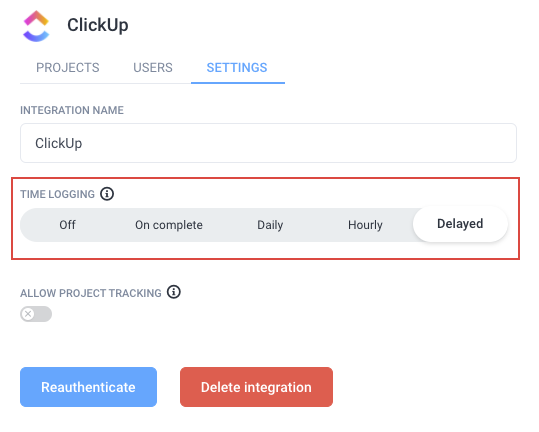
- Daily– The time gets synced once per day. (The data gets sent back at midnight UTC.)
- Hourly – The time gets synced once an hour.
- Delayed – Delays your syncing time by a day, to allow for time manual edits. (Delayed sync is currently not supported for Quickbooks.)
- Complete– The time will be pushed back to the integration tool once the task is marked as Complete, please note that not all integrations support task completion. (See the bottom of this page for a list.)
- Off– Will disable synchronizing task time for customers who really do not want it synced. (For customers who do not want the comments added to their tasks with the time information).
Project Tracking
Time can either be tracked by project or project and task. If you do not wish for your team to be able to track their time without first selecting a task, you can disable project tracking.
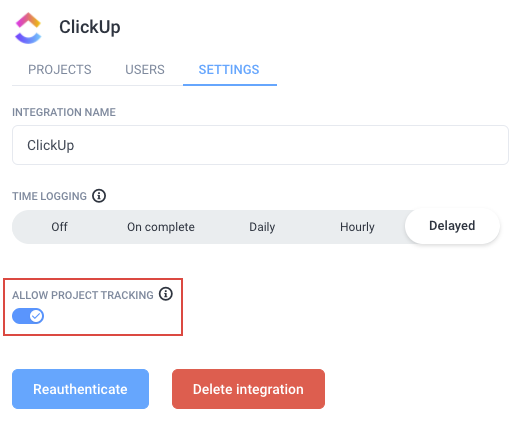
Once this setting is enabled, your team will be able to track their time against a parent project, eliminating the need to select a specific task.
When project tracking is disabled, users will not be able to edit time manually for those projects.
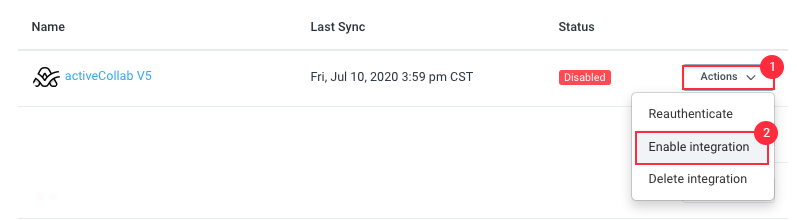
Enabling and Disabling an integration
Enable an integration
Step 1
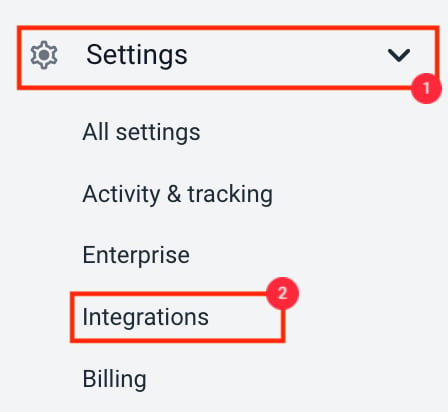
Navigate to the Settings > Integrations menu on the sidebar.
Step 2
Next to the integration name, click on Actions > Enable integration.
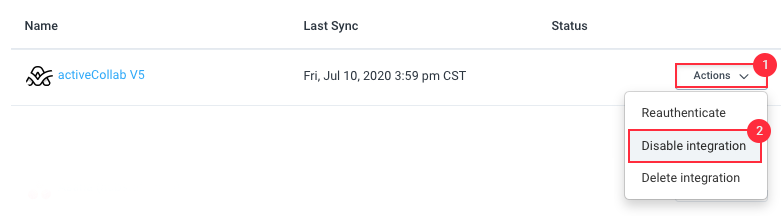
Disable an integration
Step 1
Navigate to the Settings > Integrations menu on the sidebar.
Step 2
Next to the integration name, click on Actions > Disable integration.