27 minutes
Getting Started with Hubstaff Tasks
Hubstaff Tasks is a Kanban style project management tool designed to make sure you get your work done quickly.
Here, we have leveraged the power of proven agile methodologies so that you can apply them to your projects, tasks, workflows, and keep your team productive. This tool also seamlessly integrates with our time tracking platform, so you can monitor how much time your users spent working on each task.
This guide will show you how you can start using Hubstaff Tasks like a pro!
Creating your organization
Step 1
If you haven’t created your organization yet, click the New Organization button. If you already have an existing Tasks organization and wish to add another, click on the Add Organization button in the top right corner of your account.
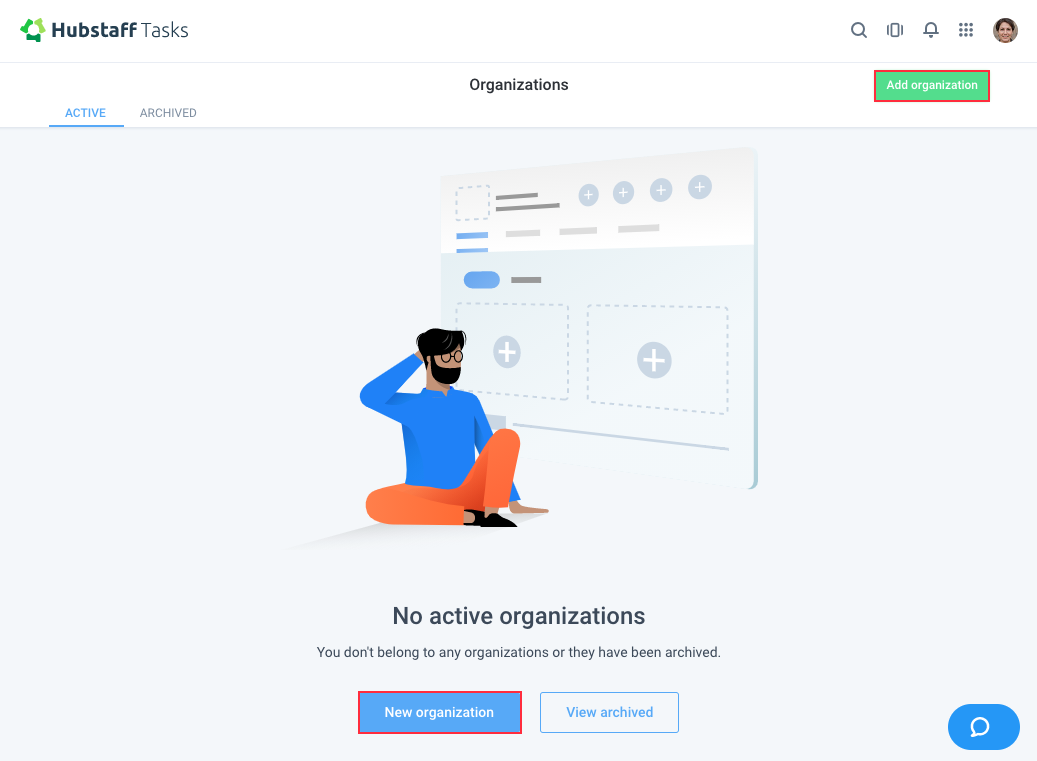
Each organization requires a separate subscription plan.
Step 2
Select your industry, then enter your organization’s name.

Once you’ve created your Hubstaff Tasks organization, you can link it to your Hubstaff (time tracking) organization by following this guide.
Inviting your team
Next, you’ll be taken to the invitation page where you can invite your team members to join your organization in Hubstaff Tasks.
If you already have a Hubstaff (time tracking) account, you will need to import your existing team, click here for the details on how to do it.
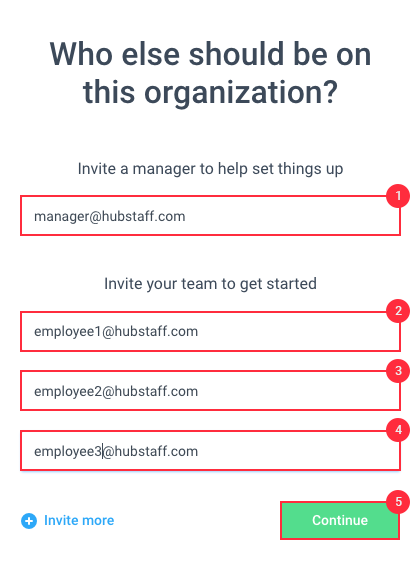
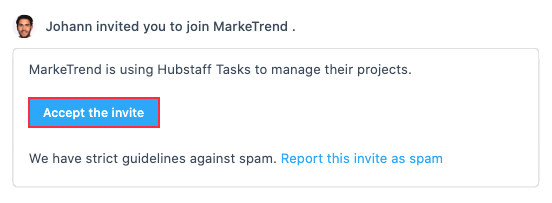
An email invitation will be sent to your team. Please ask them to click on the Accept the invite button. If they haven’t created their Hubstaff account yet, accepting the invitation will take them to the signup page to create their personal Hubstaff account.
Welcome dialog
After sending invites to your team members, you’ll see the welcome dialog, where you can either go to your Hubstaff Tasks dashboard, or book a call with our Sales team to learn more about how Hubstaff Tasks works.

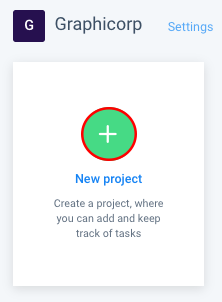
Adding projects
Step 1
Now it’s time to add projects. Click on the New project button to get started.
Step 2
Choosing a template will help you quickly create a project and use the default workflow for that project. A Blank option is also available if you wish to not use any template.
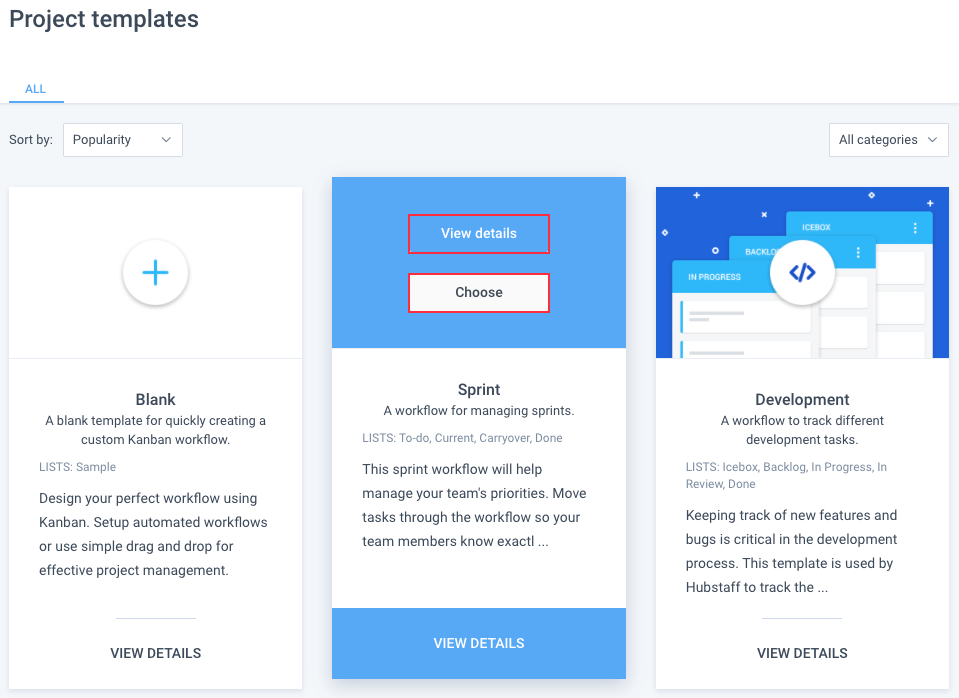
Click View Details to see more about the template and select it. You can learn more about the template, and if you want to proceed with it, click Choose template.
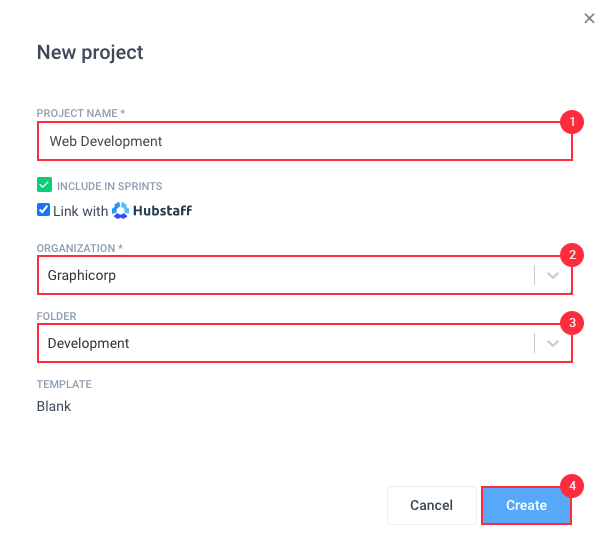
Step 3
Type in the name of the project, select the organization and folder then press Create . You can enable sprints on the newly created project as well and link the project with your Hubstaff (time tracking) organization.
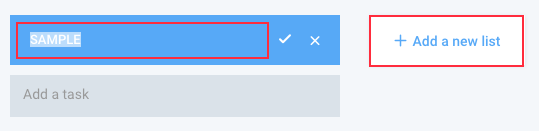
Creating lists
Creating a list allows you to add tasks to the project and organize them. Creating a list also allows you to add workflows to your projects. You can create a new list by following the steps below:
Step 1
A sample list will have been created for you after creating your project. Rename the list, or delete the list and add a new one by clicking the Add a new list button.
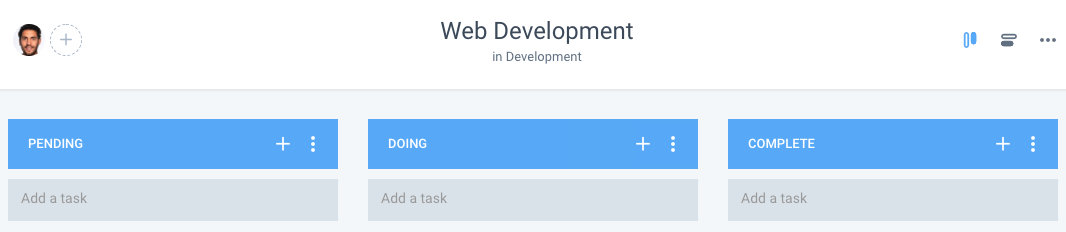
Optional
You can create multiple lists based on your task workflow in case you wish to add workflows in the future.
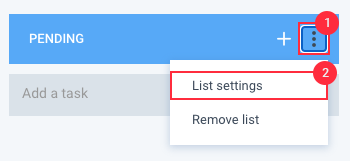
Changing list types
List types define the status of the tasks housed within a specific list. To change the list type, click on the list menu icon next to the list name, then select List settings .
Here you will see 3 list types:
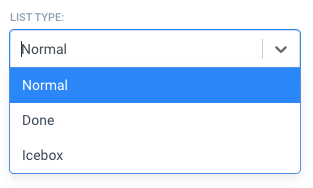
- Icebox – tasks in this list type don’t need to be worked on currently, but will most likely be added to your backlog of things to do.
- Normal – tasks in this list type are being worked on.
- Done – tasks in this list are marked as completed. Once tasks are moved to this list, if your project is linked to a Hubstaff time tracking organization, the task will no longer appear on the timer.
Adding workflows to lists
Workflows are a great way to manage task progress. Adding workflows to lists lets you add workflow actions that move tasks to a different list or assign them to another team member.
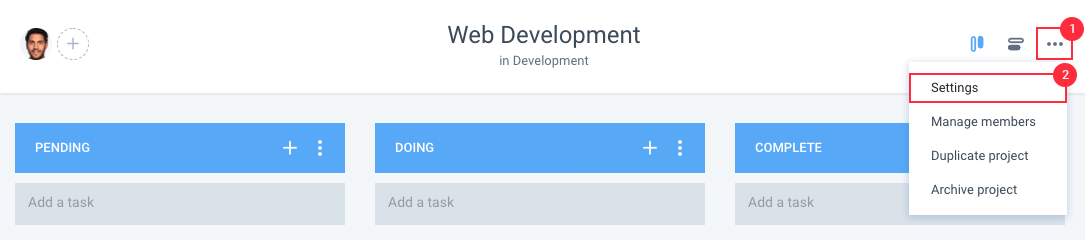
Step 1
To enable workflows for your project, navigate to the project menu button located on the top right corner of the project page, then select Settings .
Step 2
On the settings page, click the Enable workflow button.

Step 3
Go back to your project. Next to a list name, click the menu button, then select List settings .
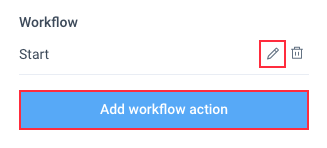
Step 4
Edit the sample workflow action, or Add a workflow action to create a new one.
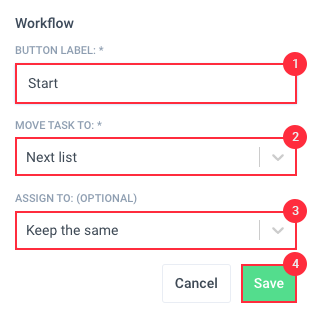
Step 5
Edit the button label, choose which list to move the task to, and define which users the tasks are assigned to once the workflow button is pressed, then hit Save to commit your changes.
Step 6
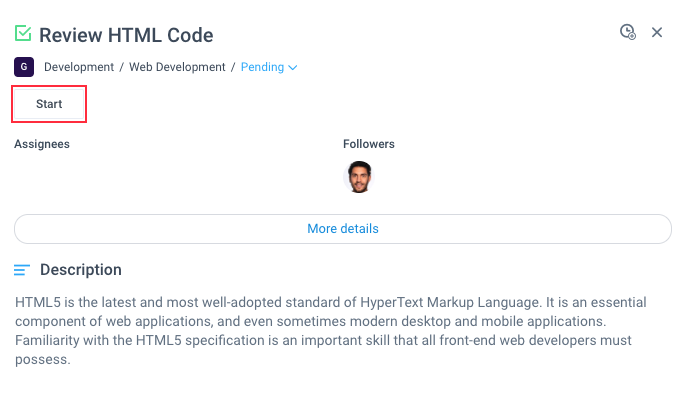
After creating a workflow action, the button will appear on the task in the list where the workflow action was assigned.
Adding tasks
Once you’ve created lists and adding workflows, it’s time to add tasks. Adding tasks lets you assign work to a team member. To add tasks, follow these steps:
Step 1
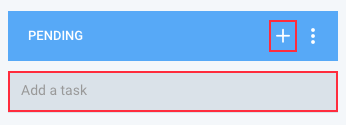
Click on the + button next to the list name to add a task to the top of the list, or the Add a task button to add a task to the bottom of the list.
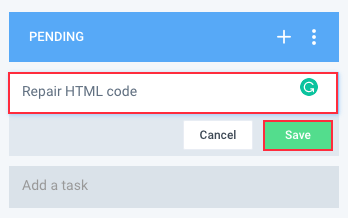
Step 2
Type in the task name then hit Save .
Step 3
You’ll see the task window and be able to change multiple options:

- Task type – define if the card is a task or a bug.
- Task name – the name assigned to the task.
- Task location – shows you the project and list name where the task is stored under.
- Task workflow buttons – shows workflow buttons to move tasks to another workflow list.
- Task description – allows you to add details or instructions on how to perform the task.
- Task dependencies – adds dependencies to the task.
- Attachments – lets you upload files into the task.
- Checklists – adds a checklist to the task. On each checklist item, you can also add assignees and due dates.

- Comments – lets you add comments to the task. You can also tag people by using @username (e.g., @daniel). If a user you tagged isn’t part of a project, you will receive a prompt asking if you wish to add them to the organization.

- Work Logs – The Work Logs section will show the time that was tracked (using the Hubstaff Time Tracking application) to the task.
- Assignee – the user to whom the task is assigned to.
- Followers – will receive any updates from the task.
- Epic – lets you choose which epic the task is assigned to.
- Labels – organize your tasks by adding labels.
- Recurring – allows you to repeat the task weekly or monthly (this feature is only available on Premium plans).
- Start Date/Due Date – lets you assign a start/due dates to the task.
- Worked – shows the time spent on the task. If you have integrated with Hubstaff (Time Tracking), time recorded to integrated tasks using any of our apps will sync back to Hubstaff Tasks.
- Estimate – lets you add an estimated time to complete the task.
- Cost – shows how much was spent on this task (requires the project and organization to be synced to Hubstaff Time Tracking and a pay rate set for the specific user).
- Web timer – allows users to track time to the task.
- Information button – shows the date/time the task was created.
- To-dos button – lets you add a task to the to-dos page.
- Task options – allows you to get a shareable link, copy, move, add dependencies or delete the task.
- Close task


Project management tools
Hubstaff Tasks homepage
The Hubstaff Tasks homepage provides a central location that shows vital information you need to plan your workday. The homepage allows you to see activity that happened, what tasks require actions from you, a quick list of your most viewed projects, and also helps you see the tasks you need to work on daily.

The homepage is broken down into four sections:
- Inbox – shows the most recent activity as well as a banner for important notifications. Click on Show more to see more notifications. To see all notifications, click on the View all notifications.
- Today – displays your daily to-do list on the My stuff page. Click on Add a to-do to quick add a to-do, or Plan my day to go to the My stuff page.
- Most viewed projects – this section gives you quick links to the projects you work on the most.
- Recently assigned to me – the list with the links to tasks that have just been assigned to you.
To learn more about the Hubstaff Tasks Homepage, click here.
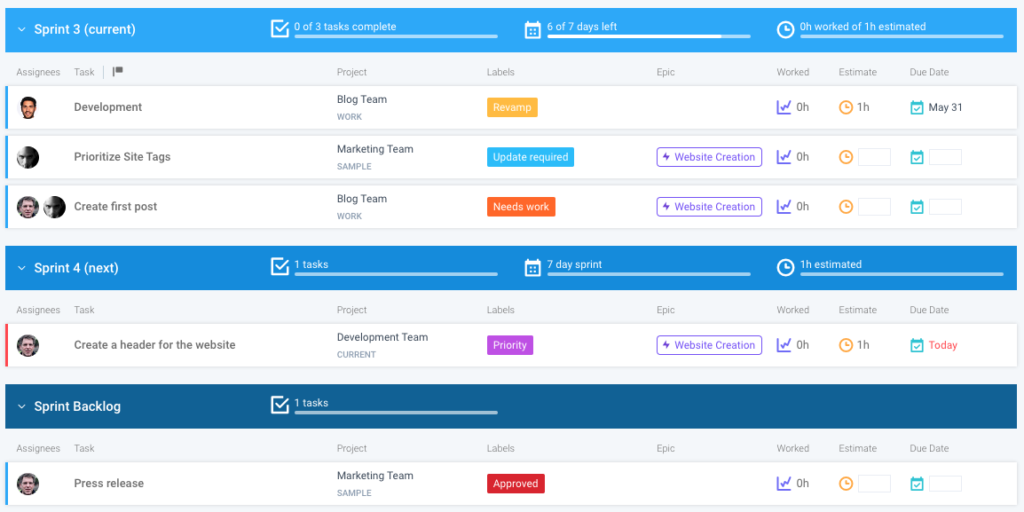
Sprints
Sprints let you focus your attention on tasks that require immediate action. It also lets you build projects and plan your week at the same time. Sprints also keep team members on track and focused on top priorities.
With Sprints, you can set specific sprint periods in weeks where a task or group of tasks needs to be completed. Adding your existing tasks to Sprints will let you know which tasks need to be prioritized weekly.
If you are familiar with or currently using Scrum or Agile methodologies, then chances are, you know how valuable sprints can be in making your project management process efficient and effective.
Epics
Epics are a great way to manage a set of tasks that can encompass multiple projects and departments.
Using epics will organize disparate tasks into a singular Epic view. For example, if you’re creating a website, and you have smaller tasks that involve multiple projects, teams, or departments, and falls into a larger task, e.g., designing a header (graphic design team), formatting CSS (developers), etc., it would be best to create one Epic so you can manage all the tasks that fall into one larger task in one page.
Looking for more information about agile best practices and how Tasks can help your team achieve effortless iterative improvement? Check out Hubstaff’s guide to agile project management by clicking here.
Stand-ups
Hubstaff Tasks’ new Stand-ups feature offers organization owners and managers an agile way to keep up to date with what their staff is working on. Team members will be to submit an update each day or week detailing what they worked on that day, what they are going to work on next, and if they ran into any blockers.
Standups help you stay updated with how your team is tracking with their assigned projects and tasks.
Looking for more information about agile best practices and how Tasks can help your team achieve effortless iterative improvement? Check out Hubstaff’s guide to agile project management by clicking here.

To learn more about Standups, click here.
Roadmap
The Roadmap view provides organization owners and managers with a bird’s eye view of all existing projects and tasks. Think of it as your all-in-one task management console in Hubstaff Tasks.
Why you should use the Roadmap View
- All-in-one management view – the roadmap section helps you visualize and manage projects and ensure timely completion. This view shows all assigned tasks broken down per project in a timeline view similar to a Gantt chart so you can see which task is assigned to which user, project, and each task’s start and end dates. You can also view assigned tasks in daily, weekly, monthly, or quarterly timelines.
- Adding tasks is a breeze – the roadmap page allows you to add tasks directly from this view, making assigning tasks to people a cinch. Once a task is added, you can easily see if the new task overlaps with another task assigned to the same user.
- Filter information quickly – in the roadmap section, you can filter tasks by members or teams, as well as filtering by projects.

To view the detailed article for the Roadmap view, click here.
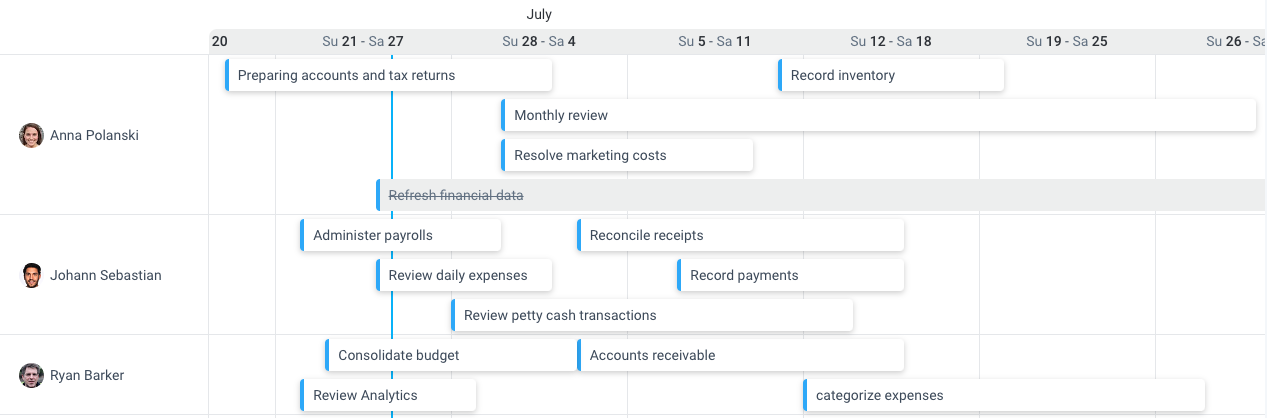
Timelines
Hubstaff offers a timeline view similar to a Gantt style chart, where tasks are displayed in chronological order to show you exactly what tasks will happen when, the target completion date of a task, and which users the tasks are assigned to.
The timeline view makes it easier for you to visualize and organize projects, estimate timelines, and manage your team’s workload.
To learn more about how you can use the Timeline view, click here.
Everything

Tasks
The Tasks view lets you see all assigned tasks.

Here you can use our powerful filtering and search tools to drill down to a specific task you wish to find.

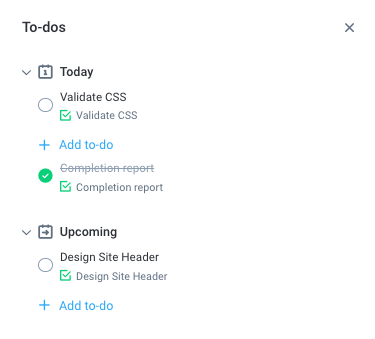
To-dos page
The To-dos view allows you to add and view existing tasks, or add simple to-dos that keep you focused on what you need to prioritize for the day or on upcoming days.
Projects and tasks need to be created before you can add items to the view. To learn more about how to add tasks, click here.
To view the complete guide to the My Plan view, click here.