26 minutes
Hubstaff Schedules
Working with schedules in Hubstaff is easy! Read our comprehensive guide to learn more about how the schedules feature works in Hubstaff.
Only organization owners and managers can create schedules for users in the organization.
Getting started with Hubstaff schedules
To get started, click on the Calendar > Schedules tab on the left sidebar.

Schedule filters
Events Filter
The Events filter allows you to filter the calendar by holidays, jobs (associated with work orders), scheduled shifts, and time offs.

Teams filter
The Teams filter lets you filter the schedules page by specific teams.

Members filter
The Members filter lets you filter the schedules page by specific team members.

Month/week/day filter
You can also filter the calendar by month, week, or day, making it more convenient to view the specific schedules you’d like to see displayed on the page.

Calendar filter
You can navigate to previous or future months/weeks/days using the navigation arrows. You can also change the timezone where the schedules are based by clicking on the timezone dropdown located on the far right side of the date selector.

Group By filter
The Group by filter allows you to choose whether you’d like to group and view schedules by time (broken down every hour) or by a team member.

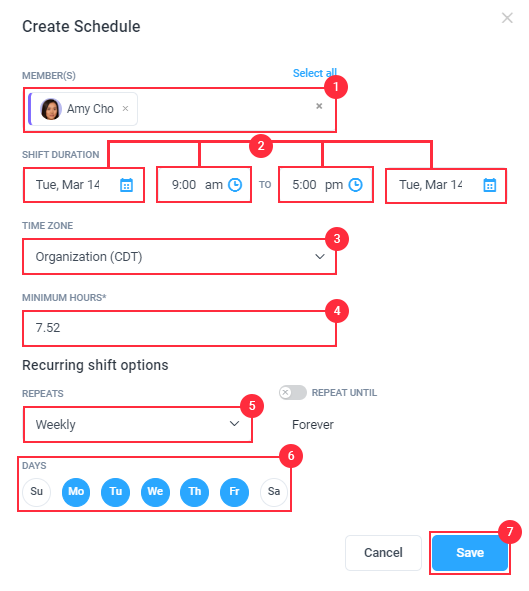
Creating a New Schedule / Shift
To create a new schedule, click on Actions > Create shifts to create a new schedule for a user.

Next, fill in the details below:
-
- Username
- Shift Duration
- From Date
- Shift Start time
- Shift End time
- To Date
- Timezone
- Organization timezone
- Member timezone
- Minimum Hours – the minimum hours a user is required to work (for example if their shift runs from 9:00 am to 5:00 pm (8 hours) with a 30-minute lunch break, you can place 7.5 minimum hours.
Minimum hours do not take into account unpaid breaks.
- Recurring Shift Options
- Never
- Weekly
- Bi-Weekly
- Repeats Until – Toggle on to choose the last day the recurring shifts are applied.
- Days – select the days the shifts will repeat.
- Click on Save to save changes.
DST changes will depend on the timezone set during schedule creation.
Management is allowed to create past shifts up to 30 days.
Management is allowed to change the shift dates.
Shift details for past shifts can now be edited which includes minimum hours, after the update the tool will recalculate and update the Shift attendance report.
After creating a schedule, you will see the schedule plotted on the Schedules screen:
Month View

Week View

Day view

Editing shifts/ adding past schedules
Hubstaff now allows organizational management to create/delete/edit past shifts on the user interface.
To create a past schedule, click on Actions > Create shifts to create a new schedule for a user.
Next, fill in the details below:
-
- Username
- Shift Duration
- From Date
- Shift Start time
- Shift End time
- To Date
- Timezone
- Organization timezone
- Member timezone
- Minimum Hours – the minimum hours a user is required to work (for example if their shift runs from 9:00 am to 5:00 pm (8 hours) with a 30-minute lunch break, you can place 7.5 minimum hours.
- Recurring Shift Options – Usually, past schedules will not require recurring shift options, if this is the case set it to Never.

If the schedule that is being plotted is outside the 30-day limit it will show this error.

Deleting Shifts
You can delete a shift in two ways:
Delete by clicking on a shift
First, by clicking on the shift, then click the Delete button.

After clicking on the shift, you will receive a popup window where you can Delete or Edit the schedule. Click on Delete to remove the schedule. You’ll then see the option to either delete only the specific shift, selected and all future shifts, and all occurrences.

Delete via the actions menu
To delete a shift, you can also do so by clicking on Actions > Delete shifts.

A dialog box will open where you can choose a specific member (or multiple team members) and:
- Delete all future shifts
- Specify the date range where you want the action to apply
- Delete all future recurring shifts

Press the Delete shifts button to confirm.
Add notes to shifts
Besides the shift attendance feature, you can also add notes to shifts (up to 1 day in advance). This allows you to leave notes for your team members, for example, task assignments, etc.
Step 1
To add notes to a shift, click on the shift, then the Edit button.

Step 2
If you’re editing a recurring shift, click on Only this shift then Edit.

Step 3
Add your note, then hit Save.

Step 4
Here’s what your team member sees once the note is saved:

Monitoring schedules
Hubstaff’s attendance scheduling is powerful because it allows you to always know when your employees are working during their shifts or not. You no longer have to chase employees down to find out if they were working or not.
Here are the three types of Schedule notifications:
Early shifts
When a user has a designated shift, and starts working before the shift starts (respective of the grace period in the organization settings, which is set to 5 minutes, by default) a user is marked as early.
Late shifts
If the user doesn’t start tracking time within the first 5 minutes (or depending on the grace period setting, can be extended to 10, 15, 20, or 30 minutes) of when their shift is scheduled to begin, they will be counted as late and a notification will be sent as soon as our the app uploads data to our server.
You can change the Grace period setting by navigating to Settings > All settings > Schedules > Calendar > Grace Period.


Missed shifts
Each team member will receive a missed shift notification if a team member doesn’t track any time during their shift when their shift ends.
Abandoned shifts
A team member will receive an abandoned shift notification when they don’t meet the minimum hour requirement set on a shift.
Team members receive notifications when a shift has been updated or added for them. As the organization owner, you will get summary notifications letting you know of all the late, missed, and abandoned shifts as well (similar to the work summary emails).
Manual time changes (Add, Edit, Delete) affect the schedule computations and the shift is updated accordingly to the manual time change.
Notification Control
You can control the notifications in your organization settings by clicking on the Settings > All settings > Schedules > Calendar > Shift Alerts. You can then enable alerts for users and owners/managers, just users, or never. Like the other Hubstaff settings, you can set this at the organization level or on a user-by-user basis:

Calendar type
You can choose whether users can view 1) Only their own schedules/time offs, or 2) The entire team schedule and time-off entries. To do this, Navigate to Calendar > Schedules > Actions > Schedule Settings.

Toggling the setting to Private will let users see their schedules, and setting it to Collaborative will let users see the team schedules.

Sync Hubstaff schedules to iCal
First, we’ll need to copy the calendar feed URL by navigating to Calendar > Schedules.

Then, click on Actions > Add to my calendar button located above your team schedules.

Next, click the Copy button to get the calendar URL.

Syncing Hubstaff schedules on iCal for OSX
- Open the iCal app.
- Navigate to File > New calendar subscription or press Option (⌥) + Command (⌘) + S.
- Enter the iCal feed URL you copied from the schedules page, then hit Subscribe.
Syncing Hubstaff schedules on iCal for iOS
- Open the iCal app.
- Tap the Calendars button.
- Next, click the Add calendar button.
- Choose the Add subscription calendar option.
- Enter the URL you copied from the dashboard calendar, then hit Subscribe.