10 minutes
Hubstaff Teams Overview
Hubstaff allows you to create Teams within your organization. The Teams feature makes assigning multiple users to a project easier. It also allows you to assign a Team Lead so that you can delegate common day-to-day tasks like creating schedules, setting up user roles and projects, as well as approving timesheets and time offs.
Creating a new team
Step 1
Navigate to People then Teams on the sidebar.

Step 2
Click on the Add team button to create a new Team.

Step 3
Type a name for your new team then hit Next or click on Save and close if you wish to continue setting up your team at a later date.

Step 4
Select Teammates and Team Leads then hit Next.

Team leads manage the team and all the projects assigned to it. Their extra permissions include:
- Approving timesheets (and submitting user timesheets, when enabled)
- Approving modify time requests
- Approving Time Off requests
- Creating schedules for the team
- Create and edit team projects
- Edit team member projects and roles
- View screenshots/activities for other members
- Manage financials
These permissions can be modified through the Team Leads tab on the Edit team dialog here.
Step 5
Choose the project/s for your new Team then hit Save.

After completing the set-up, you’ll receive a notice that your new team has been created:


Editing Teams
To edit an existing team’s name, members and/or projects, navigate to People then Teams on the sidebar menu, then next to the team you wish to edit, click on Actions > Edit team.

Editing the team’s name
On the Edit team dialog, click on the General tab. Assign a new team name, then hit Save.

Editing the team’s members
On the Edit team dialog, click on the Teammates tab then add/remove team members on the Teammates form field, then hit Save.

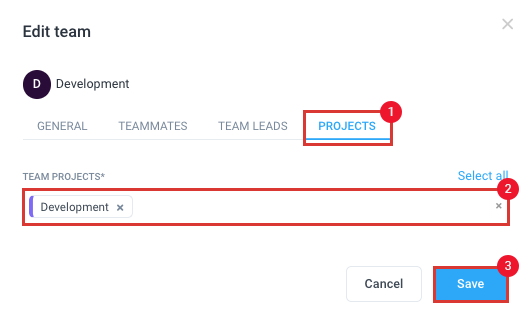
Editing the team’s projects
On the Edit team dialog, click on the Projects tab, then add/remove projects on the Team projects field then hit Save.
Providing manager access to a specific team member as team leads
You can assign one or more users within an existing team as a Team Lead to have manager access. Users assigned as Team leads will be able to approve timesheets, time-offs, and create schedules for the team depending on the access level enabled for them.
Step 1
To assign a Team lead to an existing team, click on People then Teams on the sidebar, then next to the team name, click on Actions > Edit team.
Step 2
Navigate to the Team Leads tab, then choose the team member/s you wish to assign as Team Lead/s.

You can also toggle the individual permissions settings to enable/disable the assigned Team Leads from being able to:
- Approve (and submit) timesheets
- Modify time requests,
- Time-off requests,
- Schedule shifts,
- Create projects, and
- Edit team member and project roles
- You may also adjust notification settings for each permission.
Once you’re done, hit Save.
Team leads can view the schedules of their assigned team members once the “Schedule shifts” feature is enabled regardless of the calendar setting.