38 minutes
Organization Settings in Hubstaff
The Hubstaff organization settings page lets you customize and manage how each Hubstaff feature works within your organization.
To access your organization settings, navigate to Settings on the sidebar.
![]()
Settings

Organization
Company information
To access this setting, navigate to Settings > Organization > Company information
This is where you can edit your organization’s name, address, logo, tax ID, currency, the day when the workweek starts, and timezone.

Security and Login
This section includes settings to make your account more secure. You can enable either or both single sign-on and/or two-factor authentication.
Single Sign-On and SCIM
Single sign-on
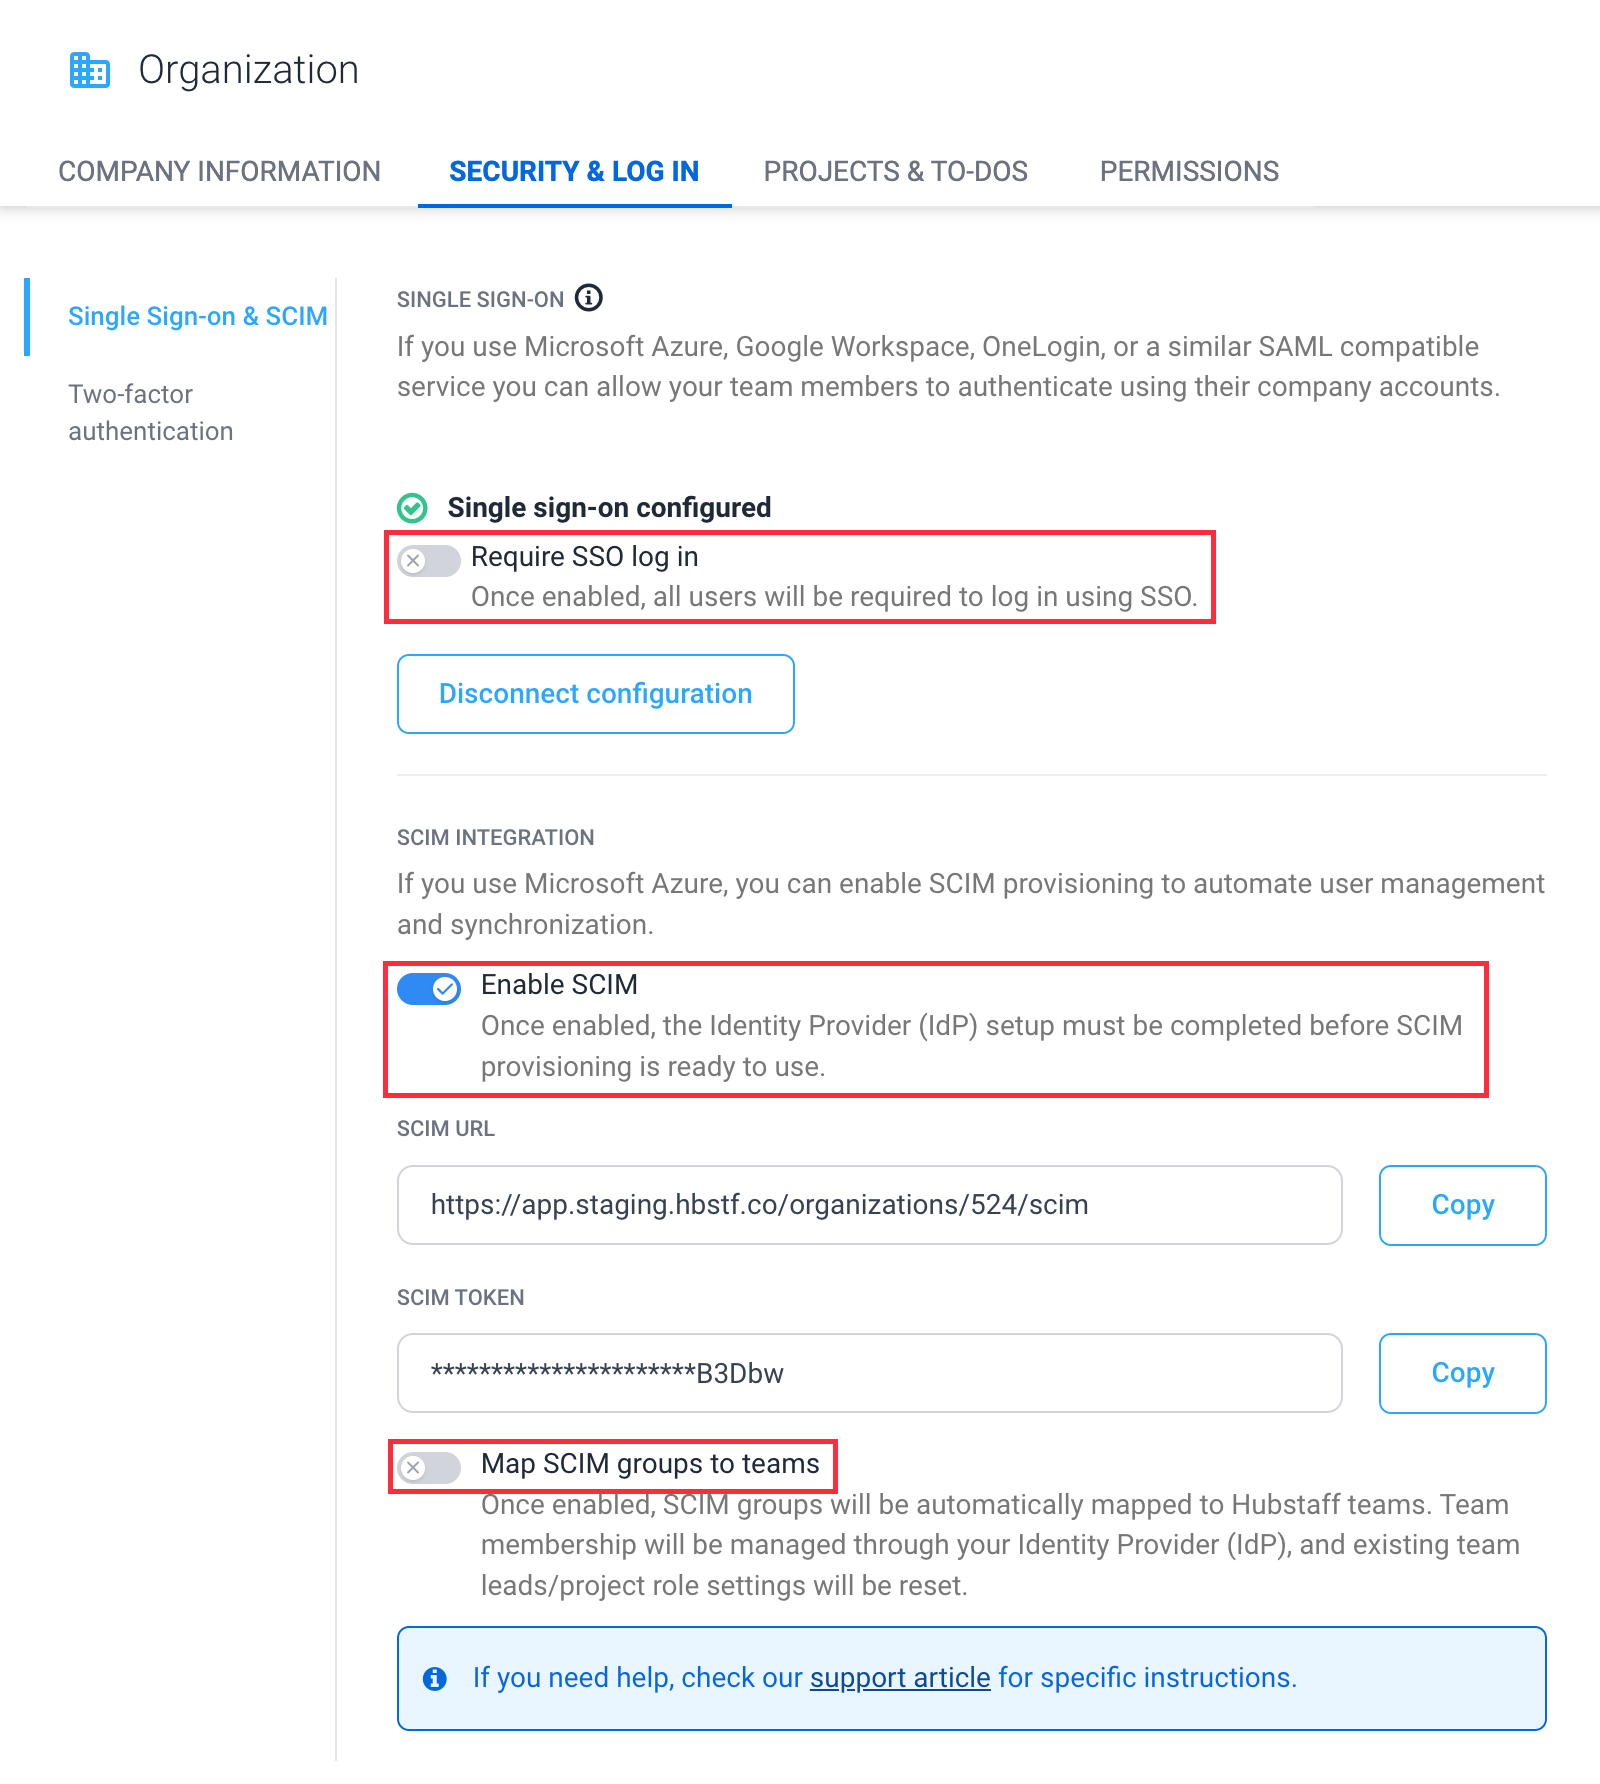
Enabling single sign-on will allow users to sign in to Hubstaff using any of our supported SSO platforms. Toggle the setting to On to enable SSO.
System for Cross-domain Identity Management
If you are using IdP systems such as Microsoft Azure, and wish to link it to Hubstaff for identity management, you can enable SCIM. Optional: you can map SCIM groups to Hubstaff teams as well.
Two-Factor Authentication
Enabling two-factor authentication will require users to authenticate via an authenticator app, or SMS prior to logging in. To enable 2FA, toggle the setting to Required. Organization owners can also reset 2FA for team members via this page.

Projects and to-dos
Default project role
To access this setting, navigate to Settings > Organization > Projects > Default members role.
This setting allows you to choose the default role applied to each member when you create new projects. You can also change the settings for individual team members. For more information about what each role can access, please click here.

Complete to-dos setting
If you’d like to enable or disable to-do completion for your team, navigate to Settings > Organization > Projects > Complete to-dos setting.

By default, the setting is at Everyone, which means all users are able to complete tasks/to-dos. Toggle the setting to Management only so that only owners and managers can mark tasks as completed.
Manage to-dos setting
You can set who will have access to edit or delete to-dos.
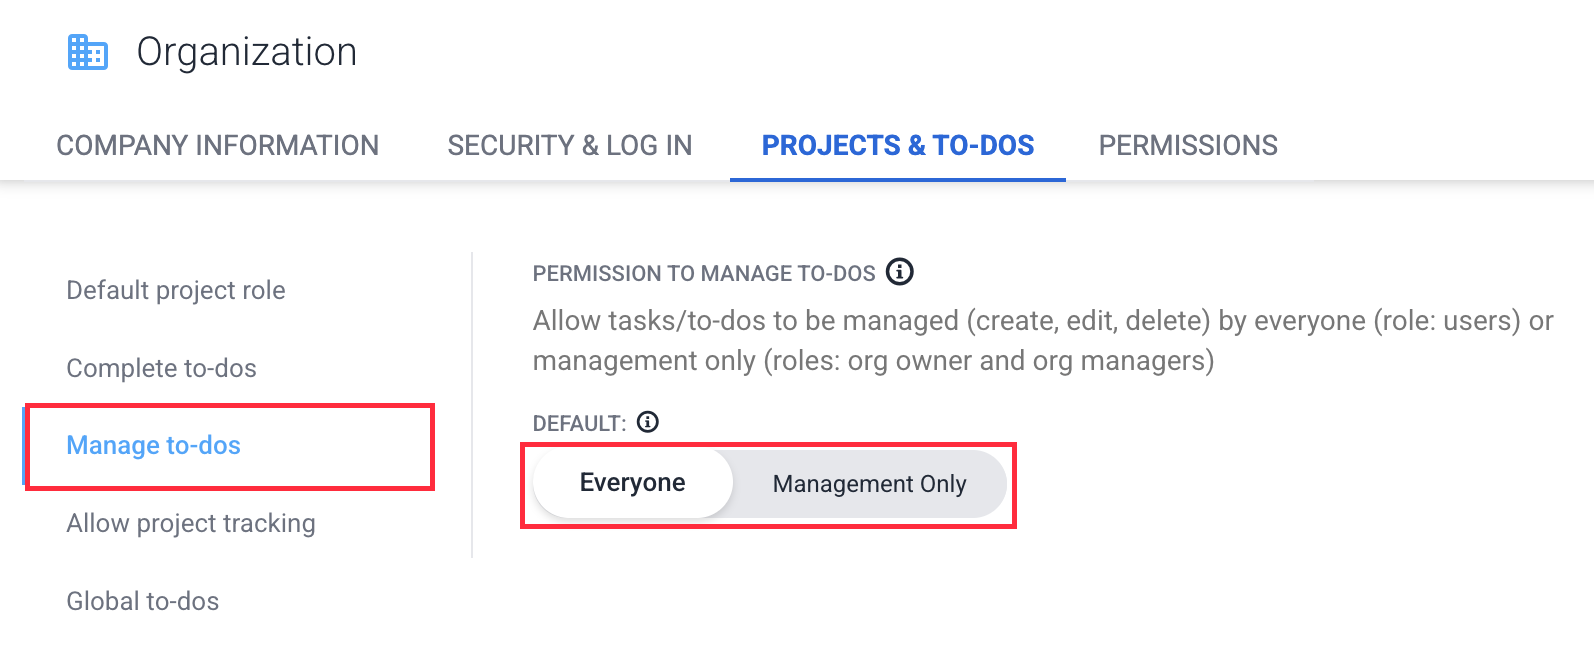
By default, the setting is at Everyone, which means all users are able to edit and delete tasks/to-dos. Toggle the setting to Management only so that only owners and managers can edit and delete tasks/to-dos.
Allow project tracking
Allows you to enable or disable project-level time tracking (tracking time directly to a project).
When disabled, members must select a to-do and cannot track time directly to the project. Toggle the Global setting to apply the setting to all projects, or toggle individual projects.
![]()
Global to-dos
Global to-dos are tasks that can be replicated throughout different projects. You can add a global to-do via the settings page and assign it to specific projects.

When you add a global to-do, you’ll be asked to add the to-do name, the projects you wish to add them to, and an option to add the to-do to all future projects, if you wish.

Permissions
Role permissions
The role permissions tab allows you to set what type of permissions are allowed per role type (Organization manager/project manager/viewer, you can also add a custom role).

Manage IT permission for Users
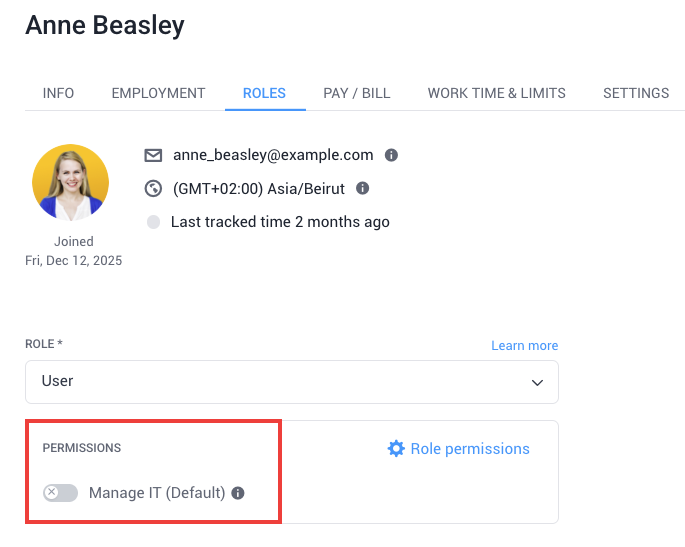
The Manage IT permission is a custom permission that can be assigned to specific members with a User role. It allows them to perform IT support-related tasks — configuring SSO/SCIM, managing automatic tracking policies, and accessing the Silent app setup, without granting them full Manager-level access.
To assign the Manage IT permission:
- Navigate to People → Members → Click on the User’s name → Roles → Permissions
- Enable the Manage IT toggle
- Confirm changes in the pop-up window
- Click Save Changes
This is an individual member-level setting. Once enabled, the permission applies only to the specific User role members to whom you grant it. Enabling it for one user does not automatically grant the permission to other User role members in the organization.
Team permissions
The team permissions tab allows you to toggle the global setting to let team leads manage projects.

Members
Custom fields
This area allows customizations on the member profiles.
Profile fields
The profile fields allow you to add or edit custom fields that appear on member profiles.

Email notifications
This sets whether the members will receive ANY email communication from Hubstaff.

Work time limit
This area shows all the limits of the users’ weekly, daily, day restrictions, and individual limits.

Payments
To access this setting, navigate to Settings > Members > Payments.
This setting works with the Automatic payment feature. You can choose whether to process payments manually or automatically. You can also choose the time payroll is processed based on your organization timezone, or delay your payroll by a specific number of days.
For example, if a user’s payroll is set to Weekly, and the delay is set to 1 day, the user will receive payments on Tuesday, at the time selected by your organization.

Achievements
To access this setting, navigate to Settings > Members > Achievements.
This page allows you to define the achievement metrics for your team from the Achievements Settings page. To learn more about Achievements, click here.
Efficiency pro
This achievement badge is given to members who meet their activity goals every day. For example, if their goal is to achieve a 50% activity percentage on average per day, they will receive this badge if they hit that target.

Productivity champ
This achievement badge is given to members who complete their weekly To-dos goal. For example, if you set their goal to “5”, the team member will receive an award if they complete 5 To-dos by the end of the week.

Time hero
This achievement badge is given to team members who meet or exceed the designated number of working hours that are set as their goal target at the end of each week.

Schedules
Calendar
This area shows your calendar settings and customizations.
To access this setting, navigate to Settings > Schedules > Calendar.
Calendar type
The Calendar type setting allows you to change you team calendar visibility to Private, where users can view everyone’s schedules and time offs, or Collaborative, where everyone can see all schedules and time off entries posted. Organization managers and owners will always be able to view everyone’s schedules regardless of the setting.

Shift alerts
This applies to the Attendance Scheduling, which sends alerts when someone is late, misses, or abandons a shift. You may choose if management or the user receives alerts. You may also choose both or disable notifications for the organization.

Grace period
The grace period setting allows you to change how long before a user is marked as “late.” The default setting applies the changes to the entire organization, and you can also change individual settings for each team member.

Job sites
To access this setting, navigate to Settings > Schedules > Job Sites.
Restrict timer to job sites
This setting allows you to restrict team members from being able to track outside job sites. When the setting is enabled, users will only be able to record time within the range of a specific job site.

Enter/exit notifications
Organization owners and managers can be notified through the mobile app when their team is entering/exiting job sites, this way you’ll know exactly when and where your team is working.

Map
Track Locations (Mobile only)
To access this setting, navigate to Settings > Schedules > Map > Track locations (Mobile Only).
This feature applies to team members who track time through our mobile-based iOS and Android time tracking (GPS enabled) application. Our mobile time-tracking applications for iOS and Android allow your team to track their time and locations on the road or in/ out of the office.
You can choose from any of the settings below:
- Off – disables location tracking.
- Tracking time – records locations when a user is tracking time.
- During shifts – record locations when the app is open and the user has a scheduled shift.
- Always – record locations when the app is open.

Activity and tracking
Activity
To access this setting, navigate to Settings > Activity & tracking > Activity.
Track apps and URLs
This setting allows you to enable/disable recording apps and URLs team members use when working. You may choose to track just Apps or Apps & URLs at the same time.

Data privacy
Turning this setting on will hide group or individual members’ application and URL data recordings adding a layer of privacy.

Record activity
This setting allows you to turn activity tracking ON or OFF. Activity is the percentage of keyboard and mouse activity within a certain time period tracked by a team member. For more information about how we calculate activity levels, click here.

Timesheets
To access this setting, navigate to Settings > Activity & tracking > Timesheets
Timesheet approval
You can change the organization’s default timesheet approval or individual settings on this page.

Modify time
To allow users to be able to add or edit their own time, you will want to enable the Modify Time setting on your organization.
Enabling Require approval when time is added– Manual time approvals allow organization owners, managers, and team leads (when enabled) to review any manual time additions or edits before time is added to the team member’s payable timesheets.

Require reason
This setting allows you to control if you’ll require your users to provide a reason whenever they edit their timesheets. You can enable it for the entire organization or for each individual user.

Time and Tracking
To access this setting, navigate to Settings > Activity & tracking > Time & Tracking
Allowed apps
This allows you to allow/disallow users from being able to record activity on any app besides the desktop application. Once the setting is set to All apps, users will be able to track time on desktop apps, mobile apps, chrome extension, and the web timer. When set to Desktop only, users will only be able to record time using the desktop app.

Idle Timeout
The Idle Timeout setting lets you choose the duration of time before the inactivity warning appears on your team member’s app. The Default setting applies to the whole organization. You can also change individual settings and add custom durations before a user is marked as idle.

Keep Idle Time
The Keep Idle Time organization setting allows you to control the behavior of inactivity (when your team members are inactive for however long you have set in your idle timeout settings – 5, 10, or 20 minutes).

Automatic tracking policy
To ensure accurate data recording for your team members, you can now enable desktop timer auto start/stop during their scheduled shifts, specific times, or whenever there is activity (via the silent app). You can also specify start and end times on selected dates.

Click here to learn more about how to set up automatic start/stop policies.
Screenshots
To access this setting, navigate to Settings > Activity & tracking > Screenshots
Screenshot frequency
This setting allows you to choose how many screenshots should be taken from the member’s computer every 10 minutes.

Screenshot blur
This allows you to obfuscate the image being captured. Note that the blurred image is from the actual screenshot being taken and uploaded to the server.

Delete screenshots
This setting allows you to choose whether to enable/disable the removal of screenshots by your team members. You can change the settings for the organization as a whole, or modify the settings for each individual user.

Insights
App/ URL classifications
To access this setting, navigate to Settings > Insights > App/ URL classifications.
Here you can classify whether an app or a website is:
- Classification – part of your team’s core or non-core work, or if they are unproductive.
- Category – defines what category the application or URL will be grouped on the insights widgets.

Policies
Time off
To access this setting, navigate to Settings > Policies > Time off.
Time off policies
This page allows you to add, edit, or remove existing time-off policies. To learn more about Time Off Policies, click here.

Holidays
This page allows you to add or view existing time-off policies. To learn more about Holidays, click here.

Time off balances
This page allows you to edit the balances of the users.

Work breaks
To access this setting, navigate to Settings > Policies > Work breaks.
Enabling the Work Breaks feature allows you to define and add break policies for your team so that you can keep track of your team’s break times.
Work break policies
Adding work breaks allows your users to track breaks both paid and unpaid. For detailed instructions on how to add a work break policy, click here.

Work break notification
Here you can toggle the Default setting to enable notifications to all team members or change individual user settings.

Overtime
To access this setting, navigate to Settings > Policies > Overtime.
Overtime policies allow organization owners to add a multiplier to team member pay rates when they exceed their weekly work hours. Click here to learn more.

Integrations
To access this setting, navigate to Settings > Integrations > All integrations.
This page shows the organization’s integrations together with the integrations that you can connect. You can add, remove, reauthenticate, and view all your connected integrations here.

Billing
Billing information
To access this setting, navigate to Settings > Billing > Billing information.
Here, you can upgrade/downgrade your plan subscription, change your card details, view your billing history, and download Hubstaff subscription invoices.`
On this page, you can:
- Check your current subscription plan
- Change your subscription plan
- View your current credit card information
- Change the credit card being used to pay for the account
- Remove the credit card from your account
- View billing history
- Sign up for optional add-ons

Subscription invoices
On this page, you will be able to check and download your past invoices and view your upcoming invoice.

Subscription settings
The subscription settings page allows you to customize the information that you want to be displayed on your subscription invoices. You can also control on how will receive the invoices.

Client invoice
This setting allows you to input specific information which will be added automatically to invoices you create. You can add the following information:
- Address
- Logo
- Tax ID
- Tax Rate
- Notes
- Net Terms
- Auto invoicing – toggle to turn automatic invoicing on/off
- Amounts based on – choose from hourly/fixed amounts to bill on automatic invoices.
- Frequency – send automatic invoices from 3 set frequencies: Monthly, Weekly, Bi-weekly.
- Delay sending – add a daily delay for sending automatic invoices.
- Send reminders to pay after due – sends an automatic reminder based on x number of days.
- Line items – choose the format for line items on the automatic invoice.
- Include non-billable time – toggle the setting to include time marked as non-billable.

Show/hide features
This page allows you to show or hide the features of Hubstaff. Once a feature is enabled it will show up on the left sidebar of the page.
