13 minutes
ClickUp Hubstaff Time Tracking Setup
You can track time to your ClickUp tasks with Hubstaff and have the time records synced back to each task page in ClickUp. Below we will show you how to add ClickUp to your Hubstaff account so your team can track time to ClickUp tasks directly from the Hubstaff timer application.

You must connect your account in order to see the tasks that are assigned to you. Also, connecting an integration allows for time to be sent back to the third-party software.
Only the user with an Owner/Organization manager role on Hubstaff can set up an integration.
To learn more about how to connect ClickUp to Hubstaff, please follow the steps below:
To get started make sure that you have created a space > folder > list inside your ClickUp integration.

Step 1
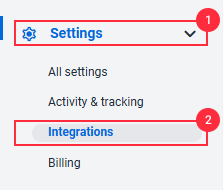
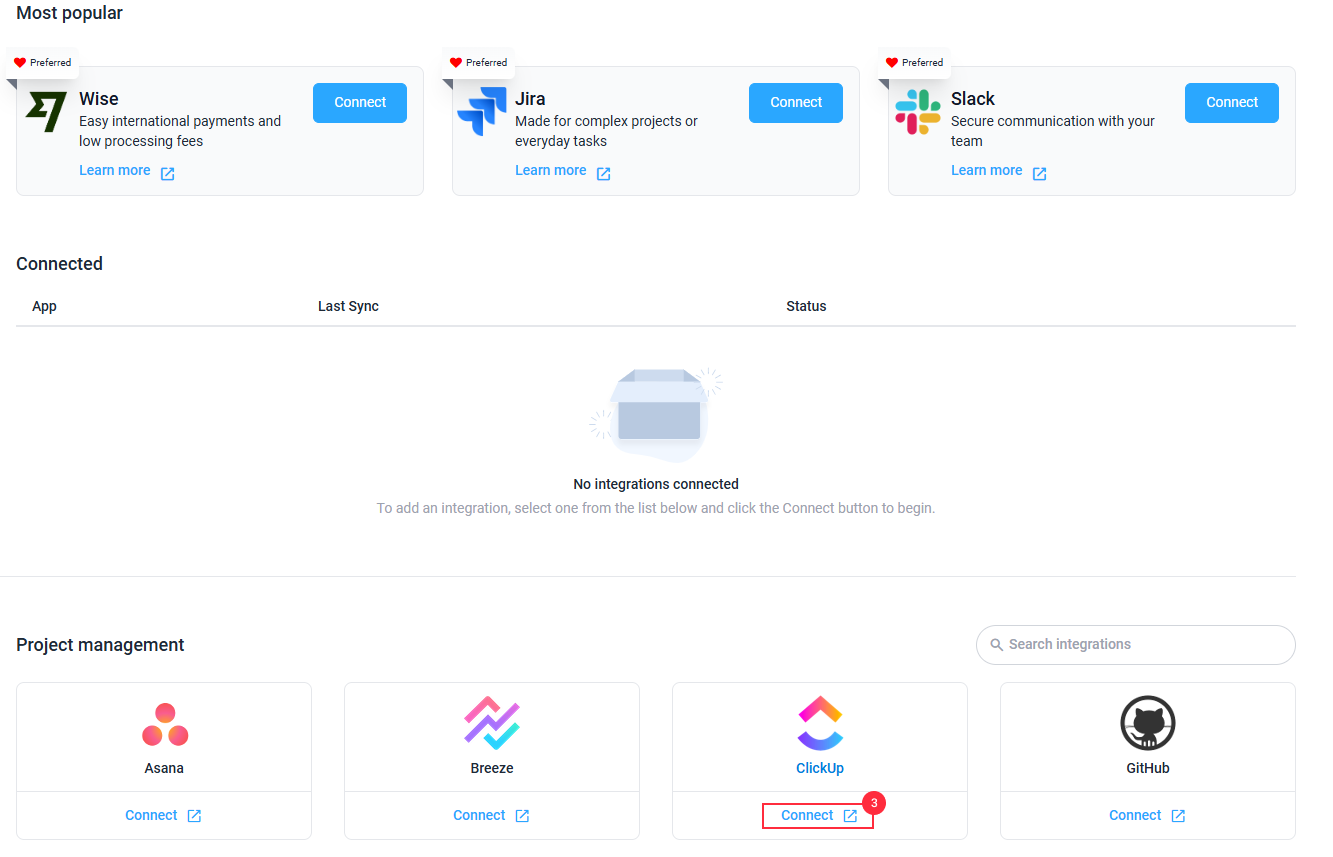
Make sure you have selected the correct organization on the top right corner of the page, then click on Settings > Integrations on the sidebar. Select the ClickUp logo from the list of available integrations.
Step 2
Enter your preferred integration name, then click Next.

Step 3
You will need to grant Hubstaff access to your ClickUp account. If you are already logged into your ClickUp account, you won’t be asked to log in again.
Select the workspace you wish to integrate, then click on Connect Workspace to authorize Hubstaff to connect to your ClickUp account.
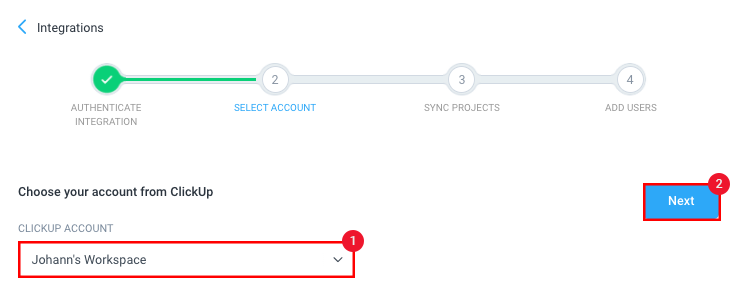
Step 4
After successful authorization, choose the ClickUp workspace that you want to integrate. Click Next.
Step 5
You’ll be taken to the Sync projects page where you can choose whether to sync all projects from ClickUp or select from a list of ClickUp projects to connect to Hubstaff projects.
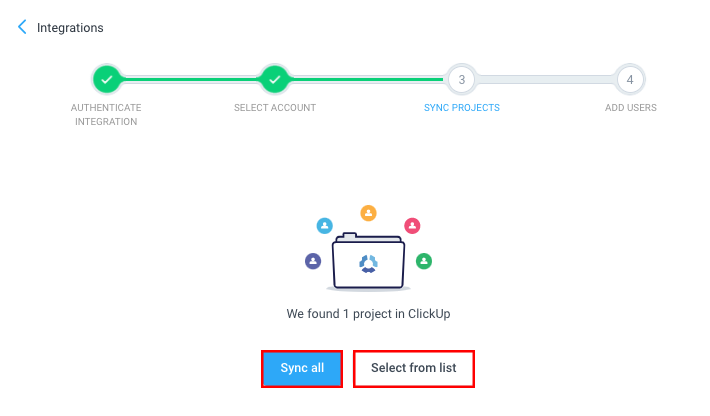
- Sync all – all projects are synced to Hubstaff, and if a project with the same name doesn’t exist, each new project will automatically be created and synced once you click on the Confirm button.

- Select from list – allows you to choose which projects to connect to Hubstaff. Check or uncheck project names on the left column. You can also enable the “Sync new projects daily” setting so all new projects are automatically linked to Hubstaff. You can also choose to manually sync projects. Choose either “Select All,” or “Unselect All,” or manually choose each project you wish to link to Hubstaff. Click on “Next” to move to the next step.

ClickUp Space name = Hubstaff project name If it’s a Space with Folder, when Folders are connected, in Hubstaff we will map the name of the Space as well:
e.g.: {ClickUp Space name} {ClickUp Folder name} = My ClickUp Space Awesome Project no. 1.
The Hubstaff integration will only be able to see folders and lists that are public. Private folders and lists will not be captured by the integration. To make the folder or lists visible you can change the settings to public under the Sharing & permission setting.
Step 6
Next, you’ll need to connect users to your integration. Make sure the “Auto-add new users” option is enabled so that all new users added to Hubstaff are automatically added to your integration. You can also choose to “Select all,” “Unselect all,” or manually choose which users you want working on your integration. Click Finish to end the setup.

Each user will be sent a confirmation email with a link to authenticate their account.
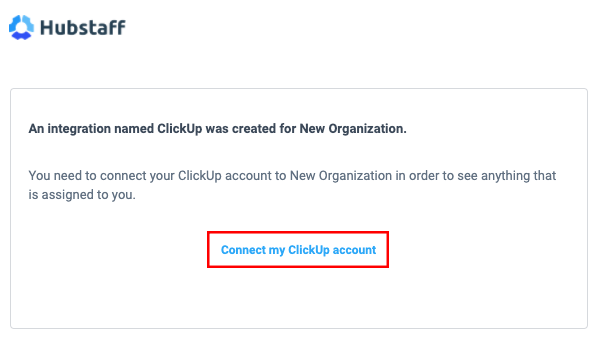
After clicking the Connect button, users will be taken to the Authorize integration dialog.

After authenticating, they will be connected to your integration and will see the tasks assigned on the To-dos page:

Step 7
Tasks assigned in integrated ClickUp projects should appear on the Hubstaff application tasks pane. Click the Play button next to the task to start tracking time.
![]()
After tracking time to a ClickUp task, and depending on your integration’s time logging settings, the time will be written back to ClickUp as a comment:
Tasks might not sync right away. It can take approximately 5 minutes after linking your team. Also, please keep in mind that each time you add a new project or user to your project management tool, the integration needs be refreshed in Hubstaff for those changes to take effect, then link those accordingly. You may also manually retry synchronization by following the steps here.
We only currently support syncing of tasks inside of a ClickUp Space or Folder. Folder-less lists are not supported.
We only currently support syncing of individual task (to-do), ClickUp Teams (User Groups) is not yet supported. Recurring tasks are not supported.
Tasks can be completed outside Hubstaff in the project management tool to have the time synced as well.
This integration supports logging time back to the integration as time entries. To learn more, click here.
Tasks synchronized with the integration are removed when the integration is deleted. Previously tracked time on these tasks will remain accessible when generating reports based on applicable durations in our Data Retention guide here.