19 minutes
How to set up Work Breaks
Enabling the Work Breaks feature allows you to define and add break policies for your team so that you can keep track of your team’s break times.
Adding a work break policy
Step 1
To add a work break policy, navigate to Settings > All settings.

Step 2
Select Work Breaks under Policies.

Step 3
Click on the Add Policy button.
Step 4
The Add work break policy dialog will pop up.
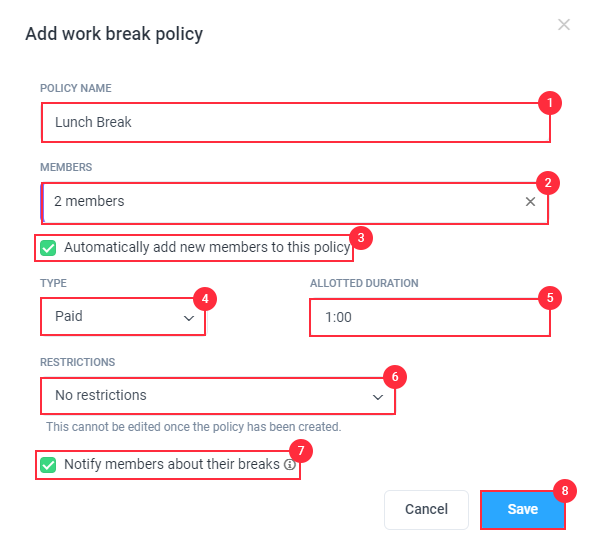
Fill in the following:
- Policy name
- Members
- Automatically add new members to this policy
- Choose if the break time is paid or unpaid. Paid breaks count towards user limits while unpaid breaks do not.
- Allotted duration of the break
- Restrictions:
- No restrictions – allows users to take any number of breaks.
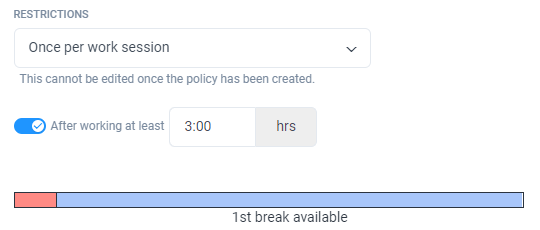
- Once per work session – allows users to take 1 break for every session of time. Can be limited to a break after X amount of work hours.
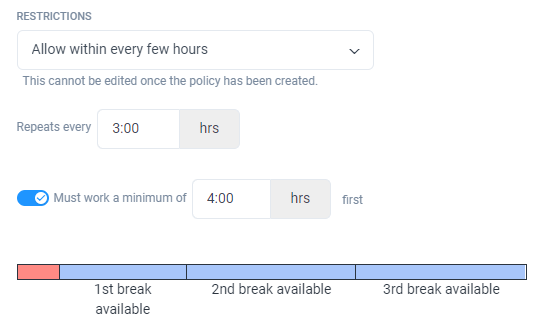
- Allow within every few hours – allows users to take breaks within a set number of hours. Organization owners can set the frequency as well as a minimum required number of hours before the user can take breaks.
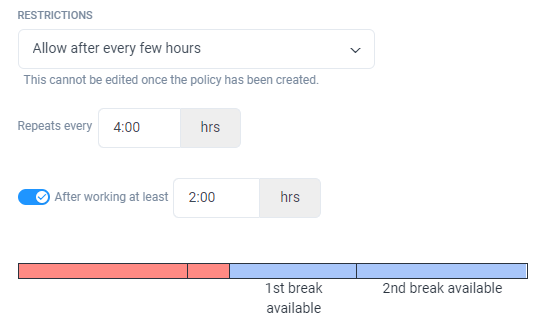
- Allow after every few hours – allows users to take breaks only after a set number of hours. Organization owners can set the frequency and the minimum number of hours worked before taking breaks.
- Notify members about their breaks: Members will receive a notification once their break is available to take (When applicable)
Hit Save to finish setting up your break policy.
Work break notification settings
To modify work break notifications, navigate to Settings > All Settings > Work Breaks > Work break notifications. Here you can toggle the Default setting to enable notifications to all team members or change individual user settings.

Tracking time to a work break policy
Desktop Timer Application
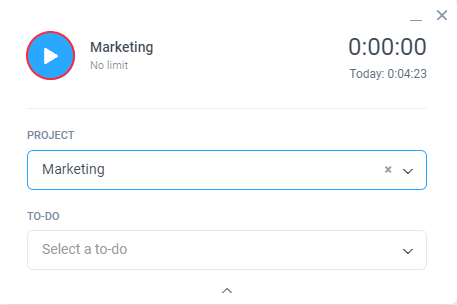
Step 1
Start tracking time for a project/task.
![]()
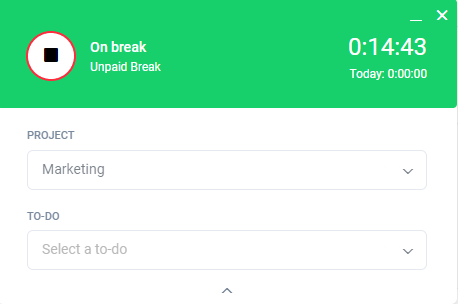
Step 2
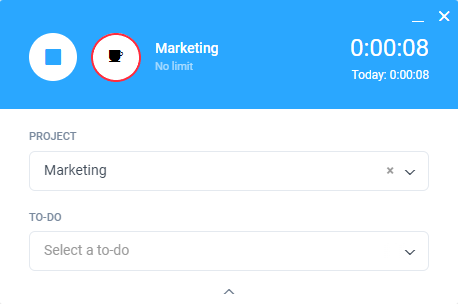
Click on the Break icon.
![]()
Step 3
Click the Stop button to resume tracking time.
![]()
Web Timer
Step 1
Start tracking time for a project/task by pressing the Play button.

Step 2
Click on the Break button next to the stop button to take a break.

Step 3
The background will turn green while you are on break, and the break policy name will appear under the On break status. Press the Stop button to end your break.
Mobile Apps
Step 1
Start tracking time for a project/task by pressing the Play button.

Step 2
Click on the Break button to take a break.

Step 3
You’ll notice the break status and the break policy name below it. Press the Stop button to end your break.

After stopping a break, the timer will automatically resume tracking time on the last known task.
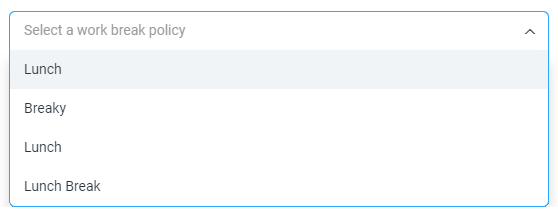
Choosing from several work break policies available
Depending on your work break policy restrictions, users may have multiple work breaks available at a time for them to take. Users will be able to choose one break from the drop-down list by following these steps:
Step 1
Start tracking time for a project/task by pressing the Play button.
Step 2
Click on the Break button next to the stop button to take a break.
Step 3
Click on the Select a work break policy drop-down list to view the available work breaks.
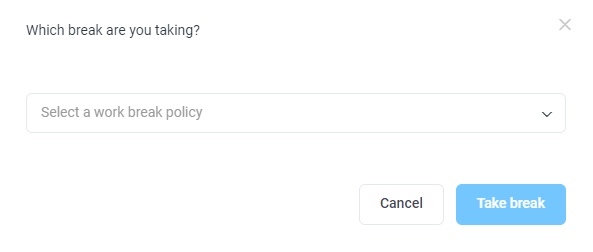
Step 4
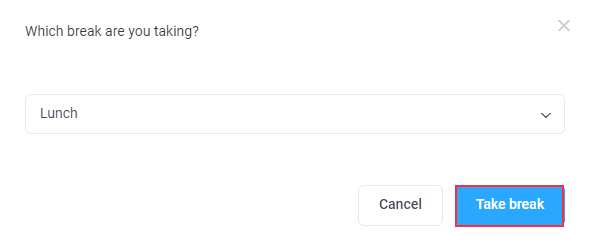
Click on the desired work break policy from the drop-down list.
Step 5
Click on the Take break button.
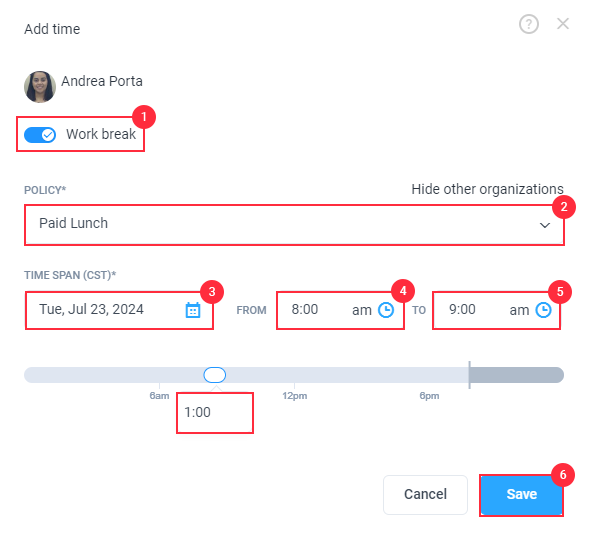
Adding breaks manually
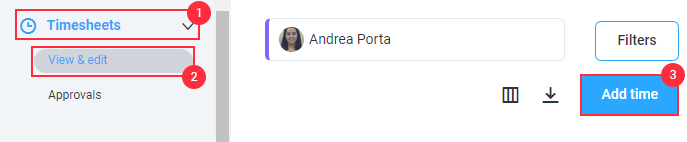
Your team can also add breaks manually once they’ve been added to a break policy.
Step 1
To do this, navigate to Timesheets -> View and edit -> Add Time.
Step 2
The Add Time dialog will appear. Toggle the work break icon then choose the date/time. Once finished, hit Save to commit your changes.
Unpaid work breaks do not count against your daily schedule minimum hours requirement, while paid breaks are counted.
Paid work breaks count against daily and weekly limits.
Paid breaks count towards PTO accruals and unpaid breaks are not included.
When a break limit is reached, the timer turns negative, and succeeding time tracked to breaks is tracked as unpaid time.
If a user fails to take a break, the manager/owner will receive an abandoned break notification within 2 hours.
If you use the “once per work session” rule on a work break policy, please note that a work session begins when a user starts tracking time on a given day and ends after they stop tracking time for 4 hours or more. Therefore, that break can only be taken once. If users have a 1-hour lunch break and they only take 30 minutes, they won’t be able to take the remaining of their lunch break a second time in the work session.
Both paid and unpaid breaks are counted on the overall time track on the timesheet pages (Daily, Weekly, Calendar).
If the Break button appears greyed out and not clickable, this is because you have not qualified for a break yet based on the organization’s break policy you have been assigned to. It is also possible that you haven’t yet been assigned to a break policy or your company has not set up work breaks yet. Contact your manager to ask about the work break policy setup for you.
Users on break will appear on the dashboard under the Who’s Online widget with a “on break” next to their status indicator. Note: The online status updates in real time.
