9 minutes
Idle Time alert (inactivity warning)
The Idle Time Alert/Inactivity Warning records how long a user has been idle or inactive during a time tracking session and asks the user whether they’d like to keep or discard the time (when enabled).
This feature works with the Desktop App and the Chrome Extension. It is not available on our Web Timer, or Mobile App. To learn more about what features each of our time-tracking applications offers, click here.
While it is easy to start/stop the Hubstaff App when the user starts or finishes work, sometimes, they might forget to start or stop the timer. The Idle Time Alert may appear in various real-world scenarios, such as:
- Attending meetings without using a keyboard or mouse
- Taking a lunch break or short rest
- Stepping away for a phone call or in-person conversation
- Reviewing physical documents or writing notes by hand
- Being away from the desk unintentionally with the timer still running
Hubstaff has included features that prompt/remind users to track time in such situations. One such feature is the Idle Time/Inactivity Warning. This article explains its purpose and how to use it to track your work time more effectively.
How does the Idle Time Alert/Inactivity Warning work?
Hubstaff’s desktop timer is designed to detect inactivity. The Idle Time feature (if set to Prompt) always prompts the user to decide whether or not to keep the idle time. This happens every 5 minutes by default. This setting, however, can be modified at any time by using the Idle Timeout settings. The available intervals are every 5, 10, 20 minutes, custom, or never.
Let’s see how it works:
Whenever the user doesn’t use the system or goes idle for the specified interval of time, the application displays the following Idle Time Alert / Inactivity Warning window:

Keep Idle Time
The user can check the box to Keep Idle Time, which will then be added to their tracked time log under the current project.
Additionally, the user can Reassign idle time to a different project. By clicking on Reassign idle time, you’ll see a new screen that looks as follows:

Following that, the user can select the project they want to allocate time to and click Assign. This assigns the Idle Time to the selected project.
Discard Idle Time
The user can choose not to keep idle time in the tracked time log by clicking on the Resume button and selecting the No, discard idle time radio button. As a result, the time tracking will continue, but the idle time will be removed from their time log.

In addition, the user can stop the timer from the idle window by selecting the Stop button.
Here is an example of how this feature works –
Assume the user attends to a phone call. Your organization has an Idle Time setting of 20 minutes. During the call, if the employee keeps using the mouse or keyboard, they will not receive any inactivity warnings.
However, if they have not used their mouse or keyboard for a continuous 20 minutes or more, Idle Time will be activated. When they interact with their system again, the Idle Time / Inactivity Warning window will prompt them with the message “You have been idle for X minutes” (X = the number of minutes the user has been idle)
The Idle Time / Inactivity Warning prompt window does not appear until 20 minutes of continuous inactivity has passed.
Filtering Idle Time in Screenshots and Timesheets
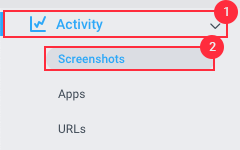
To filter Idle Time, navigate to one of these pages:
Activity > Screenshots
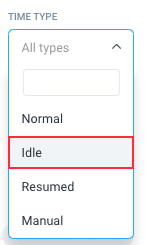
Timesheets > View & edit

Select the Idle option from the Time Type drop-down filter on either page as shown below:
Deleting screenshots of Idle Time in Hubstaff
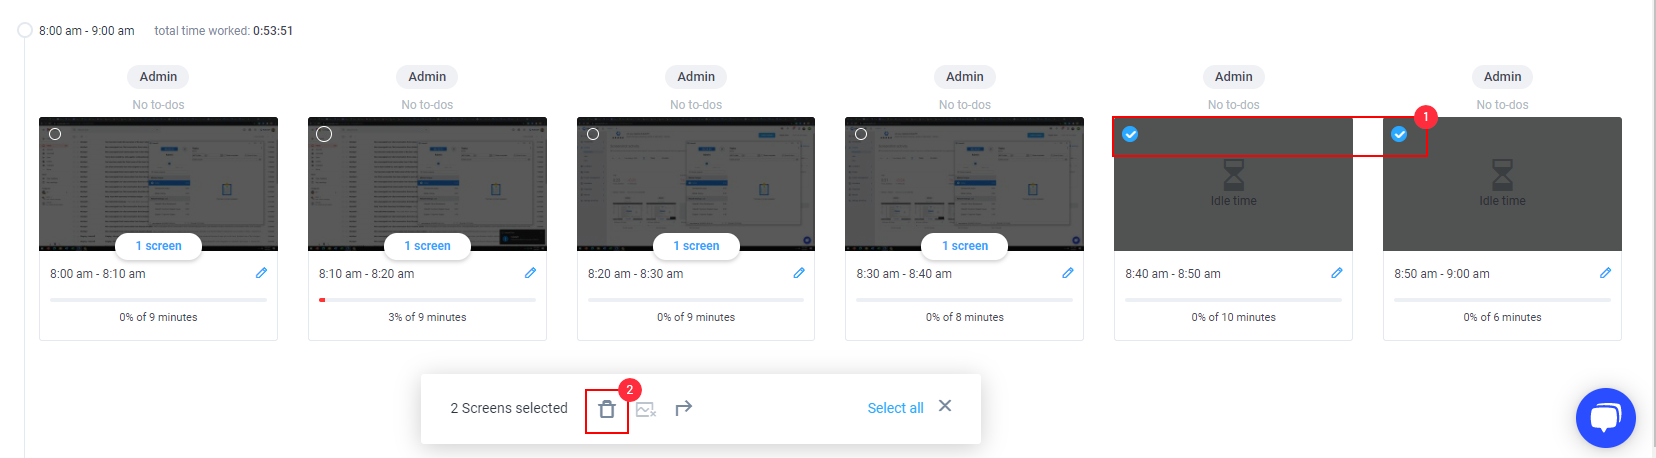
To remove screenshots with idle time, go to the Activity > Screenshots page on the sidebar menu.
Next, select the Idle option from the Time Type filters on the Screenshots page. Select the Screenshots you wish to remove and click the Delete screenshot thumbnail icon as shown below:
This feature can also be enabled/disabled on the project level.
CAUTION – When time entries/screenshots are deleted, data is permanently deleted from the server and cannot be retrieved.