38 minutes
Hubstaff Payroll Overview
Hubstaff makes team payments easy by converting tracked hours into payments — automatically or manually — through our supported payment providers: Wise, PayPal, Payoneer, Bitwage, and HRIS integrations, including Deel and Gusto.
You can also pay your team outside of Hubstaff and simply mark hours as paid, or export payment calculations for use in an external system. Timesheet approvals are available to review your team’s time before payroll runs automatically.
Hubstaff does not store any funds. Payments are sent directly from the organization owner’s payment account to the team member’s receiving account.
Getting started: The Financials Overview page
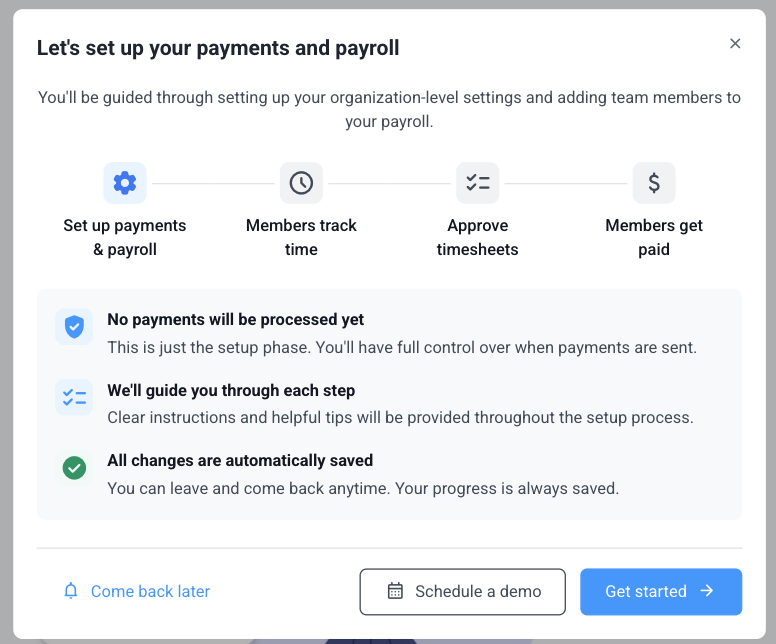
When you navigate to Financials for the first time, you’ll land on the Overview page.
From here you can:
- Click Get started now to begin the guided payroll setup
- Schedule a demo with the Hubstaff team
- Review available payment providers and their benefits

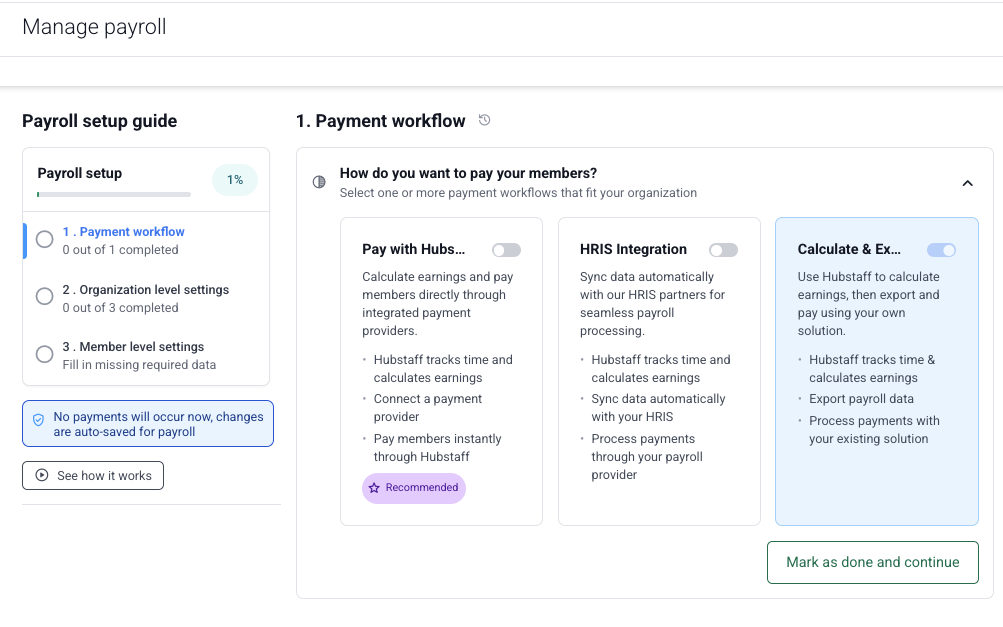
Setting up payroll: The Manage Payroll page
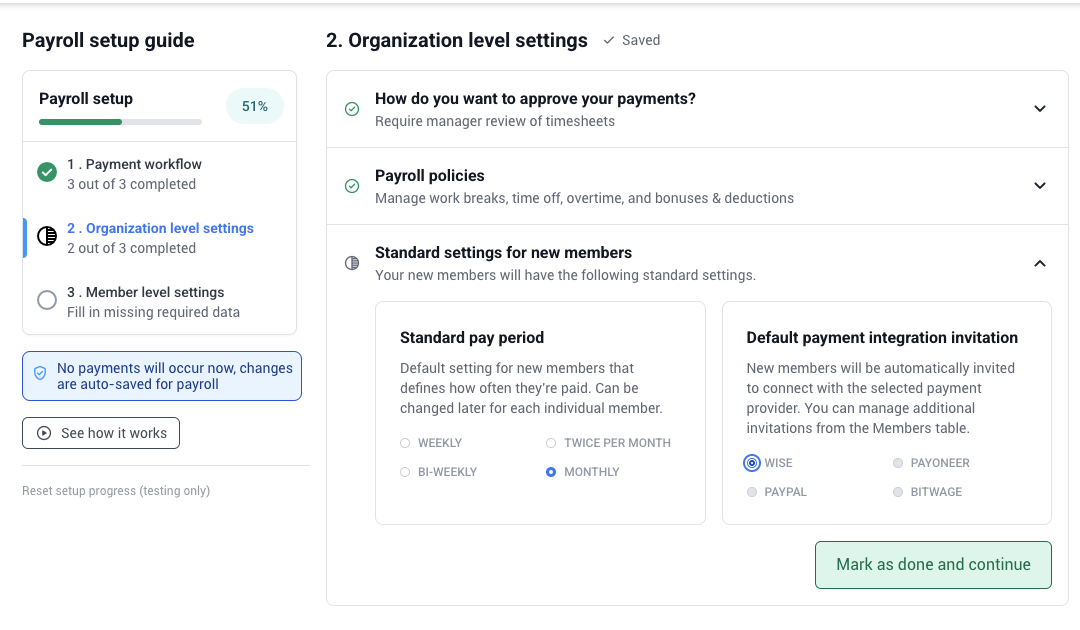
Once you click Get started, Hubstaff opens the Manage Payroll page in Setup mode. A progress bar at the top tracks your completion across three main sections:
- Payment Workflow — Choose how you want to pay your team (Hubstaff payment providers, Calculate & Export, or HRIS integration) and connect your payment accounts
- Organization-level settings — Set your payment approval method (automatic or manual), configure payroll policies, and define default settings for new members
- Member settings — Add members to payroll, set pay rates, connect integrations, and assign policies
You can work through sections in order. Some steps become available only after completing a prerequisite — for example, you can’t invite members to a payment integration until the business-level integration is connected.
Payment Workflow
Select one or more workflows to pay your team:
- Hubstaff payment providers — Connect Wise, PayPal, Payoneer, Bitwage, Deel, or Gusto directly
- Calculate & Export — Export payment calculations to pay your team outside Hubstaff
- HRIS integration — Sync tracked hours with your HRIS platform (Deel or Gusto)
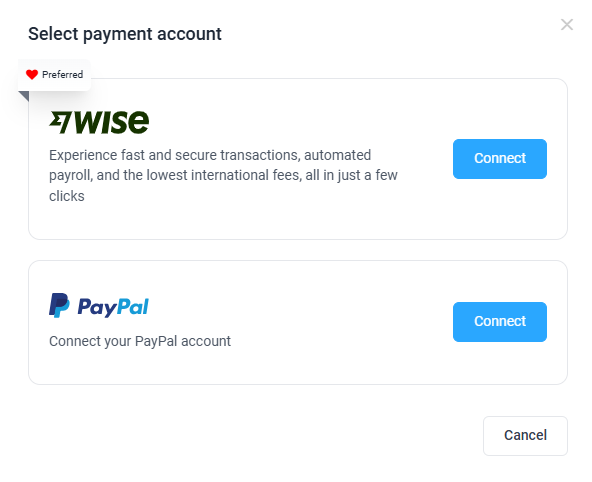
Connecting a payment provider
Step 1
Select your preferred payment provider.
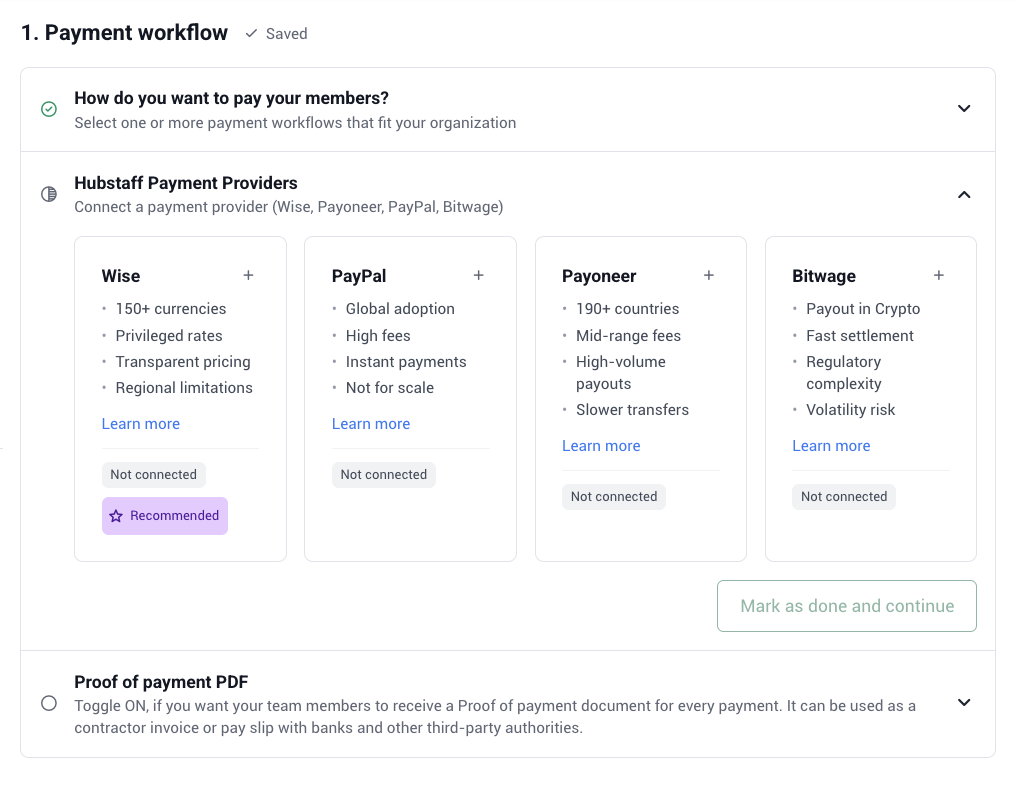
Step 2
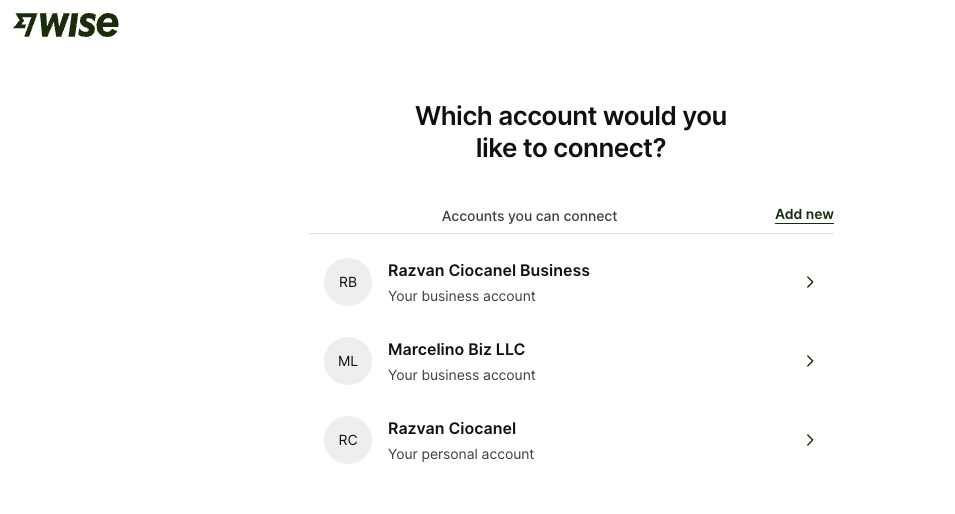
Connect your payer business account.

Step 3
Select the business account you’d like to link.
Step 4
Allow Hubstaff to access your account.
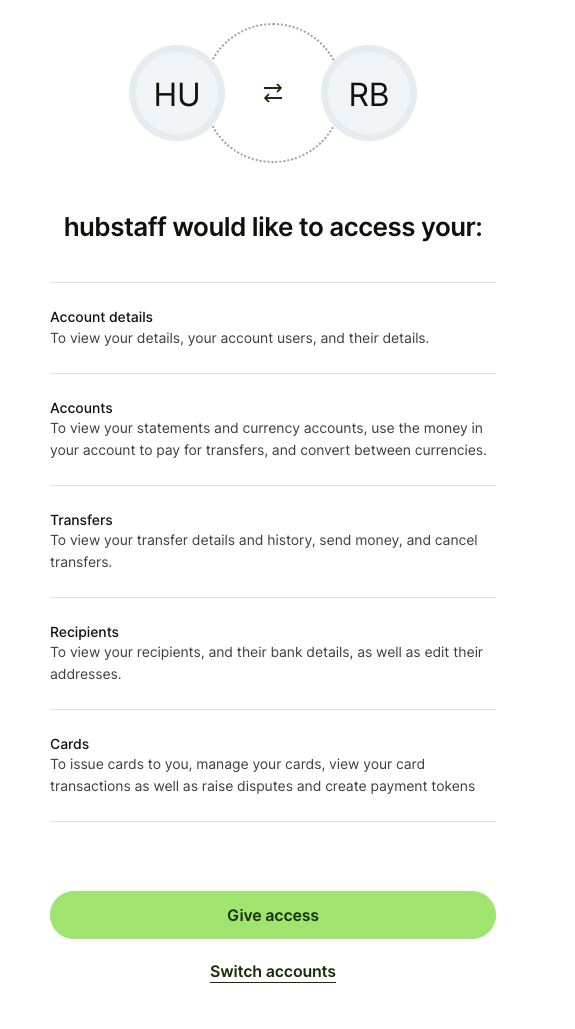
Once connected, the integration will show a Connected status on the Payment Workflow section.
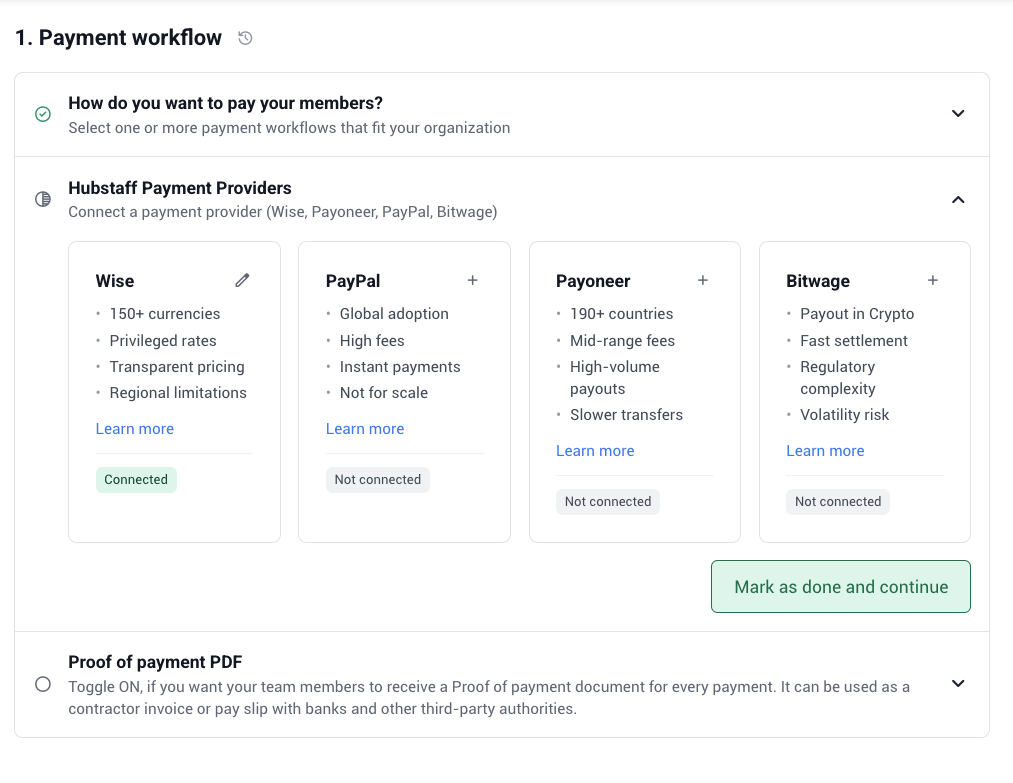
You’ll also have the option to allow team members to receive a proof of payment document for every payment processed.
Make sure to click “Mark as done and continue” for each section. Once you do, you’ll be able to proceed to the next step, and the Payroll Setup progress bar will update accordingly.
For provider-specific setup guides, see:
- Add Deel payment account
- Add Wise payment account
- Add Payoneer payment account
- Add BitWage payment account
- Add PayPal payment account
- Add Gusto payment account
Organization-level settings
Configure how payroll runs for your entire organization. Here, you can choose whether to process payroll automatically or manually, manage payroll policies such as work breaks, time off, overtime, bonuses, and deductions, and configure pay periods and primary payment integrations for your team.
Setting up Automatic or Manual payments
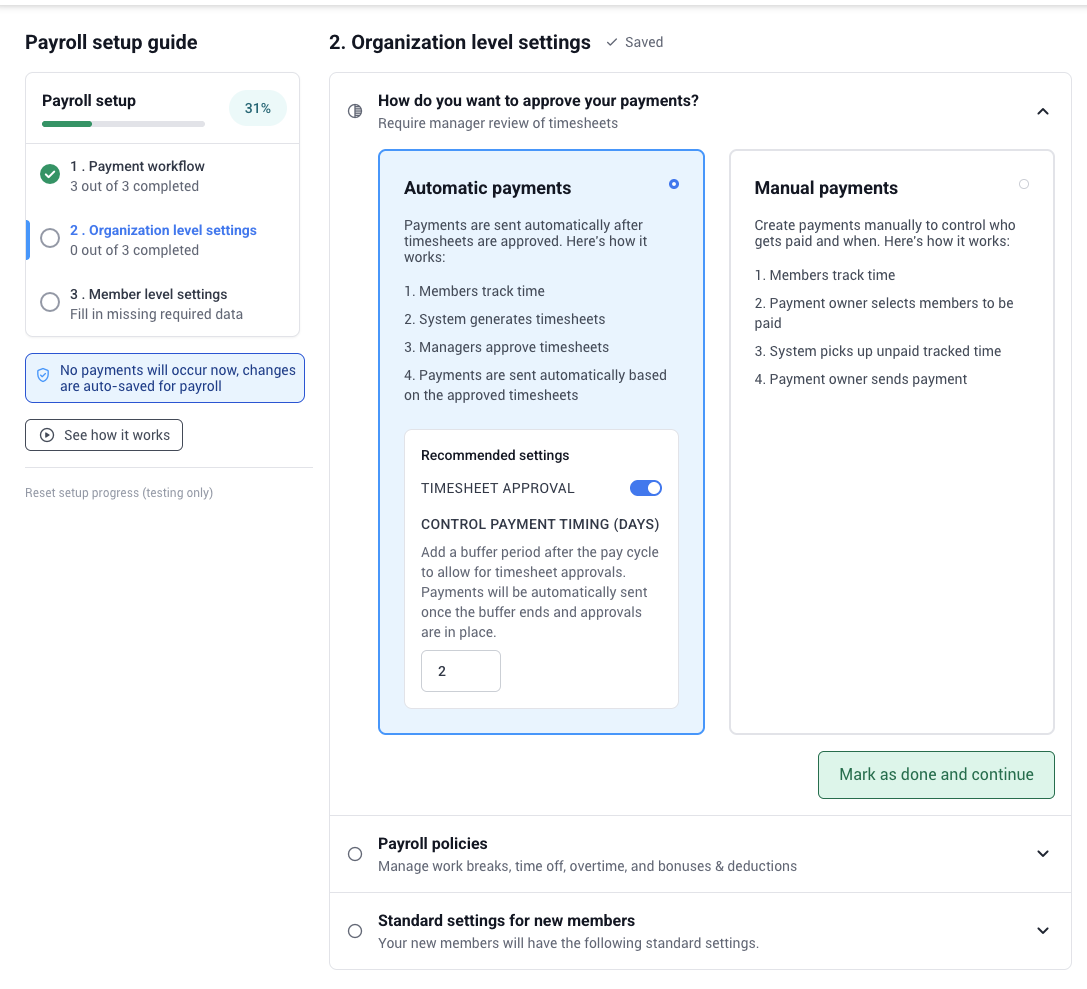
Automatic vs. manual payments
Automatic payments
Payroll runs at the end of each pay period. Timesheet approvals are enabled by default and strongly recommended before enabling automatic payments.
Manual payments
You trigger each payment manually. Timesheet approvals are optional. Note that fixed rates can only be paid via automatic payments or timesheet approvals — not manual payments.
Timesheet Approvals
Timesheet approvals let you review your team’s time before payroll processes. When enabled:
- A new timesheet is created for each member via Timesheets → Approvals
- Once timesheets are approved, submitted, or marked as paid, the date range is locked from further time edits until the next day
To learn more, see our article on Timesheet Approvals.
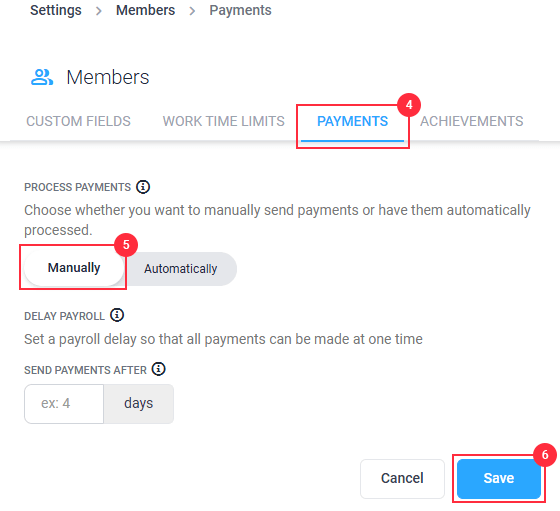
Payment Approval Window
Add a buffer period between the end of a pay cycle and when payments are processed. This gives managers time to review and approve timesheets before payroll runs. The default is 2 days — we recommend keeping it at this setting to avoid processing errors, but you can set any number of days that best fits your workflow.
Example: If payroll is set to Weekly (paid every Monday) with a 3-day window, payments will process on Thursday each week.
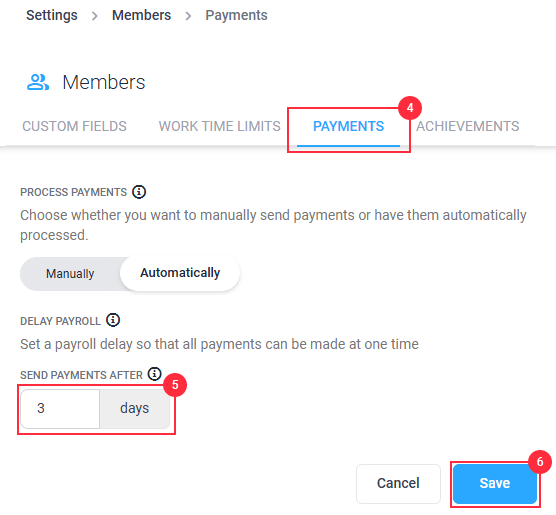
You can also adjust this outside the Manage Payroll page via Settings → All Settings → Members → Payments → Delay Payroll → Send payments after.

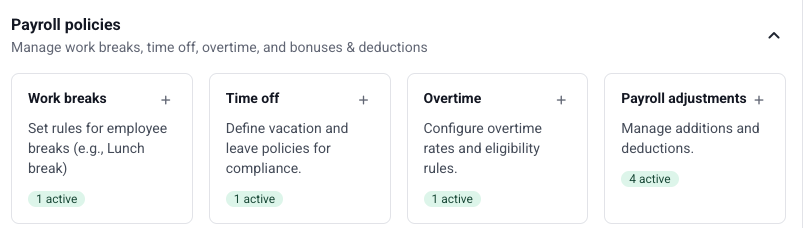
Payroll policies and default settings
From this section, you can also:
- Manage work breaks, time off, overtime, bonuses, and deductions policies
- Configure default pay period and default payment integration applied to new members when they join
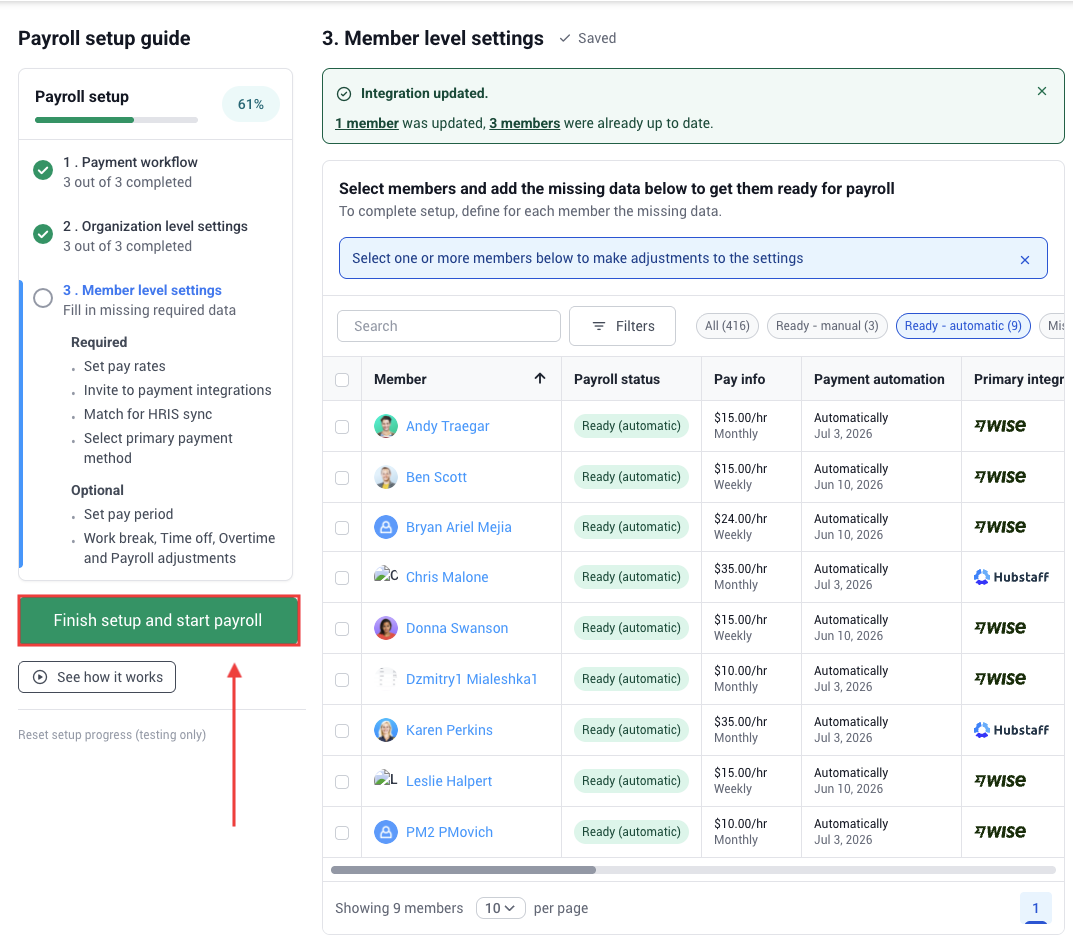
Member-level settings
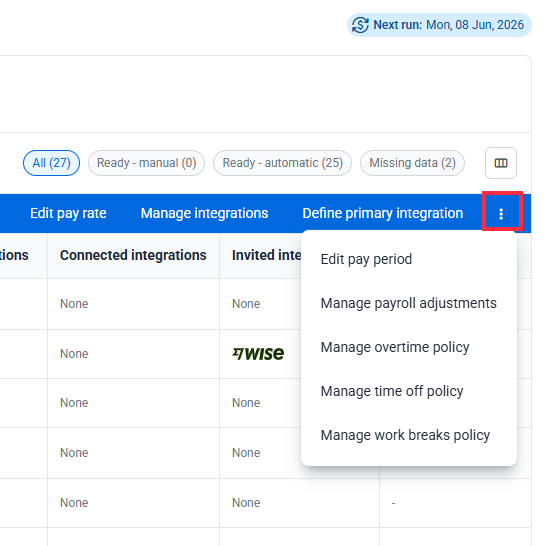
Lastly, in the Member-level settings, you can manage multiple member settings in bulk. This includes editing pay rates, managing payment integrations, setting primary integrations, and other payroll-related configurations for one or more members at the same time.
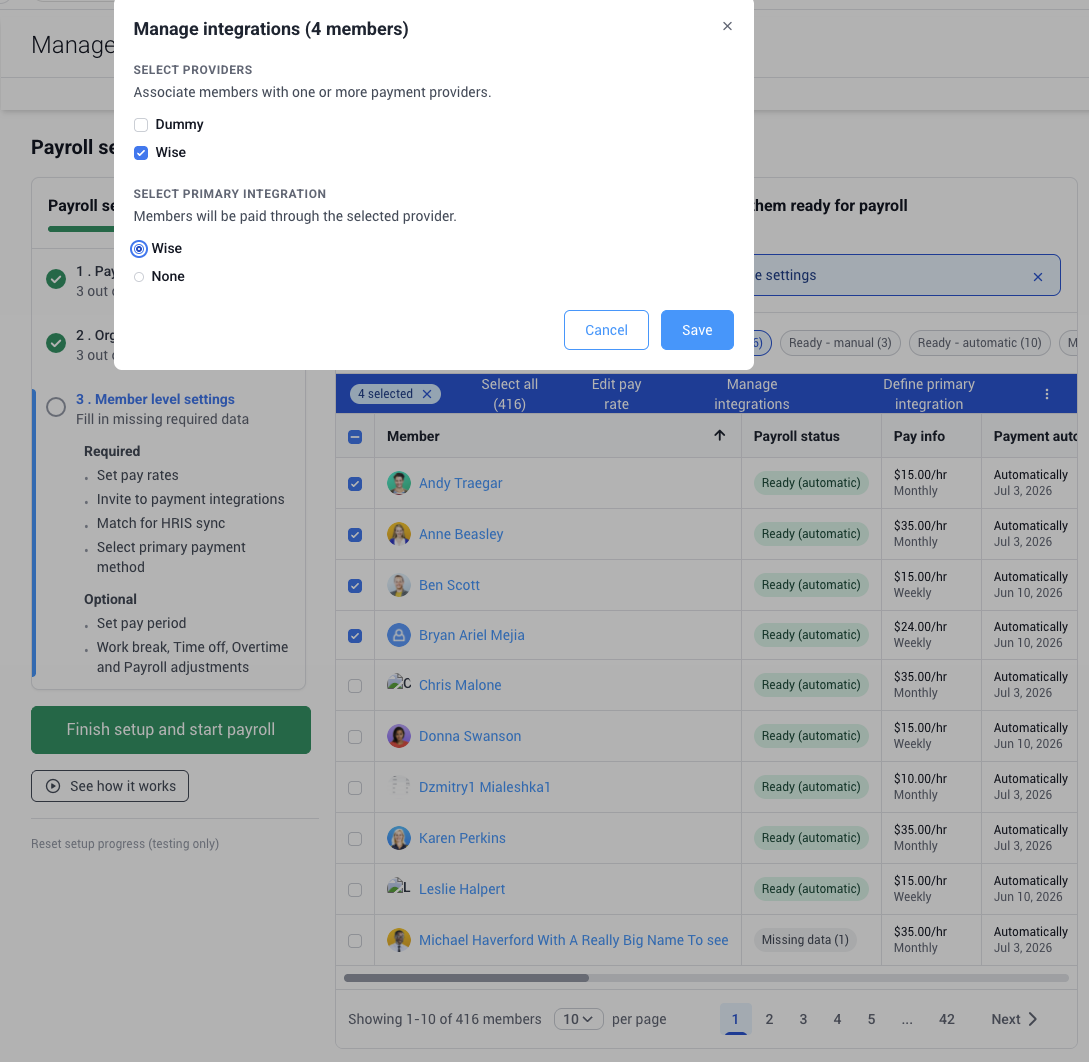
The members table
Each row in the members table shows a member’s current payroll configuration:
| Column | What it shows |
| Payroll status | Whether the member is ready for payroll or has missing settings |
| Pay info | Pay rate, pay type (hourly/fixed), and pay period |
| Payment automation | Automatic or manual, and next payment due date |
| Primary integrations | Which integration is set as primary and its status |
| Payroll adjustments / Time-off / Overtime / Work breaks | Number of active policies applied |
| Last payment | Amount and date of the most recent payment |
| Timesheets approval | Whether approval is enabled for this member |
In this area, you may edit these records from the banner at the top of the table directly or by clicking on the three-dots icon on it:
- Members – select the team members you want to add to your payroll, edit pay rates, etc.
- Pay Periods – choose from Weekly, Twice weekly, Bi-weekly, Monthly, or None (for manual payments).
- Weekly: Every org week start date.
- Bi-Weekly: Every other org week start date (For Bi-weekly payments you will have the option to choose from two pay periods)
- Twice per month: 16th and 31st of the month
- Monthly: 31st of the month
- Pay Type – hourly or fixed payments.
- Pay Rate – the rate for your employee.
- Bill Rate – the rate you can bill your client.
Member payroll status
Each member on the Manage Payroll page shows one of three statuses:
| Status | Meaning |
| Ready (automatic) | All required settings are complete. Payroll will run automatically. |
| Ready (manual) | Settings are complete for manual payment. Someone must trigger payment each period. |
| Missing data (N) | One or more required settings are incomplete. The number indicates how many issues exist. Hover for details. |
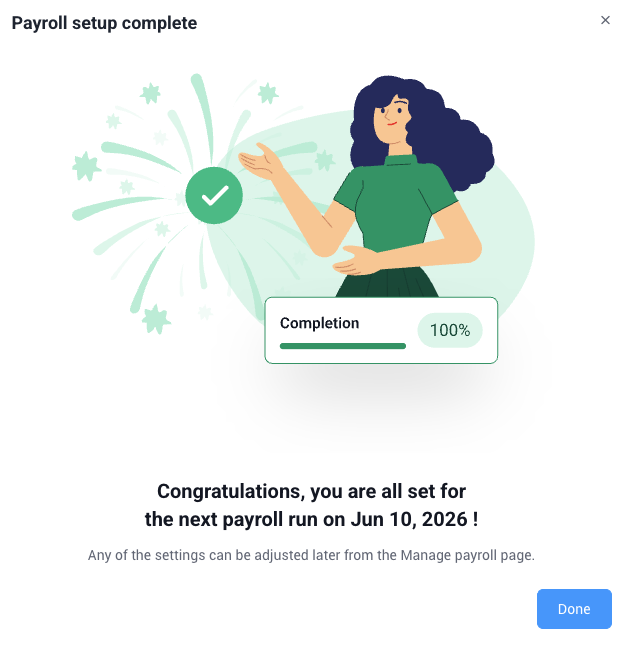
Completing your setup
Once all required sections are complete and at least one member has a Ready status, the Finish setup and start payroll button becomes active. Clicking it opens a completion dialog that shows:
Clicking it opens a completion dialog that summarizes:
- Members ready for automatic payroll
- Members ready for manual payroll
- Members not yet ready, and what’s missing
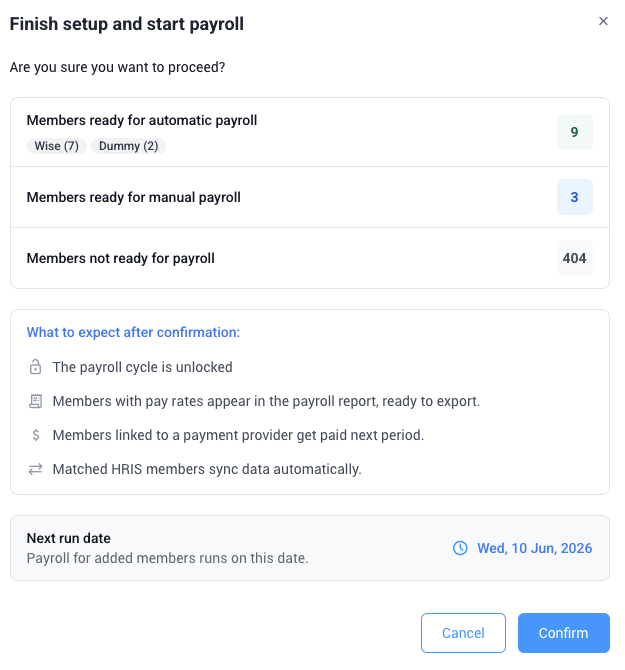
After confirming, payroll is unlocked and will run on your configured schedule. A confirmation message will display the date of your next scheduled payroll run.
Managing settings mode
If you’ve already completed setup (or were migrated from the previous payroll page), the Manage Payroll page opens in Managing settings mode. The default view shows the Members table with all your current settings.

Any required actions, such as re-authenticating an integration or approving overdue timesheets, appear as alerts at the top of the page.
Adding a payment method as a team member
For all other supported providers, team members can add their own payment accounts:
Step 1
Click your avatar in the upper right corner and select Payment Accounts

Step 2
Click Add an account and select your payment provider. Click the Connect button next to the payment gateway you wish to add.
Once your account is connected and enabled, you’ll receive payments according to your organization’s payroll schedule.
For provider-specific member guides, see:
Automatic payments
- Payroll runs automatically at the end of each pay period
- Timesheet approvals are on by default for new organizations
Setting up your payroll for automatic payments
You can set up payments to be automatically processed based on specific pay periods. Here is our complete guide on setting up automatic payments: https://support.hubstaff.com/automatic-payments-payroll/
Additionally, you’ll need to enable Automatic payments via the Settings > All Members > Payments page as shown below.

Manual payments
Setting up your payroll for manual payments
To pay your team manually, a payment account must be set up for both the owner and the user.
- You trigger each payment manually
- Timesheet approvals are optional but default to on
To set up manual payments, go to People > Members, next to your team member’s payroll account, click on Actions > Edit payment details.

After clicking on Edit payment information, a dialog box will appear to update your employee’s payment integration.

Make sure that the Pay Period is set to None and that Require timesheet approvals are not enabled. Setting a pay period and enabling timesheet approvals will cause all time tracked for that pay period to be included in automatic payments.
Now, in the upper corner of the page, click on “Save Changes”.
Additionally, you’ll need to select Manual payments via Settings > All Settings > Payments page as shown below.
Then, you’ll be able to send manual payments by following this guide: https://support.hubstaff.com/send-payment-via-payroll-manually/
Marking hours as paid
Some employers opt to pay their team outside Hubstaff and simply mark their team’s hours as paid. Here’s a guide on how to do just that: https://support.hubstaff.com/mark-work-hours-paid-timesheets-page/
One-time payments
Often, you’d like to make payments for your team that aren’t related to their time. Some examples include bonuses, travel expenses, and rentals, among others. You can make these types of payments by utilizing our One Time Amount payment option.
To do this, go to Financial > Create payments > ONE-TIME AMOUNT. To learn more, click here.
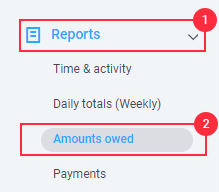
Viewing unpaid hours
To view unpaid hours for your team, simply go to Reports > Amounts owed. Click on the Team tab to view unpaid amounts for your team or the Me tab to view your own unpaid hours. Next, click on the calendar to select the date range for the report. You may also click on the Filters button to be able to select which projects and team members you’d like to view data for.
After generating the report, you’ll be able to view all unpaid hours and amounts.

Viewing and managing payments
Past payment records
To view your past payments, simply navigate to Financials > Payment records on your sidebar. A list of all the payments processed within your organization will be listed on the page.


Retrying a failed payment
If for any reason your payment has failed or has encountered an error, you may choose to retry the payment. You can do this by clicking on the Payment records tab under the Financials section on the left sidebar. There, you’ll see a list of your recent payments. Click on the Actions box next to that payment, and then click the View option. Lastly, click on the red Retry button in the payment’s detailed view.

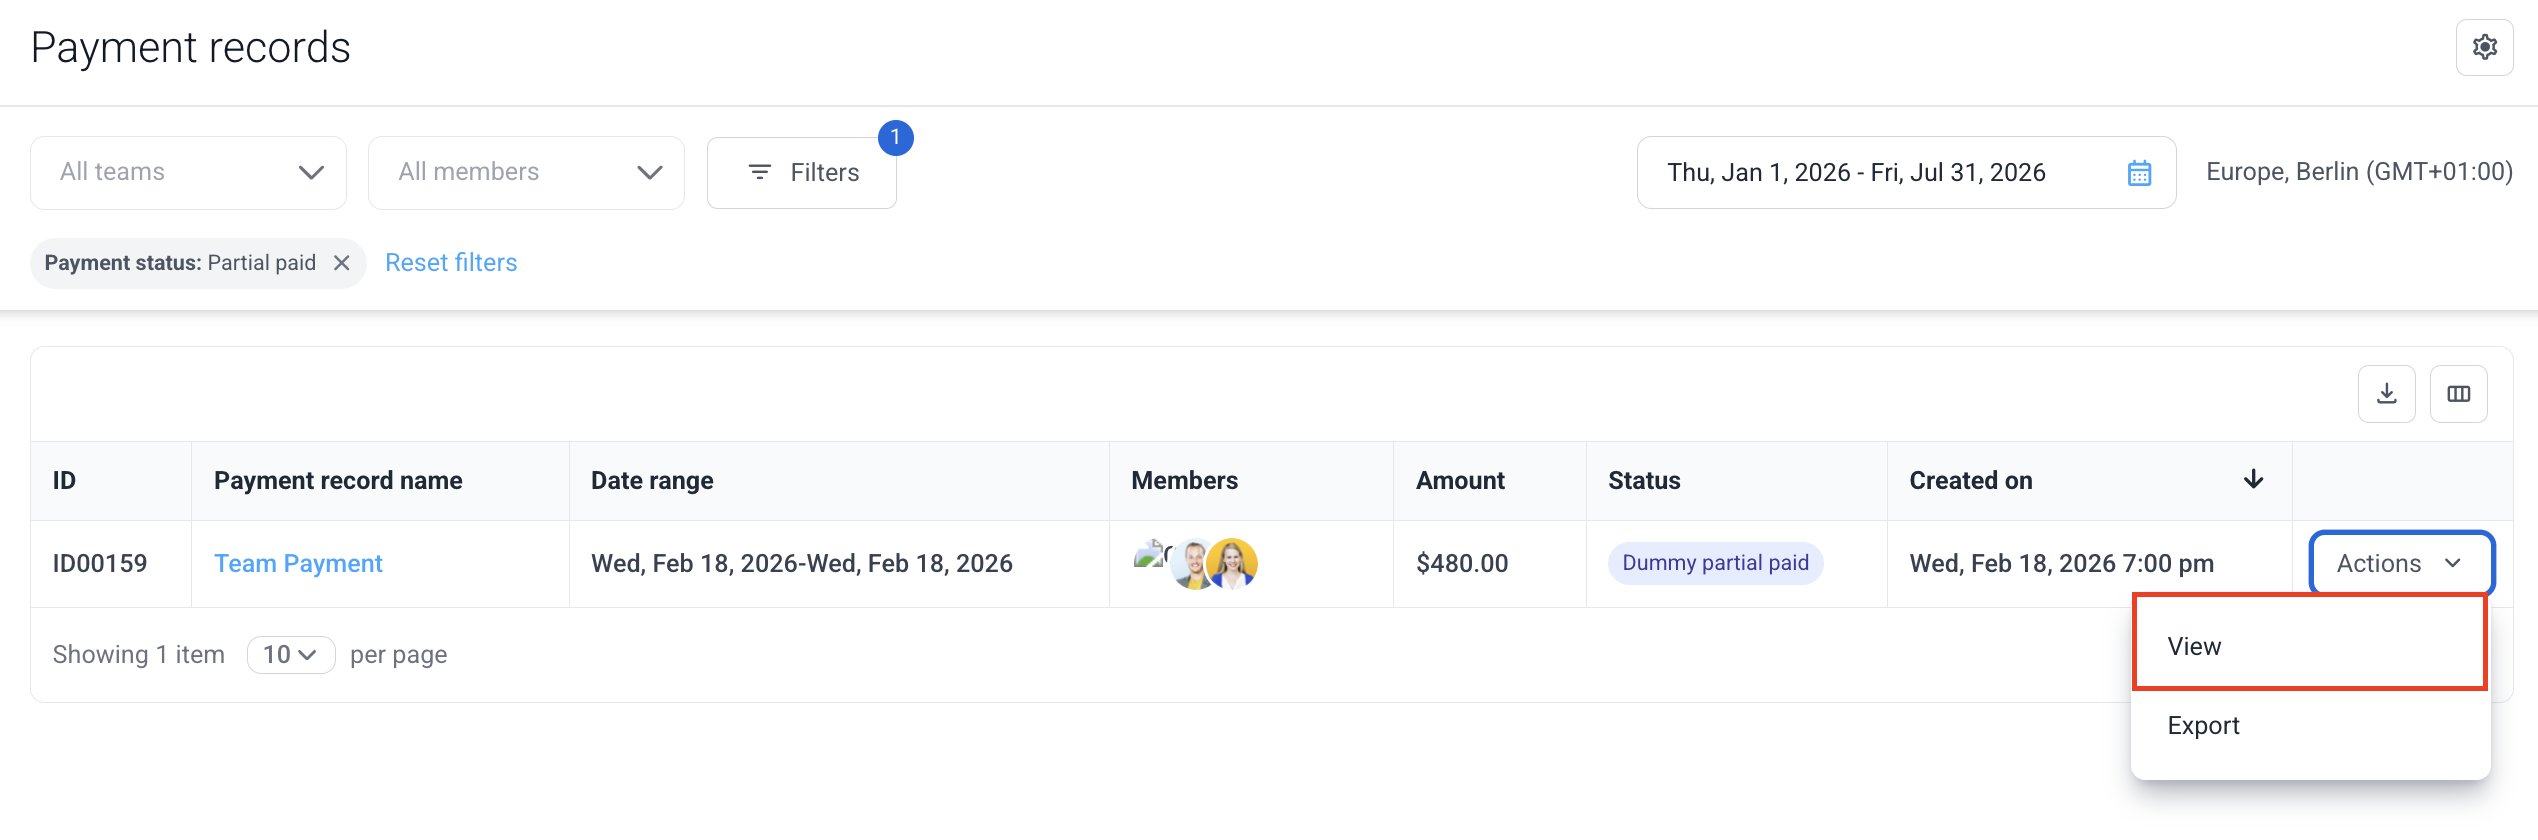
Partial payments
When using our automatic payroll system, pay periods that contain payments larger than $10,000.00 will be partially paid.
For example; if you have an unpaid amount of $9,000.00 for day 1 and $1,000.00 for day 2, then that payment will be partially paid because it reached the payment limit of $10,000.00 per transaction. The team member will get paid $9,000.00 first, and the remaining $1,000.00 will be paid on the next payment attempt, which should be the following day.
STEP 1
You should see what payments were partially paid by clicking on Financials > Payment records on the left-hand sidebar menu.
STEP 2
Payment status will show as “Partial paid”.

STEP 3
Click the Actions button and select View, you should see a detailed report for the partially paid payment and also when the remaining amount will get paid.
For frequently asked questions regarding our payroll feature, please refer here.