14 minutes
Hubstaff Invoicing Overview
Hubstaff has a robust invoicing tool that lets you create invoices for and send them directly to the clients, as well as record payments. Using our Invoicing Feature, you can create invoices for your clients or employers within seconds. Also, you can automatically or manually create line items based on the time you tracked as well as add clients, tax information, and discounts on your invoices.
For billing clients for time tracked, you need to set bill rates for each user/team member in your organization. To add or edit bill rates, please click here.
You must add Clients to your organization to enable client invoicing. Please click here if you have not set up clients in your organization yet.
Only Organizational Owners can create Client Invoices.
Users can only invoice their employers/organization.
To get started, click on any of the topics below:
Invoice Settings
Before creating invoices, you can customize the organization details. Navigate to Settings > Billing > Client Invoice on your web dashboard to get started.

Step 1
Click on Client invoice. Here, all fields are optional and any information you add here will automatically be added to any invoices you generate.

This setting allows you to input specific information which will be added automatically to invoices you create. You can add the following information:
- Address
- Tax ID
- Logo
- Tax Rate
- Notes
- Net Terms
- Payment email address for payment button
- Auto invoicing – toggle to turn automatic invoicing on/off
- Amounts based on – choose from hourly/fixed amounts to bill on automatic invoices.
- Frequency – send automatic invoices from 3 set frequencies: Monthly, Weekly, Bi-weekly.
- Delay sending – add a daily delay for sending automatic invoices.
- Send reminders to pay after due – sends an automatic reminder based on x number of days.
- Line items – choose the format for line items on the automatic invoice.
- Include non-billable time/Include expenses – toggle the setting to include time marked as non-billable and/or to include expenses.
You can also add your PayPal account to the invoicing. Through this, clients will have the option to pay you using Paypal when you invoice them through Hubstaff. Learn more about it here.
Once you have made all the required changes, click Save.
Setting bill rates
To generate automatic line items for an invoiced client, it is mandatory for each team member who is involved in the work for this client to have a Bill Rate set up. The Bill Rate refers to the amount you charge your clients, whereas the Pay Rate refers to the amount you pay employees. Follow these steps to set up a Bill Rate:
Step 1
Navigate to the People > Members section of the web dashboard.

Step 2
Next to each team member’s name, under the Payment column, click the pencil icon to edit the user’s payment information.

Step 3
Click on the Bill rate tab, set the rate and EFFECTIVE DATE of the rate.
Once the changes are complete click Save Changes.

Creating Invoices
Now you’re ready to create invoices. Click on the Financials > Invoices menu on the sidebar.

If you’re an organization owner billing a client, click on the Client tab then the New invoice button, if you’re an employee/user billing your organization, then click the New invoice button.
![]()
The Client and Team tabs are only available if you are the organization owner. If you are a User, these tabs will not be visible.
Invoice header
On the invoice header, you can:
- Upload your company logo (only available on Client invoices)
- Select the client you plan to bill (only available on Client invoices)
- Issue date
- Due date
- Invoice Number
- PO (Purchase Order) number
![]()
Automatic line items
With our invoices, you have the option to manually add the line items or have them auto-populated.
In order to auto-populate the fields, follow the steps below:
Step 1
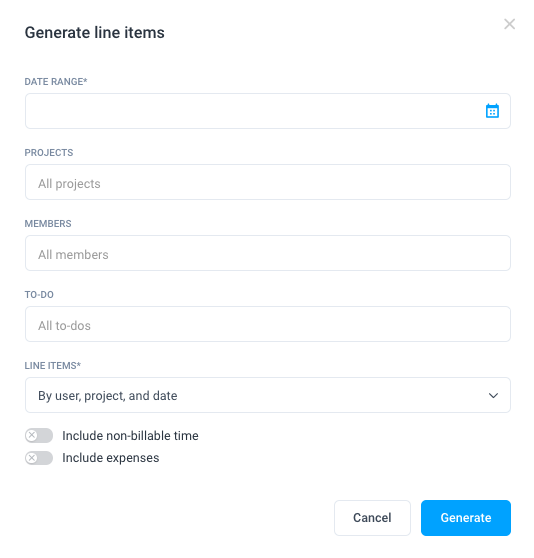
On your new invoice, click Generate line items.

Step 2
Set your date range, project, member, and line item filters as needed.
You can also toggle the settings to include Non-billable time or Expenses.
Step 3
Your invoice will be pre-filled with line items from your team’s time recordings.

You can add notes to each line item by clicking Add note next to the item description, or manually add line items. Once you’re finished, click on Save as Draft, or Save and send to send the invoice to your intended recipient.

Recurring client invoices
You can also schedule automatic invoices to be sent to your clients. To do this, follow the steps below:
Step 1
Navigate to Project management > Clients.

Step 2
For new clients, click on Add Client, then navigate to the INVOICING tab. For existing clients, click on Actions > Edit Client then navigate to the INVOICING tab.

Step 3
Click Custom under the Auto invoicing section to enable recurring invoices, then fill in the following information:

- Amount based on – bill clients based on the hourly bill rates, or a fixed price every automatic interval.
- Frequency – select the intervals the invoice will be sent. Invoices can be sent monthly, weekly, and bi-weekly.
- Delay sending – add a specific delay to your automatic invoices.
- Send reminder to pay after due – this sends an email reminder to clients when an invoice has not been settled after a specific number of days.
- Line items – define the line item format.
- Include non-billable time – this includes all non-billable times logged to projects associated with a client.