10 minutes
Adding Tasks in Hubstaff Tasks
Below are instructions on how you can add tasks to lists on Hubstaff Tasks:
Adding tasks using the browser’s address bar
Step 1
Type in tasks.new on your browser’s address bar.

Step 2
Fill in the task name, organization name, project name, list name, and position then hit Create.

Step 3
You’ll see the task window and be able to do several things.
- Task type – define if the card is a task or a bug.
- Task name – the name assigned to the task.
- Task location – shows you the project and list name where the task is stored under.
- Task workflow buttons – shows workflow buttons to move tasks to another workflow list.
- Task description – allows you to add details or instructions on how to perform the task.
- Dependencies – allows you to add dependencies, e.g., waiting on, blocking, related to.
- Attachments – lets you upload files into the task.
- Checklists – adds a checklist to the task.
- Comments – lets you add comments to the task, you will also have an option to attach files in the comments.
- Work Logs – The Work Logs section will show time that was tracked (using the Hubstaff Time Tracking application) to the task.
- History – shows the task history.
- Assignee – the user whom the task is assigned to.
- Followers – will receive any updates from the task.
- Sprint – lets you choose which sprint the task is assigned to.
- Epic – lets you choose which epic the task is assigned to.
- Labels – organize your tasks by adding labels.
- Recurring – allows you to repeat the task weekly or monthly (This feature is only available on Premium plans).
- Start Date – lets you assign a start date to the task.
- Due date – lets you assign a due date to the task.
- Worked – shows the time spent on the task.
- Estimate – lets you add an estimated time to complete the task.
- Worked progress bar – shows the time spent on the task against the set estimate.
- Cost – shows how much was spent on this task (requires the project and organization to be synced to Hubstaff Time Tracking and a pay rate set for the specific user).

Adding tasks via the Tasks page
Step 1
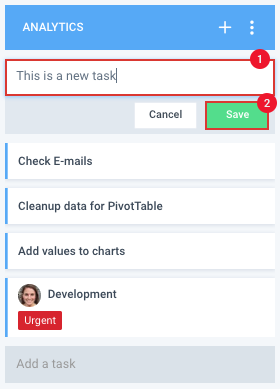
Click on the Add button located in the top right corner of each task list to create a new task.

Step 2
Type in the name for the task and click Save.
Step 3
Next, click on the newly created task to open it and add more details.

Step 4
You’ll see the task window and be able to do several things.
- Task type – define if the card is a task or a bug.
- Task name – the name assigned to the task.
- Task location – shows you the project and list name where the task is stored under.
- Task workflow buttons – shows workflow buttons to move tasks to another workflow list.
- Task description – allows you to add details or instructions on how to perform the task.
- Dependencies – allows you to add dependencies, e.g., waiting on, blocking, related to.
- Attachments – lets you upload files into the task.
- Checklists – adds a checklist to the task.
- Comments – lets you add comments to the task, you will also have an option to attach files in the comments.
- Work Logs – The Work Logs section will show time that was tracked (using the Hubstaff Time Tracking application) to the task.
- History – shows the task history.
- Assignee – the user whom the task is assigned to.
- Followers – will receive any updates from the task.
- Sprint – lets you choose which sprint the task is assigned to.
- Epic – lets you choose which epic the task is assigned to.
- Labels – organize your tasks by adding labels.
- Recurring – allows you to repeat the task weekly or monthly (This feature is only available on Premium plans).
- Start Date – lets you assign a start date to the task.
- Due date – lets you assign a due date to the task.
- Worked – shows the time spent on the task.
- Estimate – lets you add an estimated time to complete the task.
- Worked progress bar – shows the time spent on the task against the set estimate.
- Cost – shows how much was spent on this task (requires the project and organization to be synced to Hubstaff Time Tracking and a pay rate set for the specific user).