Enable Users for Payroll
Read this guide if you have already added a payment account to your organization. If you haven’t, these guides show how to get started:
- Add PayPal payment account
- Add Transferwise payment account
- Add Bitwage payment account
- Add Payoneer payment account
When your organization has a payment account set up and you have added users, you can enable them for automatic or manual payments. To do this, go to Financials > Manage payroll, and then click Actions beside the name of the user and Enable.

With the Edit option, you can edit the following options:
- Pay Period – Weekly (Default), Twice per month, Bi-weekly, Monthly
(pay periods start on Monday or your organization’s week start day and end on Sunday) - Pay Type – Hourly or Fixed payments. Fixed payments only work through automatic payroll.
- Pay Rate – the amount the owner of the organization will pay the employee
- Bill Rate – the amount the owner of the organization will bill the client
The automatic option will allow your team payments to go out automatically each pay period – just set it up once and let Hubstaff take care of the rest.
Note: You must click the “Enable auto-payment” button for payroll to go out automatically.
If you select the manual option you can still pay your team directly, though you will be required to manually send each payment (with one simple click of a button).
Currency
Hubstaff offers support for different currencies. The currency that you have enabled in your organization needs to have sufficient funds of the same currency within your payment merchant for Payroll to be successful.
Example:
Your organization’s currency in Hubstaff is AUD. You are trying to pay your team for their work done and the total payment is AUD 400.
In your payment account, you have USD 1000 and AUD 200.
This payment would fail because there are not sufficient funds in the correct currency in the payment account. For this payment to be successful, you would need to ensure that your payment account either has AUD 400 OR you would need to change your Hubstaff organization’s default currency to USD so the USD funds from your payment account would be used.
Failed Payments
Occasionally, payments will fail. You will see these listed under the “Past” section under the payments tab. Failed payments will show a status of “Error” and you can hover your cursor over the question mark icon to see more information about why the payment failed.
Two common reasons payments fail are due to insufficient funds or your account not being authorized. You can make some changes to your account (such as adding more funds or reauthorizing) and click the “Retry” button next to the failed payment to make another attempt.
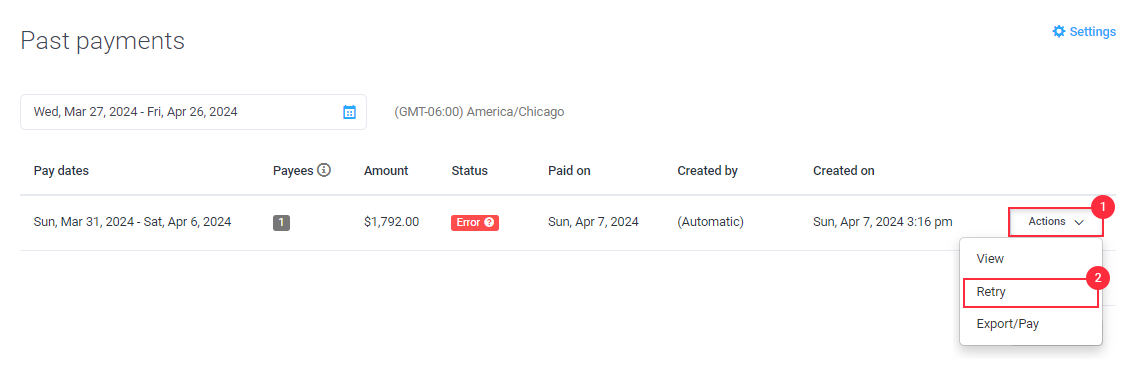
The system will try to make the payment again (you can only retry the same payment three times).
Pay Periods
Pay periods allow you to set the time frame for when automatic payments will go out. Additionally, You can set the pay periods to:
- Weekly (default) – Pay periods will start on Monday of the previous week or your organization week start day and then end on Sunday. Example: If the current date is Wednesday, February 11th, the pay period would be Monday, February 2nd to Sunday, February 8th.
- Twice per Month – The first pay period will start on the first of the month and go to the 15th of the month. The second pay period will start on the 16th and go until the end of the month.
- Bi-Weekly – Pay periods start on Monday and end on Sunday two weeks later. Example: A pay period could be Monday, February 9th to Sunday, February 22nd.
- Monthly – The pay period starts on the first of the month and ends on the last day of the month.
You can always see what pay period you are in by hovering over the pay period “i”:

Important Notes
- Funds need to be in your payment account before the payment is attempted because the payment accounts are not able to pull funds from credit cards or bank accounts.
- To make payments through your payment account in a certain currency, you need to have a non-zero balance in your payment account in that same currency. The payment account does not convert currency for payments.
- All fees come out of the organization owner’s payment account, except for Wise (formerly Transferwise), where you can select which end gets billed the transfer fee.
- Navigate to the Financials > Past Payments page to view records of previous payments.
- You can use Payoneer’s Notification Alert (under “Advanced Settings”) for a minimum balance threshold.