14 minutes
How to Invite Team Members
In order for your team to get started using Hubstaff, you will need to first invite them to join your organization account. Once they are added and tracking time on our timer applications, you will be able to monitor their productivity, automate payroll, track project progress, generate comprehensive work reports, and much more.
Here are the steps to invite your team:
Only organization owners, managers, and team leads are able to send invitations.
Inviting members
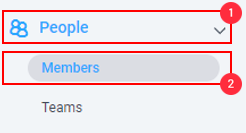
Step 1
Navigate to People > Members on the left sidebar of your web dashboard.
Step 2
Click on the Invite member button located towards the right-hand corner of the page.

Step 3
The Invite member dialog box will appear. Here, under EMAIL, you can enter your member’s email address. You can also enter multiple email addresses separated by commas. (If you are a large organization inviting members in bulk, please skip to the Bulk inviting members section of this article). Then, set the roles assigned to the invited members and the projects to which each member should belong, and click Send.

A dialog box will appear confirming that the invite has been sent to the recipient/s:
![]()
Step 4
Each member will receive an email inviting them to join your organization.

Step 5
Once they click Accept Invite, they’ll go to the Hubstaff signup page to create their personal Hubstaff account.
They must enter their full name, email, and password, agree to the Terms, Privacy Policy, and DPA, then click Create my account.

Step 6
After signing up, the invitation will be accepted, and clicking on the Go button will take your team members to their dashboard.

Step 7
You can now go back to the People > Members page on your sidebar to confirm that the system successfully added the user to your organization.

Invite via link
Step 1
Navigate to the People > Members tab on the left sidebar.

Step 2
Click on the Invite member button located on the right-hand corner of the page.
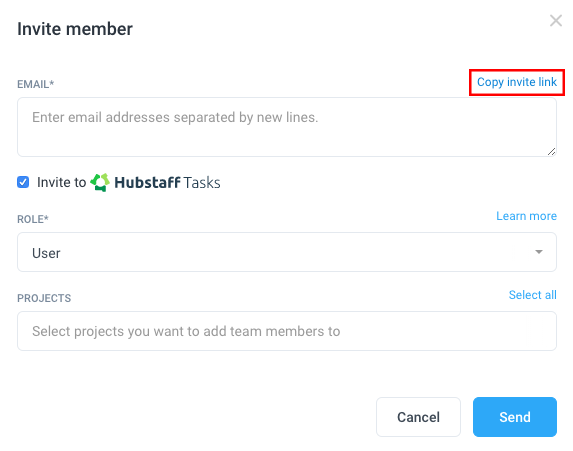
Step 3
The Invite member dialog will appear. Click on the Copy invite link button.
A dialog box will appear confirming that the invite link has been copied.


Step 4
The invite link will be copied to your computer’s clipboard. You can share the invite link with your team members to ask them to join your organization.
Step 5
Once members click the invite link, they’ll go to the Hubstaff signup page to create their personal Hubstaff account.
Step 6
After signing up, your team members accept the invite, and clicking the Go button takes them to their dashboard.
You can now go back to the Members page on your sidebar to confirm that the system successfully added the member to your organization.

Resending invitations
If the person no longer has the invitation or the one you sent expired, you’ll need to send them another one. To do this, follow the steps below:
Step 1
Navigate to the People > Members tab on the left sidebar.
Step 2

Deleting invitations
If you don’t want to add the invited member, you still may delete the pending invitation. To do this, follow the steps below:
Step 1
Navigate to the People > Members tab on the left sidebar.
Step 2
