Time off transactions report

The Time off transactions report allows you to see the remaining balances for your account as well as other members of your organization.

Before this report can be generated, a Time off policy must be set.
Time off transactions added to archived time off policies will still appear on this report.

Step 1

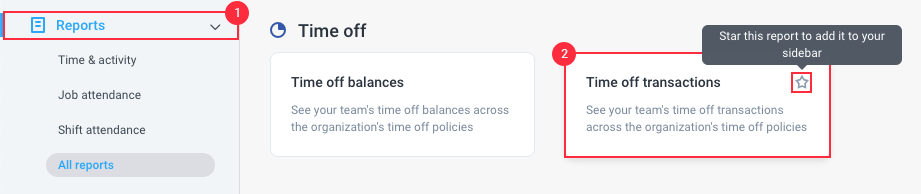
Click on the Reports tab on the left sidebar and then select Time off transaction under the Time Off category. You may also click on the “star” icon to add this report under the Reports menu.

reports time off transactions

Step 2

You will be taken to the Time Off transactions report, which will show you all the time off requests along with the following details:

  1. Policy – the time off policy used when the time off was applied.
  2. Requested on – the date the team member applied for time off.
  3. Start date – the date when the time off starts.
  4. End date – the date when the time off ends.
  5. Type – shows the time off type.
  6. Reason – shows the reason the user placed when filing the time off.
  7. Approved by – shows the user that approved the time off.
  8. Changed by – shows the user that modified the time off.
  9. Duration – shows the total duration of the time off applied.

time off transactions

Optional

Filter the report using the Team, Policy, Type, Changed by drop down menus. Toggle the “include accruals” setting to display all earned/accrued time offs. You can also choose to save your current filters so you can apply them in future reports.

time off transactions filters

Sending Reports

Reports can be sent to one or more email recipients by clicking on the Send button.

Add the email recipients on the field, separating each email address with a comma, then customize the message (optional) then either send a test message clicking the “Send me test” button, or click on “Send” to send the report.

Scheduling Reports

You can also schedule reports to be sent automatically by clicking on the “Schedule” icon. After clicking the icon, a dialog box will appear where you can:

  1. Enter the e-mail addresses of the recipients.
  2. Customize the message on the e-mail.
  3. Choose the file type (CSV/PDF).
  4. Enter the name of the report.
  5. Choose the Date Range included in the report from:
    1. Today
    2. Yesterday
    3. Last 7 days
    4. This week
    5. Last week
    6. The last 2 weeks
    7. This month
    8. Last month
  6. Delivery Frequency – how often the report is sent. Choose from:
    1. Daily
    2. Weekly
    3. Monthly (when the monthly option is selected you are provided 3 additional options: 1st of the month, 15th of the month, Last day of the month)
  7. Delivery time – exact time when the report is sent.
  8. Send preview – sends a sample report.
  9. Save – stores your scheduled report, which you can view via the Scheduled Reports section.


Exporting Reports

The report can be exported as a PDF or CSV, allowing you to keep local records of your team’s expenses.

  • Was this Helpful ?
  • Yes   No
  • Was this Helpful ?
  • Yes   No