5 minutes
How to Add Budgets to Clients in Hubstaff
By adding a client budget, you will be able to keep track of your cost and time as well as ensure that you do not go over budget.
Creating the Budget
Step 1
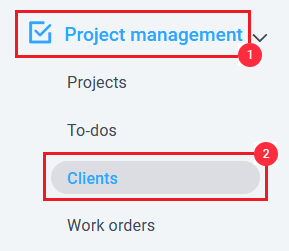
Select Project management > Clients from the sidebar on the web dashboard menu –
Step 2
Click on the pencil icon in the Budget column next to the client’s name for whom you want to set the budget.

Step 3
Enter the required information and then select Save.
- Type – choose either Total Cost or Total Hours.
- Based on – choose between Pay Rate or Bill Rate.
- Amount – assign a specific budget amount.
- Notify at – specify a percentage when you would be notified via email that the threshold is reached.
- Start Date – assign a start date for the client’s project. The budget will only include time tracked from this date onward.
- Resets – Never or Monthly
- Include non-billable time– toggle on or off to have non-billable time accounted or not accounted for in the project budget

Editing the Budget
Step 1
Select Project management > Clients from the sidebar on the web dashboard menu
Step 2
Click on the pencil icon under the Budget column of the client for whom you want to set the budget. You can also access this by clicking Actions > Edit Client and selecting the Budget tab.

Step 3
Make the necessary changes, then click Save. You can also click Clear budget and select Save to delete the current budget.
