10 minutes
Billable and Non-billable hours on projects
Managing which projects are billable to a client is easy. By following the steps below, you’ll be able to assign projects to two categories – Billable and Non-billable. This feature is generally used for client invoicing.
Both billable and non-billable projects count towards the time that is recorded on the reports and timesheets and it is payable via manual and automatic payments.
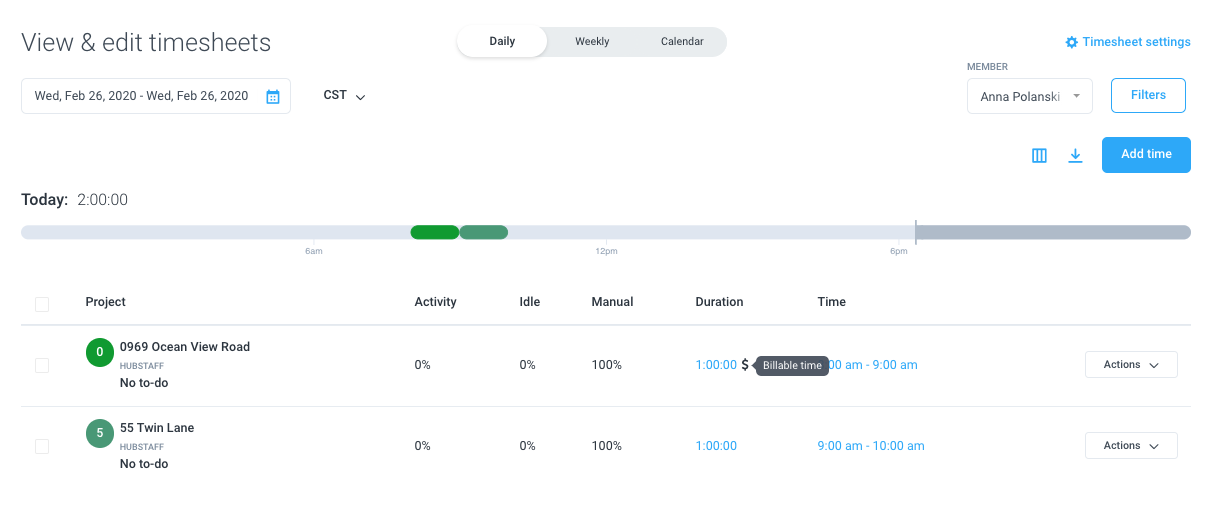
The image below shows two types of time tracked by a user: The first time span shows time tracked to a billable project and the second time span shows non-billable time.
Project Settings (billable or non-billable)
Billable settings when adding projects
When you are adding a new project, you can toggle on whether you want that project to be billable or not.
Under the General Tab, set the toggle to billable (√) if you wish for all hours recorded towards the project to be marked as billable. If you do not, toggle off (x).
Press Save to finalize your new project.

Billable settings when editing projects
Step 1
Select Project Management from the main navigation menu and click Projects. Then, click on Actions against the relevant project.
Select Edit project from the drop-down menu.


Step 2
Set the toggle to billable (√) if you wish for all hours recorded towards the project to be marked as billable. If you do not, toggle off (x).
Press Save to confirm the changes made.

Marking manual time entries as billable or non-billable
Adding a new manual time entry
Step 1
Click on Timesheets then View & edit and select Daily. Then, click the Add time button.

Step 2
Complete all necessary fields regarding your manual time entry, including the project/to-do, time span, and duration details.
Check the billable tick-box if you wish for all hours recorded towards the time entry to be marked as billable. If you do not, deselect the tick-box.
Press Save to finalize your new manual time entry.

Editing a manual time entry
Step 1
Click on Timesheets then View & edit and select Daily. Then, click on Actions against the relevant time period. Select Edit time entry from the drop-down menu.


Step 2
Alter any aspects of the time entry you wish to change. Then, check the billable tick-box if you wish for all hours recorded towards the time entry to be marked as billable. If you do not, deselect the tick-box.
Press Save to finalize your changes.

How to mark only select hours in a time entry as billable
In order to mark certain hours as billable or non-billable within a time period, you will need to split the time entry to separate it.
For example, if you have a time period of 8 am – 12 pm tracked for that day, and you wish to mark 9 pm – 12 pm as billable/non-billable you will need to first split the time entry. This designates 9 pm – 12 pm as a separate time entry.
To do this, please follow the steps below.
Step 1
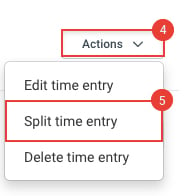
Click on Timesheets then View & edit and select Daily. Then, click on Actions against the relevant time period. Select Split time entry from the drop-down menu.
Step 2
- Under the Reassign time section, enter the time period you wish to mark as billable/non-billable. In the example above, you would enter 9am – 12pm.
- Check the billable tick-box if you wish for all hours recorded towards the time entry to be marked as billable. If you do not, deselect the tick-box.
- Select the project and the to-do name.
- Press Save to confirm the changes made.

Step 3
You will see the hours marked with a dollar sign if they are labeled billable. If you have selected hours to be marked as un-billable, the dollar sign will be removed.